Adobe Illustrator is the industry-standard vector graphics software used by designers to create scalable artwork, including logos, icons, typography, and complex illustrations. Mastering Adobe Illustrator basics involves understanding the fundamental difference between vector and raster graphics, navigating a specialized workspace, and learning to manipulate paths using essential tools like the Pen and Shape Builder.
Understanding the Foundation: Vector vs. Raster Graphics
Before opening the software, it is vital to understand the technology that powers Adobe Illustrator. Most digital images, such as those taken with a smartphone or edited in Adobe Photoshop, are raster graphics. These are composed of a fixed grid of pixels. When you enlarge a raster image, it loses quality and becomes "pixelated" or blurry because the computer must guess how to fill in the gaps between pixels.
In contrast, Adobe Illustrator is a vector-based program. Vector graphics are not made of pixels; they are created using mathematical paths defined by points, lines, and curves. Because these paths are calculated mathematically, a vector graphic can be scaled to the size of a business card or a massive highway billboard without any loss of resolution or clarity. This makes Illustrator the primary choice for professional branding and logo design, where versatility across different media is required.
As of 2026, Adobe Illustrator continues to be the dominant force in the design industry because of this mathematical precision. Whether you are designing for high-resolution print or responsive web interfaces, the vector engine ensures that your lines remain crisp and your colors remain consistent regardless of the final output dimensions.
Navigating the Adobe Illustrator Workspace
The first hurdle for any beginner is the interface. Illustrator’s workspace is highly customizable, but most designers start with the Essentials or Essentials Classic workspace. Understanding where your tools are located is the first step toward a fluid workflow.
The Toolbar and Control Bar
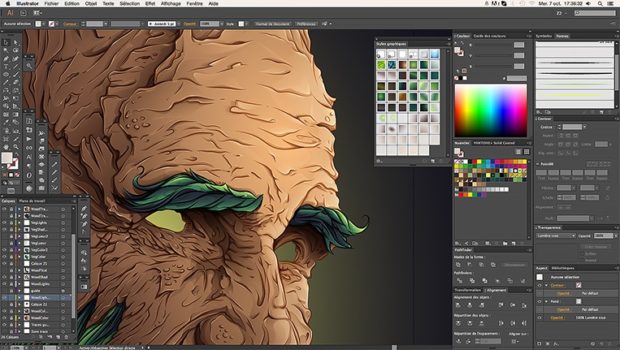
Located on the far left of the screen, the Toolbar contains every tool you need to create and edit objects. Some tools have a small triangle in the bottom-right corner, indicating that hidden tools are nested beneath them. For example, clicking and holding the Rectangle tool will reveal the Ellipse, Polygon, and Star tools.
At the top of the screen is the Control Bar (or the Properties panel on the right). This area is context-sensitive; it changes based on what you have selected. If you select text, it shows font options; if you select a shape, it shows fill and stroke options. This dynamic feedback is essential for making quick adjustments without digging through deep menus.
Artboards: Your Digital Canvas
In Illustrator, you work on Artboards. Unlike a single-page document in a word processor, Illustrator allows you to have multiple Artboards of different sizes within a single file. This is incredibly useful for creating a brand identity package where you might have one Artboard for a business card, another for letterhead, and a third for a social media banner. Using the Artboard Tool (Shift + O), you can add, resize, or rearrange these workspaces at any time.
Essential Tools for Every Beginner
To begin creating, you must familiarize yourself with a handful of core tools that handle 90% of the work in a typical design project.
The Selection Tools (V and A)
There are two primary ways to interact with objects:
- Selection Tool (Black Arrow, Shortcut: V): This tool selects the entire object or group. Use this to move, scale, or rotate your artwork.
- Direct Selection Tool (White Arrow, Shortcut: A): This tool selects individual anchor points or segments of a path. This is the key to "reshaping" your objects. If you have a square but want to drag one corner out to make a trapezoid, the Direct Selection Tool is what you need.
The Pen Tool (P)
The Pen Tool is arguably the most powerful and feared tool in Illustrator. It allows you to draw custom paths by placing anchor points. Clicking creates a straight line between points, while clicking and dragging creates a curved line (Bézier curve). Mastering the Pen Tool takes practice, as you must learn how to manipulate "handles" to control the direction and intensity of a curve. However, once mastered, it allows for the creation of any shape imaginable.
The Shape Builder Tool (Shift + M)
For those who find the Pen Tool intimidating, the Shape Builder Tool is a revelation. It allows you to create complex shapes by merging or subtracting simpler ones. For example, if you overlap two circles, you can use the Shape Builder to join them into one "cloud" shape or delete the overlapping section to create a crescent moon. This "pathfinder-on-the-fly" approach is often more intuitive for beginners than traditional drawing.
Mastering Color, Fills, and Strokes
Every object in Illustrator consists of two main components: the Fill and the Stroke. The Fill is the color or pattern inside the shape, while the Stroke is the outline or border.
The Swatches and Color Panels
To apply color, you use the Swatches panel, which holds a library of pre-set colors, or the Color panel for custom mixing using RGB or CMYK values. In 2026, Adobe’s integration with Adobe Color allows users to import trending palettes directly into their workspace, ensuring that beginners can achieve professional-looking color harmony with ease.
Global Swatches
A pro tip for beginners is to use Global Swatches. When you save a color as a global swatch, any object using that color is linked to the swatch. If you later decide the "corporate blue" needs to be slightly darker, you simply update the swatch, and every single object in your document using that color will update automatically. This saves hours of manual editing in complex documents.
Working with Typography
Illustrator is widely used for "Type Design" because it treats text as a vector object. There are two ways to enter text:
- Point Type: Click once and start typing. This is best for headlines or single lines of text. The bounding box scales the text itself if you drag the corners.
- Area Type: Click and drag to create a text box. This is for paragraphs. If you resize the box, the text reflows inside it rather than stretching.
Converting Text to Outlines
A critical step in "Adobe Illustrator basics" is learning to Create Outlines (Shift + Ctrl + O). When you send an Illustrator file to someone else, they may not have the same fonts installed. By converting text to outlines, you turn the letters into static vector shapes. The text is no longer editable as words, but it will look exactly the same on any computer, and you can manipulate the individual anchor points of the letters as if they were drawings.
Comparison of Essential Illustrator Tools and Functions
| Tool Name | Keyboard Shortcut | Primary Function | Best Use Case |
|---|---|---|---|
| Selection Tool | V | Selects and moves whole objects | General layout and scaling |
| Direct Selection | A | Edits individual anchor points | Refining and reshaping paths |
| Pen Tool | P | Creates custom paths and curves | Logo tracing and custom icons |
| Type Tool | T | Adds and edits on-screen text | Headlines, body copy, and logos |
| Shape Builder | Shift + M | Merges or deletes overlapping shapes | Creating complex icons from primitives |
| Eyedropper | I | Samples color or style from an object | Ensuring color consistency |
| Artboard Tool | Shift + O | Manages the canvas areas | Setting up multi-page documents |
Organizing Your Work with Layers
As your designs become more complex, the Layers panel becomes your best friend. Layers allow you to stack objects on top of each other. Think of them as clear sheets of acetate. You can lock layers (to prevent accidental moving) or hide them (to focus on a specific part of the design).
A common beginner mistake is putting everything on one layer. By separating your background, your main subject, and your text onto different layers, you gain much more control over the selection and organization of your project.
Saving and Exporting Your Artwork
Because Illustrator files can contain many different elements, knowing how to save them is crucial. The native format is .AI. You should always keep a master copy in this format to preserve your layers and editable paths.
For sharing or final delivery, you will use the Export menu:
- PDF: The standard for printing and sharing documents that need to look the same everywhere.
- SVG (Scalable Vector Graphics): The preferred format for web icons and graphics, as it remains crisp on retina displays and has a small file size.
- PNG/JPG: Use these only if you need a raster version of your work for social media or presentations where vector support is unavailable.
Frequently Asked Questions
Why is my image blurry when I zoom in?
If your image is blurry, you are likely working with a raster image (like a JPEG or PNG) that was placed into Illustrator, rather than a vector object created within the program. To fix this, you can use the "Image Trace" feature to attempt to convert the pixels into vector paths, though the results vary depending on the image complexity.
How do I undo a mistake in Illustrator?
The standard shortcut is Ctrl + Z (Windows) or Cmd + Z (Mac). Illustrator allows for multiple undos, which can be adjusted in your Preferences. It is a good habit to save versions of your work (e.g., "Logo_v1", "Logo_v2") so you can revert to earlier concepts if needed.
What is the difference between CMYK and RGB?
CMYK (Cyan, Magenta, Yellow, Key/Black) is the color mode used for physical printing. RGB (Red, Green, Blue) is used for digital screens. When starting a new document, Illustrator asks you to choose a color mode. If you are designing a business card, choose CMYK; if you are designing a social media post, choose RGB to ensure colors appear vibrant on screens.
Why can't I see my paths when I'm not selecting them?
This usually happens if the object has no Fill and no Stroke assigned to it. Look at the bottom of your toolbar; if you see two white boxes with red diagonal lines through them, your object is "invisible." Assign a stroke color to make the path visible.
How do I align objects perfectly?
Illustrator includes an Align panel (Window > Align). This allows you to select multiple objects and align them to their centers, left edges, or right edges. You can also "Distribute" them so there is equal spacing between every object, which is essential for professional-looking layouts.
Practical Recommendation for New Users
To truly learn Adobe Illustrator basics, avoid the temptation to just read about the tools; you must use them. A highly effective practice exercise is to download a simple, high-resolution logo (like the Apple or Nike logo) and place it into a layer. Lower the opacity of that layer, lock it, and then try to "trace" the logo on a new layer using only the Pen Tool or Shape Builder. This exercise forces you to understand how curves work and how to simplify complex shapes into their most basic vector components.
As of 2026, Adobe offers extensive guided tutorials within the "Learn" panel inside the software. Utilizing these interactive sessions while practicing your tracing will significantly shorten your learning curve.