Apple Checkout—primarily powered by the Apple Pay JS API and native iOS frameworks—refers to the seamless, secure purchase interface that allows customers to complete transactions on websites and mobile applications using their saved Apple Wallet credentials. By leveraging hardware-based tokenization and biometric authentication, Apple Checkout eliminates manual data entry, dramatically speeds up transactions, and significantly lowers cart abandonment rates for online merchants.
While the term occasionally refers to the proprietary purchase flow on Apple's own retail store (including options like Apple Card Monthly Installments and Apple Trade In), in e-commerce and web development it standardly denotes the integration of Apple Pay into a digital storefront. This overview details how Apple Checkout operates under the hood, how consumers interact with it, the business advantages it delivers, and the exact process merchants follow to implement and optimize it.
Understanding Apple Checkout: Key Architecture and Security Mechanics
The technical foundation of Apple Checkout relies on a secure architecture designed to protect cardholder data while maintaining zero friction for the user. Unlike traditional checkout systems that require users to input credit card numbers, billing details, and shipping addresses into online forms, Apple Checkout executes transactions using tokenization and encrypted data payloads.
- User Device
- User Initiates Purchase
- Biometric Auth (Face ID / Touch ID)
- Secure Element (SE) generates Device Account Number (DAN) + Cryptogram
- Merchant Environment
- Apple Pay JS / SDK captures encrypted Payment Token
- Sends payload to Payment Service Provider (PSP) API
- Payment Processor & Card Network
- PSP forwards token to Visa / Mastercard / Amex Network
- Card Network decrypts token & validates cryptogram with Issuing Bank
- Settlement & Return
- Issuing Bank approves funds
- Merchant receives confirmation
Hardware-Level Security and Tokenization
When a user adds a credit or debit card to Apple Wallet, the actual card numbers are not stored on the device or on Apple servers. Instead, a unique Device Account Number (DAN) is generated, encrypted, and safely stored within the Secure Element—an industry-standard, certified chip embedded in Apple hardware.
During an Apple Checkout transaction:
- The merchant’s application or site requests a payment token via the Apple Pay API.
- The user authenticates using Face ID, Touch ID, Optic ID (on Apple Vision Pro), or a device passcode.
- The Secure Element generates a dynamic security code (cryptogram) unique to that specific transaction.
- Apple packages the encrypted token, cryptogram, and selected contact/shipping information and transmits it to the merchant server or payment gateway.
Because the merchant receives only an encrypted token rather than raw payment card details, the implementation falls outside the heaviest scope of PCI-DSS compliance audits for the merchant, while protecting consumers against site-scraping malware and database breaches.
Supported Operating Environments and Browsers
Originally restricted exclusively to the Safari browser on iOS and macOS, Apple Checkout has expanded across the Apple software ecosystem.
- iOS / iPadOS Apps: Native integration via the
PassKitframework. - Safari Web Browsers: Full support on iOS, iPadOS, macOS, and visionOS using the Apple Pay JS API.
- Third-Party Browsers: Support for non-Safari web browsers (such as Google Chrome, Microsoft Edge, and Mozilla Firefox) on iOS and iPadOS, as well as cross-device desktop checkout where a Mac or PC displays a QR code scanned by an iPhone running recent system software.
The Consumer Experience: How Apple Pay Checkout Works
From a customer standpoint, Apple Checkout replaces multi-step checkout forms with a rapid, double-click payment approval workflow. This workflow takes seconds rather than minutes.
1. Express One-Touch Initiation
When browsing an online store, the customer encounters a distinctive Apple Pay button. Selecting this button skips standard cart entry steps like manually specifying shipping addresses, selecting shipping speeds, and entering 16-digit card numbers.
2. Sheet Rendering and Verification
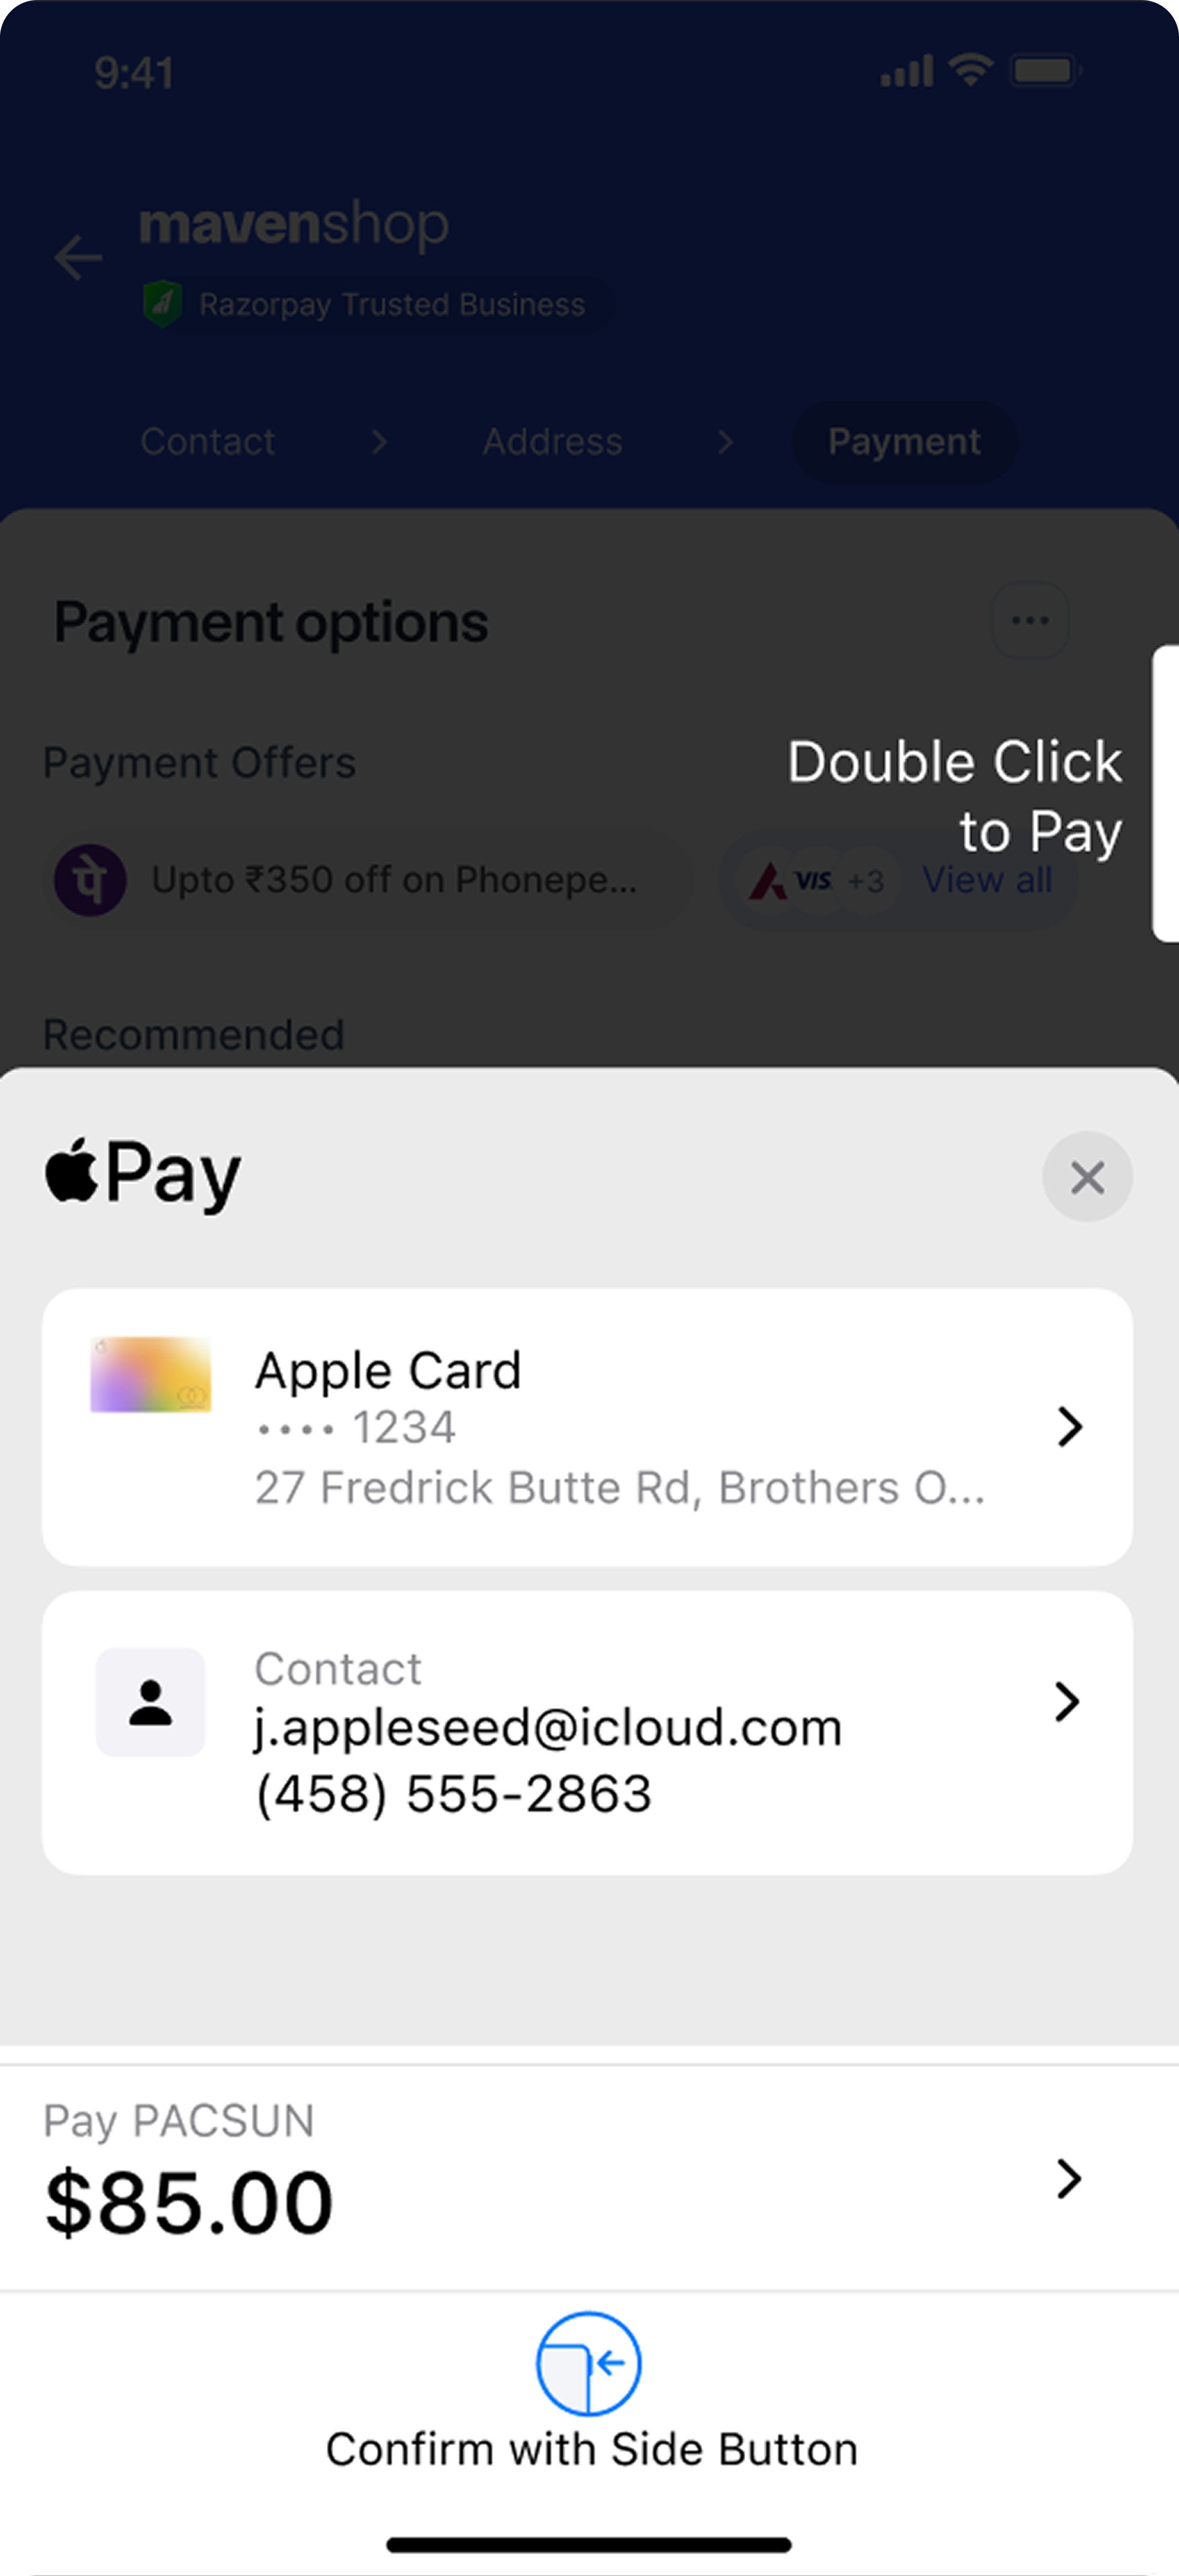
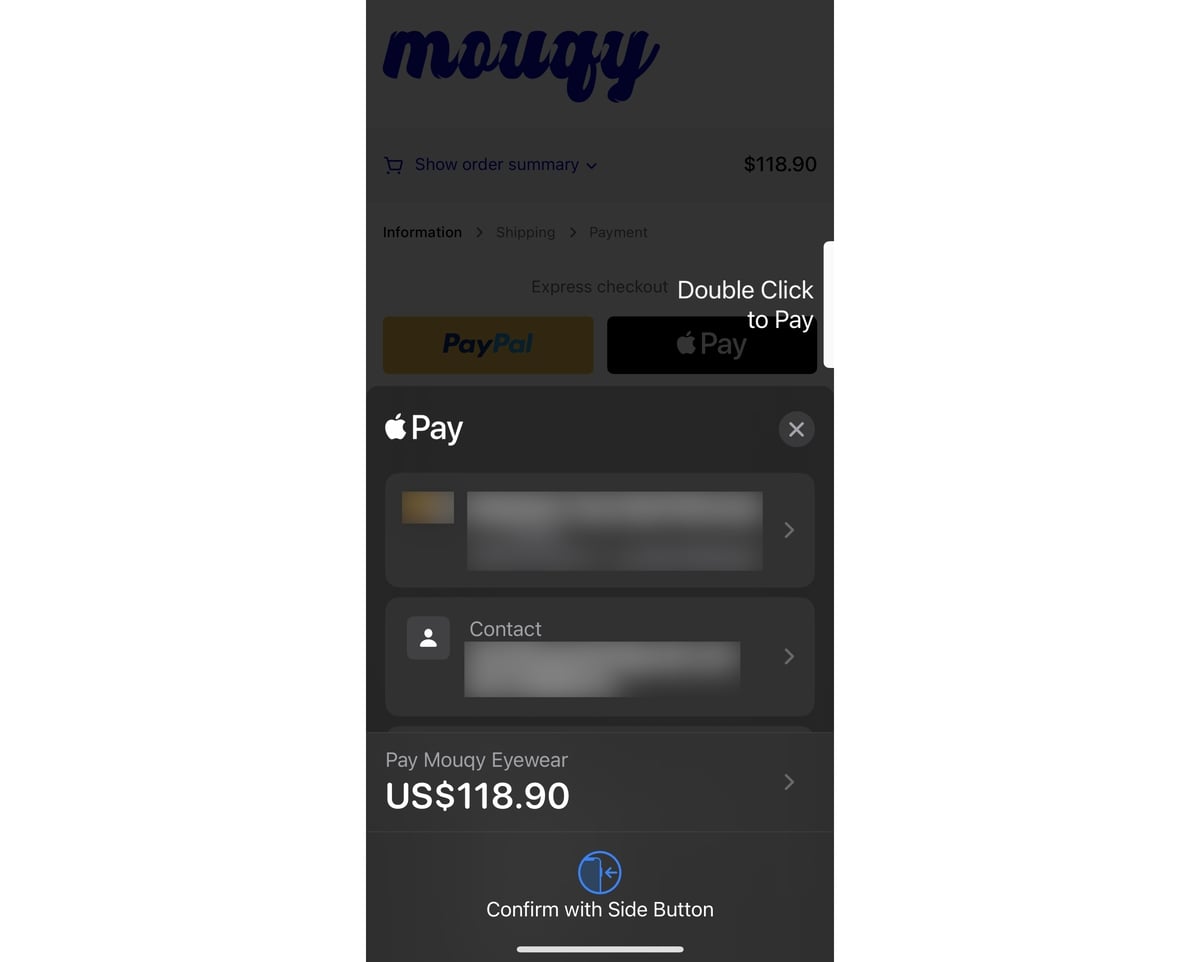
An overlay—known as the Apple Pay sheet—appears directly over the merchant’s webpage or native app interface. This sheet presents a unified summary including:
- The active card selected from Apple Wallet (with an option to tap and select alternative payment methods).
- Saved shipping and billing addresses.
- Selected shipping options and costs (dynamically updated if the merchant offers variable rates based on location).
- Order subtotal, estimated taxes, and total transaction cost.
3. Biometric Authorization and Handoff
To confirm the order, the customer authenticates. On an iPhone with Face ID, this requires double-clicking the side button and scanning the user's face. On a MacBook with Touch ID, it requires a simple fingerprint scan on the Touch Bar or keyboard sensor.
For cross-device transactions—such as a customer checking out on a Windows PC or Mac without integrated biometrics—the web interface displays an Apple Pay prompt that communicates securely via Bluetooth and iCloud with the user's nearby iPhone or Apple Watch, allowing them to complete authorization on their personal handheld device.
Merchant Benefits and Business Metrics
Implementing Apple Checkout provides measurable conversion improvements for web businesses, particularly mobile-first retail channels.
- Standard Web Checkout:
- Add to Cart
- Contact Form
- Address Form
- Billing Info
- Review
- Complete (High friction, 5-7 friction points, elevated drop-off)
- Apple Pay Express Checkout:
- Apple Pay Button
- Biometric Scan
- Complete (Frictionless, 1-2 actions, minimal drop-off)
Cart Abandonment Reduction
Mobile web conversion historically lags behind desktop conversion due to tedious form-filling on small touchscreen keyboards. Apple Checkout reduces the physical actions required to complete a purchase from dozens of keypresses down to a single click and biometric scan. Research across major payment processors consistently shows that offering Apple Pay can increase checkout conversion rates by 10% to 20% on mobile platforms.
Enhanced Fraud Protection and Chargeback Dynamics
Because every Apple Checkout transaction requires biometric authorization or passcode verification alongside dynamic cryptograms, transactions carry elevated cryptographic proof. For card-not-present (CNP) e-commerce merchants, routing transactions through Apple Pay often shifts liability for certain types of fraudulent chargebacks away from the merchant and onto the card issuer, operating similarly to 3D Secure verification without creating buyer drop-off.
Zero Gateway Surcharges from Apple
Apple does not charge merchants, payment gateways, or developers any additional fee to accept Apple Pay. Merchants simply pay their standard payment processing fees negotiated with their merchant service provider (e.g., Stripe, Shopify Payments, Adyen, or PayPal Braintree).
Technical Setup: How Merchants Implement Apple Pay
Integrating Apple Checkout into an e-commerce platform involves specific domain validation steps, developer credentials, and payment gateway configuration.
- Merchant Developer Console
- Create Merchant ID (
merchant.com.example) - Generate Payment Processing Certificate
- Host Domain Verification File (
.well-known)
- Create Merchant ID (
- Payment Service Provider (e.g., Stripe, Adyen, Shopify, Braintree)
- Link Apple Merchant Credentials to Gateway
- Enable Apple Pay in Payment Settings
- Frontend Web Implementation
- Render Apple Pay Button using Apple Pay JS
- Handle
onpaymentauthorizedEvents
Prerequisites Checklist
Before writing code or configuring payment settings, merchants must fulfill several administrative and infrastructure prerequisites:
- Apple Developer Account: An active membership in the Apple Developer Program.
- HTTPS Architecture: Secure TLS/SSL configuration across the entire site. Apple Pay will not render or initialize on non-HTTPS domains (except during local testing environments on localhost).
- Compatible Payment Service Provider (PSP): An active merchant account with a processor supporting Apple Pay token decryption (e.g., Stripe, Adyen, Authorize.Net, Checkout.com, or Square).
Step 1: Merchant ID and Domain Verification
To accept Apple Pay via the web (Apple Pay JS), developers must register their domain inside the Apple Developer portal:
- Log into the Apple Developer Account and navigate to Certificates, Identifiers & Profiles.
- Create a new Merchant ID (e.g.,
merchant.com.yourstore). - Under Merchant IDs, add the Web Domains where the checkout will execute.
- Download the Domain Verification File provided by Apple.
- Upload this file to the merchant server at the following exact path:
https://yourdomain.com/.well-known/apple-developer-merchantid-domain-association - Click Verify in the Apple Developer console.
Step 2: Payment Processing Certificate Configuration
A Payment Processing Certificate encrypts transaction data before it leaves the browser.
- If using a Payment Gateway (Recommended): Gateways like Stripe or Adyen automatically manage certificate creation and token decryption. Merchants simply toggle "Apple Pay" within their payment gateway dashboard and allow the PSP to validate domains programmatically.
- If building a Direct Integration: Developers must generate a Certificate Signing Request (CSR) from their server, submit it to Apple to download an
Apple Pay Payment Processing Certificate, and install the private key on their payment server.
Step 3: Frontend Implementation (Apple Pay JS)
The frontend code checks if the client device supports Apple Pay, renders the standard button, and handles payment sessions.
Below is a simplified example demonstrating the core lifecycle of an ApplePaySession implementation:
// Step 1: Check if Apple Pay is available on the client device if (window.ApplePaySession && ApplePaySession.canMakePayments()) { const payButton = document.getElementById('apple-pay-button'); payButton.style.display = 'block'; payButton.addEventListener('click', () => { // Step 2: Define the payment request structure const paymentRequest = { countryCode: 'US', currencyCode: 'USD', supportedNetworks: ['visa', 'masterCard', 'amex', 'discover'], merchantCapabilities: ['supports3DS'], total: { label: 'My Store Purchase', amount: '49.99' } }; // Step 3: Create the ApplePaySession (Version 3 or higher recommended) const session = new ApplePaySession(3, paymentRequest); // Step 4: Validate the merchant session with your backend session.onvalidatemerchant = async (event) => { const response = await fetch('/api/validate-apple-merchant', { method: 'POST', headers: { 'Content-Type': 'application/json' }, body: JSON.stringify({ validationURL: event.validationURL }) }); const merchantSession = await response.json(); session.completeMerchantValidation(merchantSession); }; // Step 5: Handle payment authorization when user scans Face ID / Touch ID session.onpaymentauthorized = async (event) => { const token = event.payment.token; // Send payment token to server/PSP for processing const chargeResponse = await fetch('/api/process-payment', { method: 'POST', headers: { 'Content-Type': 'application/json' }, body: JSON.stringify({ token: token }) }); const result = await chargeResponse.json(); if (result.success) { session.completePayment(ApplePaySession.STATUS_SUCCESS); window.location.href = '/order-confirmation'; } else { session.completePayment(ApplePaySession.STATUS_FAILURE); } }; // Step 6: Begin the session UI overlay session.begin(); }); }
Technical Comparison: Apple Pay vs. Standard Web Checkout vs. Other Express Options
Understanding where Apple Checkout fits within the broader ecosystem of express payments helps merchants craft an optimal payment page layout.
| Feature / Metric | Apple Pay Checkout | Standard Guest Checkout | Google Pay | Shop Pay / Express Wallets |
|---|---|---|---|---|
| Primary Authentication | Hardware Biometrics (Face ID/Touch ID) | Manual Password / SMS OTP | Google Account / Device Auth | SMS One-Time Passcode (OTP) |
| Card Data Exposure | Zero (Tokenized DAN) | Exposed to Form / Merchant PCI | Zero (Tokenized Virtual Card) | Encrypted stored card |
| Mobile Speed (Average) | 5 – 10 seconds | 60 – 120 seconds | 5 – 10 seconds | 10 – 15 seconds |
| Domain File Verification | Required (.well-known) |
Not Applicable | Not Required | Platform Dependent |
| Native Operating System Reach | iOS, macOS, iPadOS, visionOS | Universal (All Platforms) | Android, Chrome OS, Windows | Universal Web Browsers |
| Merchant Processing Fees | Standard gateway rates (No extra Apple fee) | Standard gateway rates | Standard gateway rates | Standard gateway rates |
| Fraud Liability Shift | Yes (Supported card types) | No (Merchant liable) | Yes (Supported card types) | Depends on underlying network |
Apple Store Checkout: Ecosystem-Specific Purchasing Options
While "Apple Checkout" in developer contexts refers to Apple Pay integration, consumers purchasing products directly from the official Apple Online Store or Apple Store App encounter proprietary checkout features tailored to Apple's product line.
Apple Card Monthly Installments (ACMI)
Customers paying with an Apple Card can select 0% APR monthly payment plans during the official Apple Store checkout. The system automatically calculates interest-free payments for eligible hardware (e.g., iPhones, Macs, iPads) and integrates the bill directly into the user's Apple Wallet statement.
Apple Trade In Integration
During the official checkout process, customers can declare an existing device for trade-in. The estimated value is applied immediately as an instant credit toward the purchase total, reducing the authorization amount charged to the user's credit card.
Carrier Activation and Financing
For iPhone purchases, Apple Store checkout links directly to major telecom carriers (e.g., AT&T, Verizon, T-Mobile). Customers can verify existing carrier accounts, select device upgrades, and attach carrier financing directly within the checkout sheet without navigating away to carrier portals.
Troubleshooting & Implementation Pitfalls
When setting up Apple Checkout, web developers and merchants often encounter specific failure modes during configuration and testing.
| ERROR / SYMPTOM | ROOT CAUSE & RESOLUTION |
|---|---|
| Apple Pay Button Does Not Render | • Non-HTTPS environment (Check TLS setup).• JavaScript runtime missing ApplePaySession check.• Browser is running on an unsupported OS/Device combination. |
| Merchant Validation Failed | • .well-known verification file missing or unreadable.• IP restrictions blocking Apple validation requests.• Expired Merchant Identity Certificate in Developer Console. |
| Session Cancellation (Status 108) | • Mismatch between domain origin and registered Merchant ID.• Validation backend calling event.validationURL via insecure HTTP instead of server-side HTTPS. |
1. Domain Validation Failures
- Symptom: The Apple Pay session fails instantly upon initialization, throwing an error during the
onvalidatemerchantcallback. - Solution: Ensure the server hosting the domain verification file returns an
HTTP 200 OKstatus and serves the file with a clear text content-type (text/plain). Disallow redirects on the.well-knownURL path, as Apple's validation servers will not follow HTTP 301 or 302 redirects.
2. Certificate Expiration
- Symptom: Apple Pay suddenly stops working on a previously validated storefront, displaying generic transaction processing errors to buyers.
- Solution: Apple Pay Merchant Identity Certificates expire periodically (typically every 25 months). Developers must log into the Apple Developer portal, regenerate the certificate, download it, and upload the updated certificate to their backend server or payment service provider dashboard before the expiration date.
3. Missing Hardware Support Handling
- Symptom: The Apple Pay button displays on devices that cannot make payments, resulting in broken clicks.
- Solution: Always wrap UI buttons in feature detection logic. Call
ApplePaySession.canMakePayments()to verify operating system capability, and callApplePaySession.canMakePaymentsWithActiveCard(merchantIdentifier)to confirm the user actually has a valid card provisioned in their Wallet. If neither condition is met, hide the button or default back to standard guest checkout forms.
Frequently Asked Questions
Does accepting Apple Pay cost extra processing fees for merchants?
No. Apple does not charge merchants, software vendors, or consumers any fee for using Apple Pay. Transactions processed through Apple Checkout incur standard payment processing fees charged by your credit card processor (such as Stripe, Shopify, Adyen, or Square).
Why isn't the Apple Pay button showing up during checkout testing?
The Apple Pay button requires an active HTTPS connection (HTTP is not permitted, except on localhost), a supported browser (Safari or modern iOS browsers), and an Apple device with an active card provisioned in Wallet. Additionally, if the domain is not verified via the .well-known/apple-developer-merchantid-domain-association file, the payment session will fail to initialize.
Can customers use Apple Pay on non-Apple devices like Windows PCs?
Yes. On non-Apple hardware or desktop browsers like Google Chrome, modern implementations of Apple Pay JS display a dynamic QR code when the user clicks the Apple Pay button. The user scans the QR code with their iPhone or iPad running recent software, allowing them to authorize the desktop transaction biometrically on their personal mobile device.
Is Apple Checkout compliant with PCI-DSS guidelines?
Yes. Because Apple Checkout uses tokenization—replacing actual credit card numbers with encrypted Device Account Numbers (DAN) and dynamic single-use cryptograms—merchants do not handle or store sensitive payment card data. This reduces the merchant's PCI-DSS compliance requirements to the lowest tier (typically SAQ A).
How does Apple Checkout handle shipping address selection?
When a user clicks the Apple Pay button, the Apple Pay sheet automatically exposes the user's stored shipping addresses from Apple Wallet. When the user changes their selected address within the sheet, the onshippingcontactselected event fires in JavaScript, allowing the merchant's server to recalculate shipping fees and taxes dynamically before the final payment authorization occurs.
Actionable Next Steps for Merchants and Developers
To successfully implement and maximize the conversion performance of Apple Checkout on your e-commerce platform:
- Audit Gateway Compatibility: Check whether your current payment processor supports automated Apple Pay onboarding. If you use major platforms like Shopify, BigCommerce, WooCommerce, or Stripe, enable Apple Pay via your admin settings to automatically bypass manual certificate creation.
- Set Up Apple Developer Credentials: If building a custom web stack, register a Merchant ID inside the Apple Developer Console and host the domain verification file at your server's
.well-knowndirectory. - Implement Feature Detection: Update frontend code to check
ApplePaySession.canMakePayments()before rendering UI components to ensure non-compatible devices see an optimized standard checkout interface. - Optimize Button Placement: Position the Apple Pay button at the top of product detail pages and quick-cart drawers—not just on the final payment page—to allow customers to bypass cart steps entirely.