To program a stepper motor with an Arduino in 2026, you must define the steps per revolution, initialize the motor pins using a library like Stepper.h or AccelStepper, and use specific functions to control speed and position. The code sends a sequence of digital pulses to a motor driver, which translates these logical signals into the physical electrical phases required to rotate the motor in precise increments.
Understanding the Logic of Stepper Motor Control
Stepper motors are unique in the world of motion control because they do not rotate freely like standard DC motors. Instead, they move in fixed increments known as steps. For a standard bipolar motor, a single full rotation is typically divided into 200 steps, meaning each step represents exactly 1.8 degrees of movement. The primary role of your Arduino code is to manage the timing and sequence of these steps.
When writing Arduino stepper motor code, you are essentially managing a pulse-train. Each pulse sent to the driver causes the motor to move one step. The frequency of these pulses determines the motor's speed, while the total number of pulses determines the distance traveled. In 2026, while modern microcontrollers like the Arduino Uno R4 have increased processing power, the fundamental logic of toggling pins in a specific sequence remains the cornerstone of motion control.
The complexity of your code depends heavily on the motor driver you choose. Traditional drivers like the ULN2003 require the Arduino to handle the four-phase sequence manually (or through a library), while more advanced drivers like the A4988 or TMC2209 only require two pins: Step and Direction. In the latter case, the code simply sets the Direction pin to High or Low and then "pokes" the Step pin to move the motor.
Hardware Prerequisites and Driver Compatibility
Before writing a single line of code, it is essential to match your software logic to your hardware configuration. Arduino boards cannot provide enough current to power a stepper motor directly from their I/O pins. Doing so will likely destroy the microcontroller. Therefore, your code always interacts with a motor driver.
Common Driver Architectures
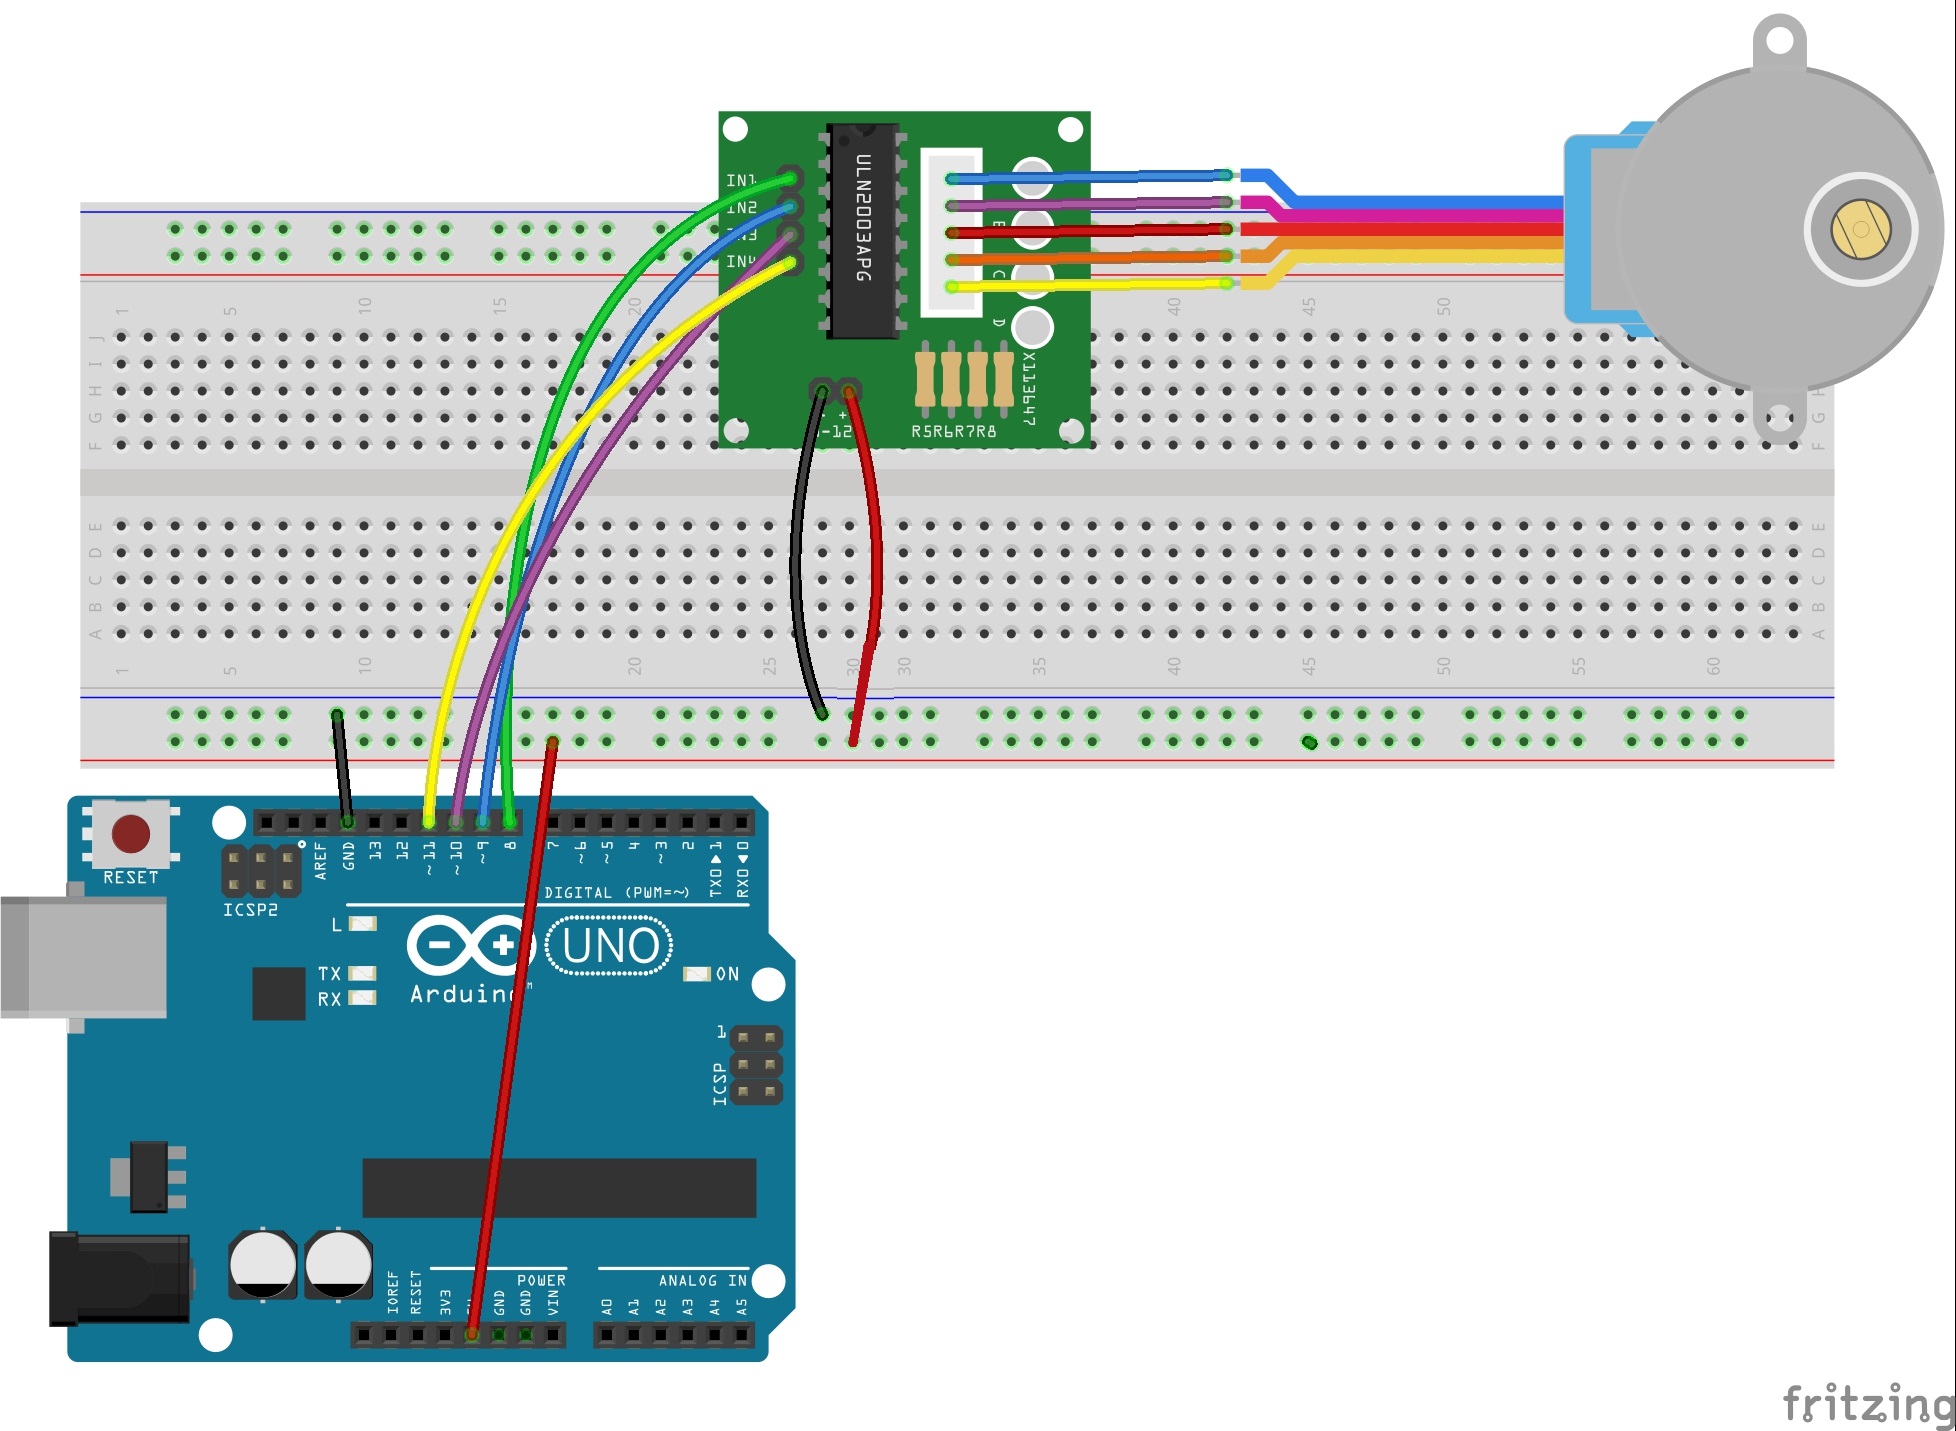
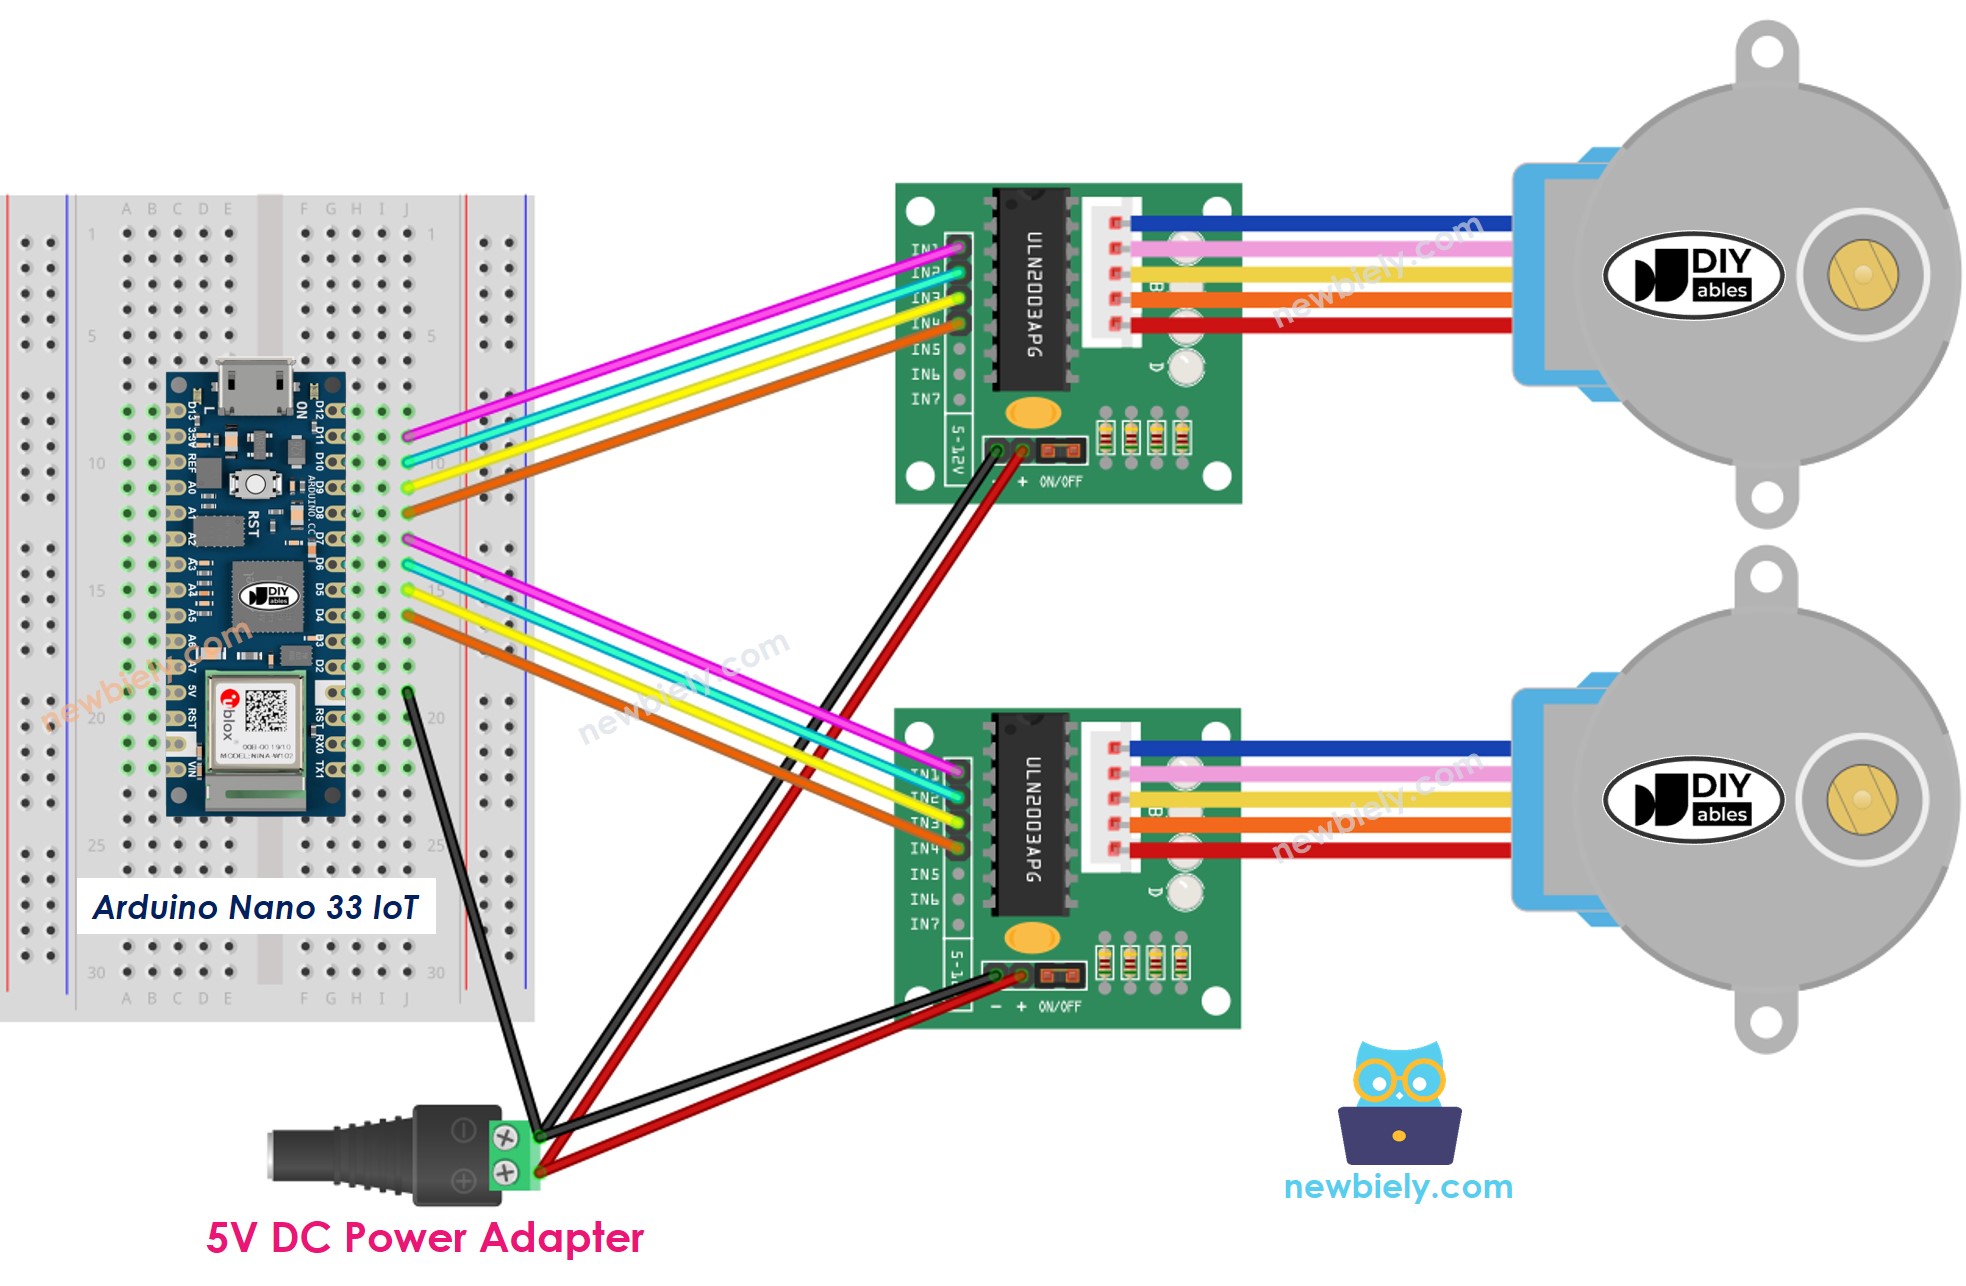
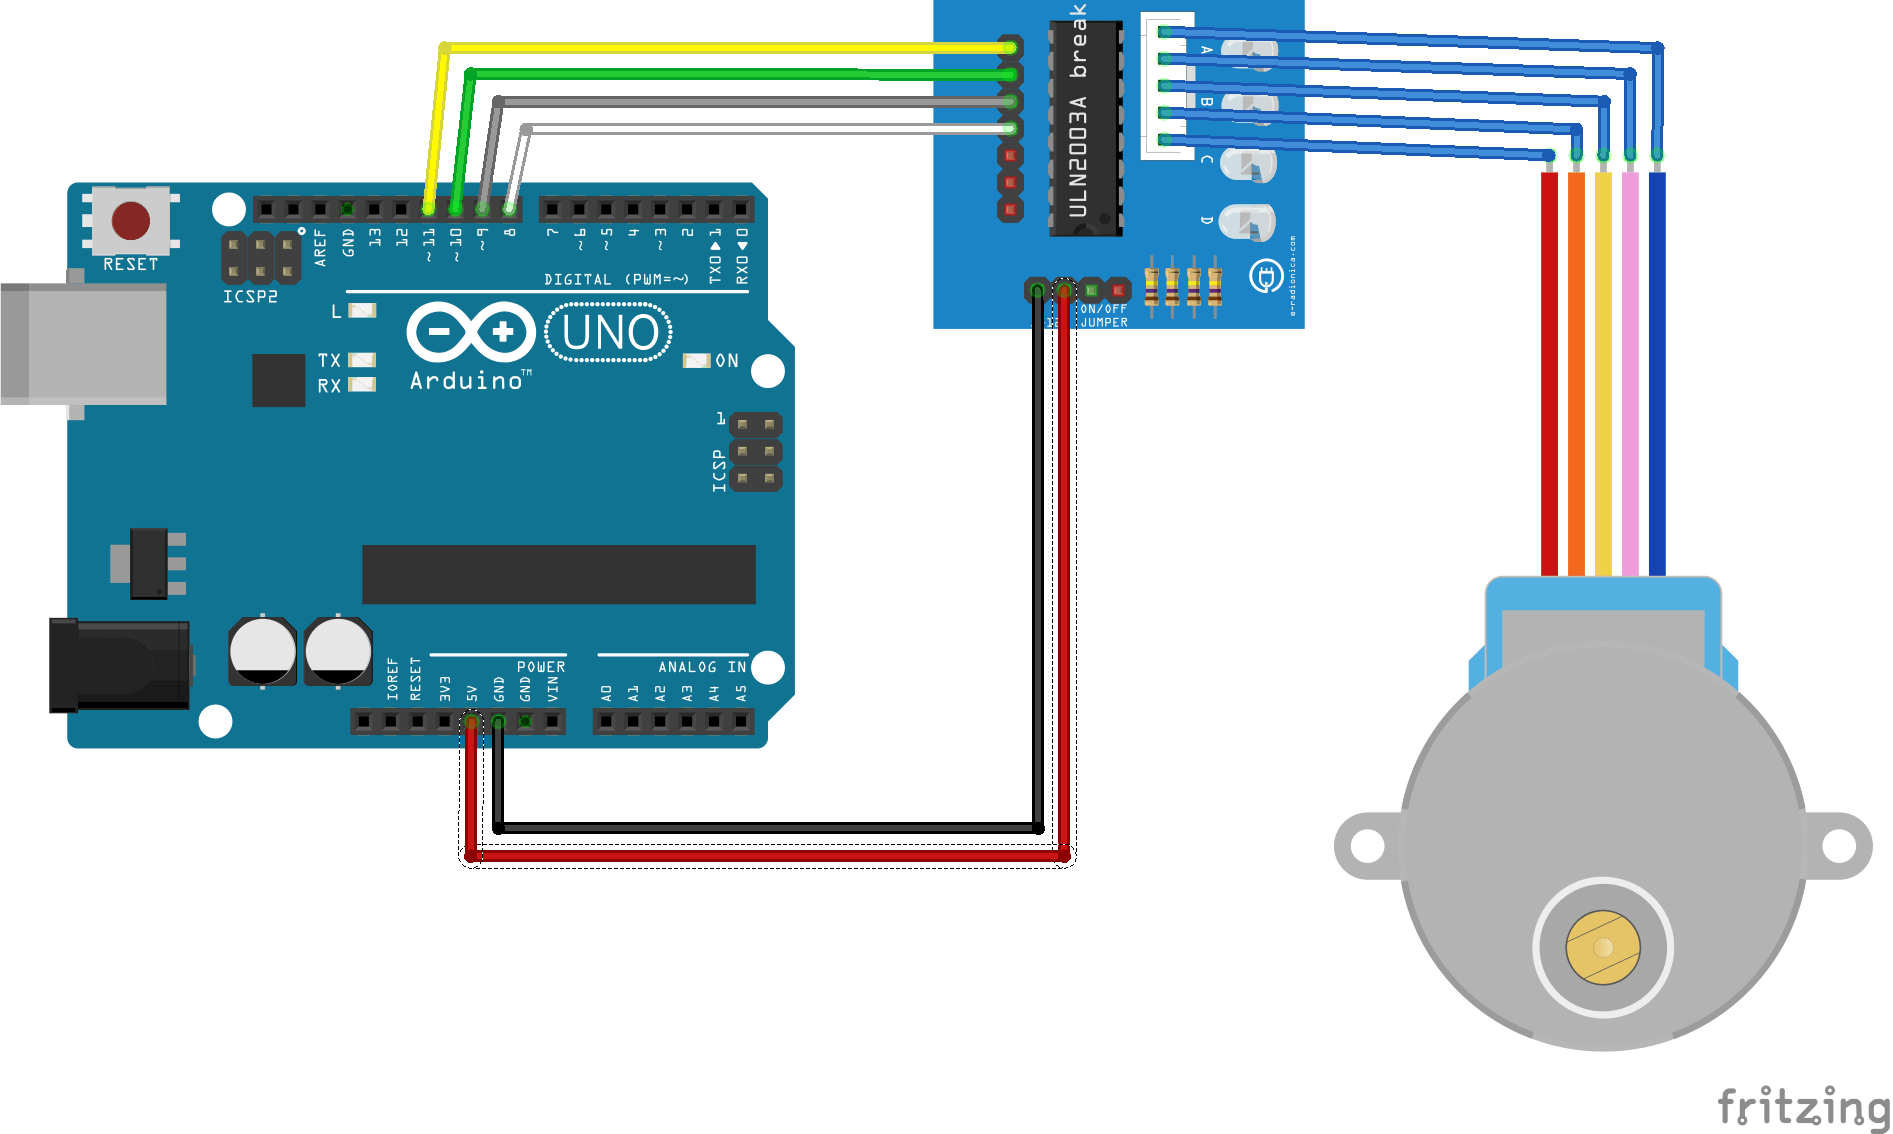
- Darlington Transistor Arrays (ULN2003): Typically used for small, 5V unipolar motors like the 28BYJ-48. The code must manage four separate output pins.
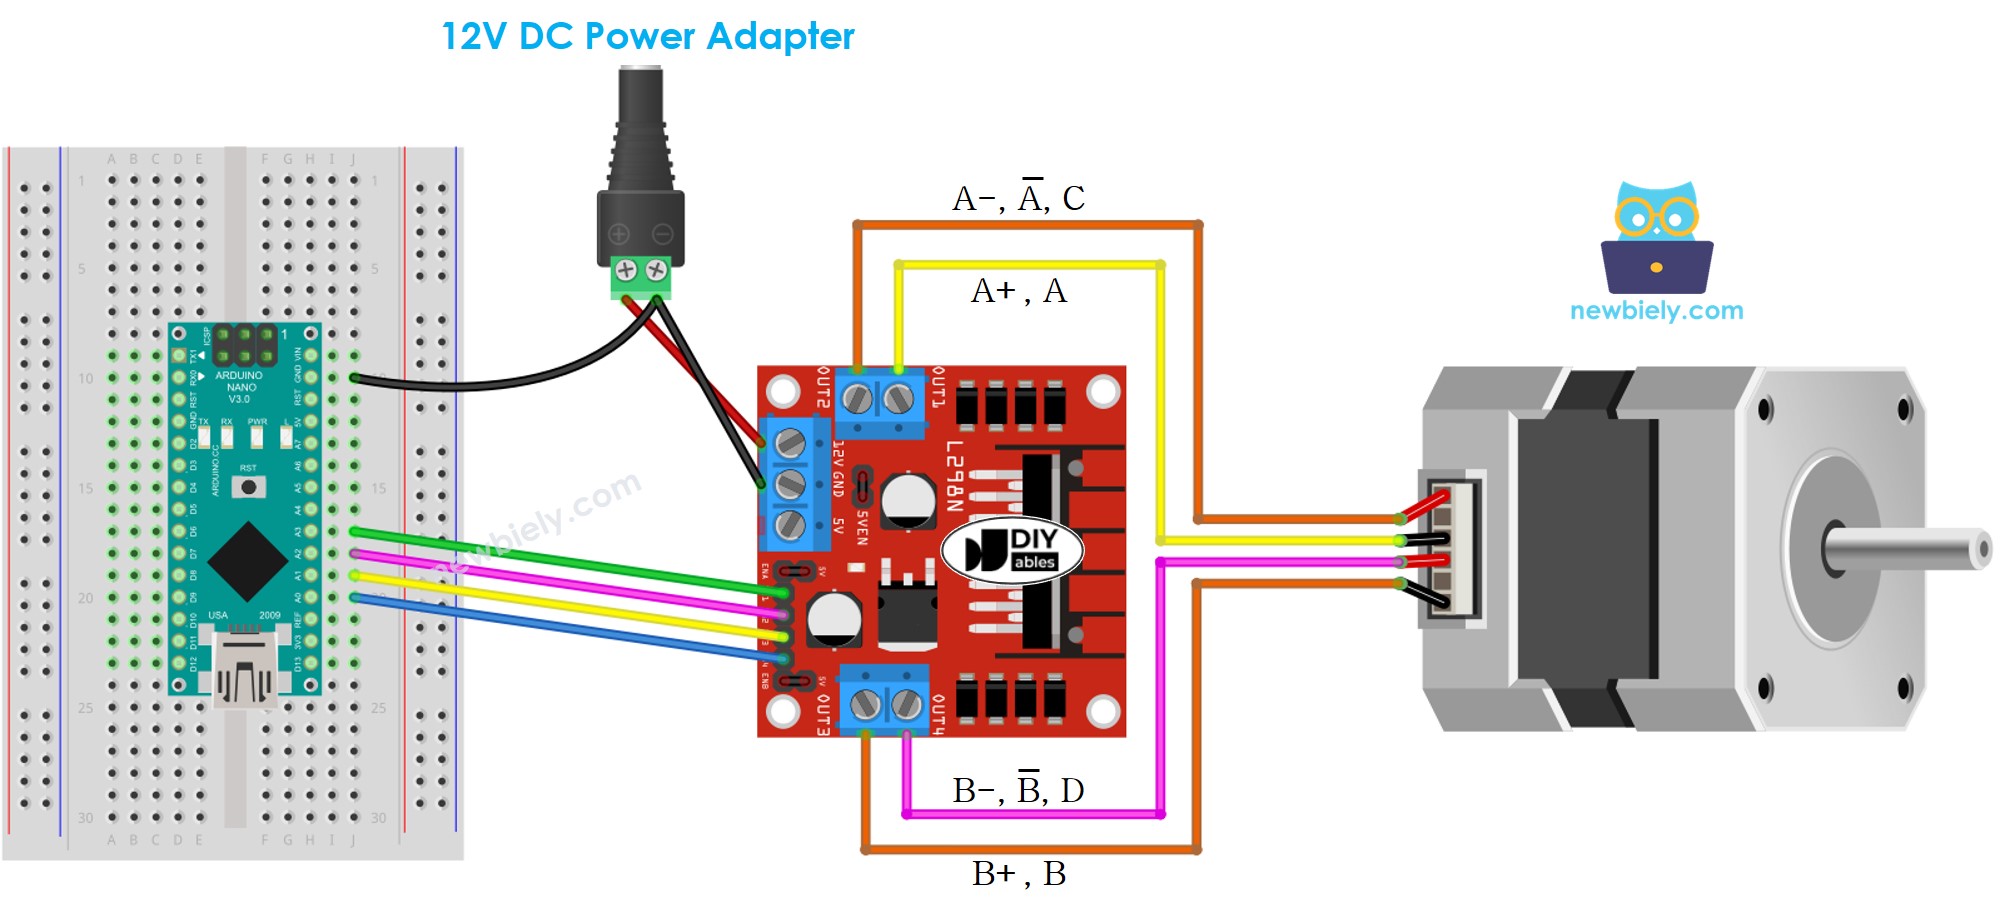
- H-Bridge Drivers (L298N): Older technology used for bipolar motors. These require significant manual phase management in the code.
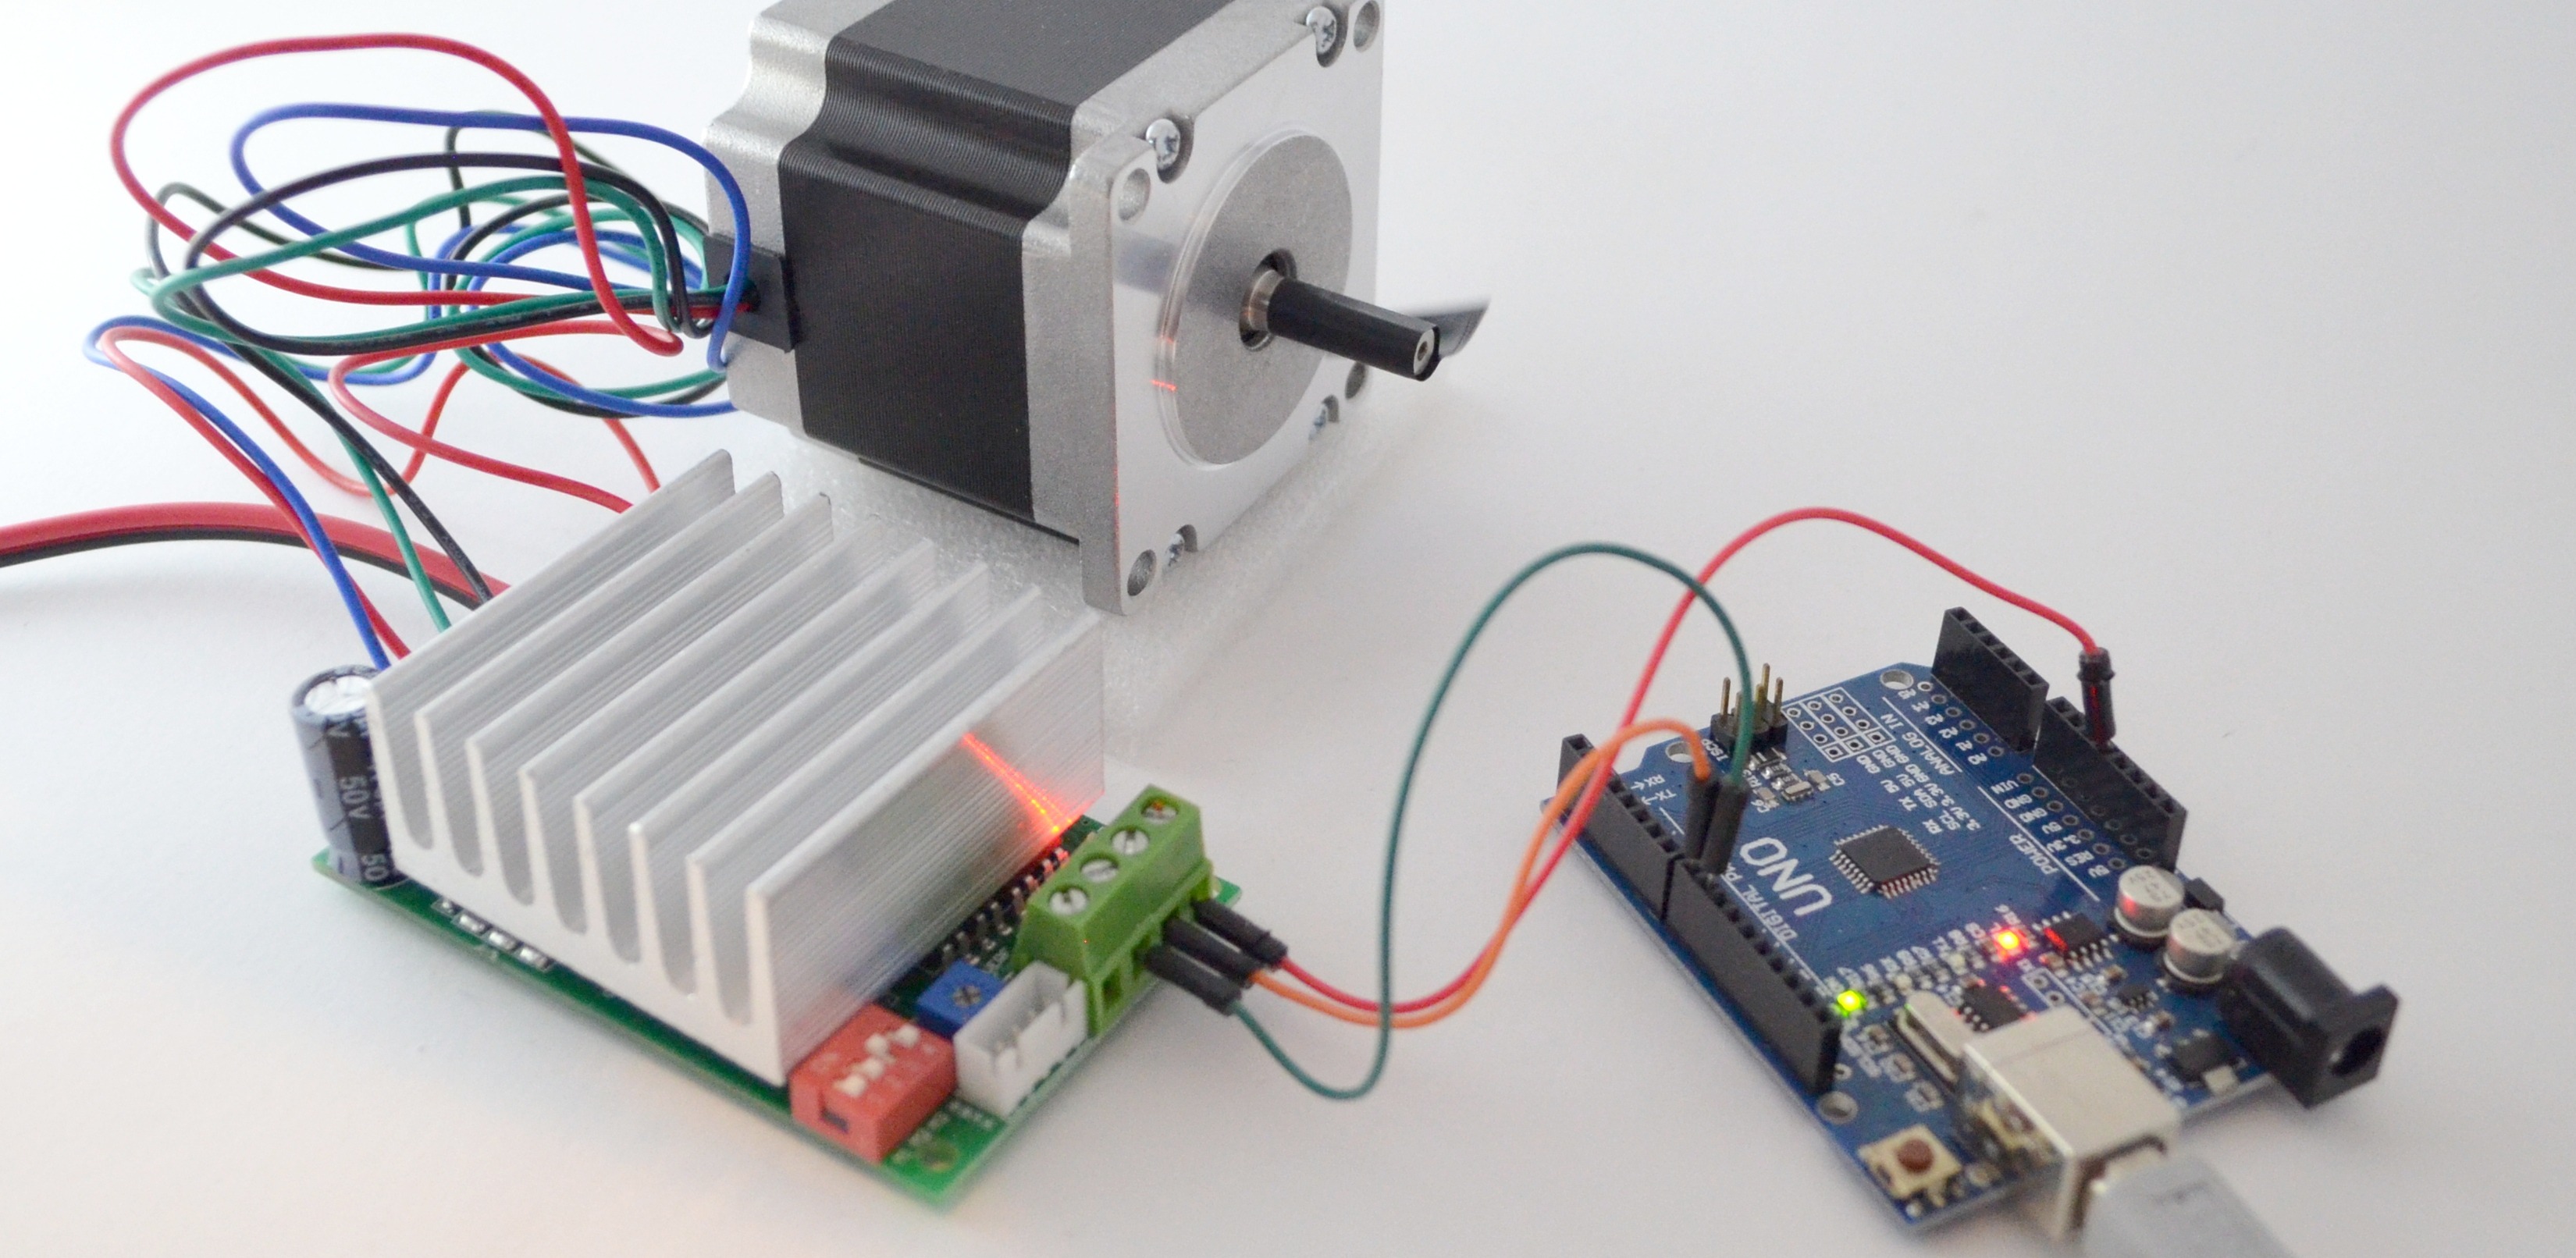
- Step/Direction Drivers (A4988, DRV8825, TMC2209): The modern standard for CNC and 3D printing. These simplify code significantly by offloading the phase sequencing to the hardware chip.
The physical wiring dictates how the library object is initialized. For instance, if you are using an A4988 driver, your code needs to know which Arduino pin is connected to the Step input and which is connected to the Direction input. Misconfiguring these in the code is the most common cause of "vibrating but not turning" motor issues.
Deep Dive into the Standard Stepper Library
The Stepper.h library comes pre-installed with the Arduino IDE and is the simplest way to get a motor spinning. It is best suited for basic applications where only one motor moves at a time and complex acceleration profiles are not required.
Initializing the Motor Object
To use this library, you first include the header file at the top of your sketch. You then create an instance of the Stepper class. This requires two pieces of information: the number of steps your motor takes to complete a full 360-degree rotation and the pin numbers used for control.
For a two-pin driver setup, the syntax involves passing the steps per revolution followed by the two pin numbers. For a four-pin setup, such as a ULN2003, you pass the four pins in the specific order required by the driver's phase logic. In 2026, it remains a best practice to define these pin numbers as constant integers (const int) at the beginning of your code to make future hardware changes easier to implement.
Setting Speed and Executing Movement
Inside the setup() function, you define the motor speed using the setSpeed() method. This value is typically expressed in Rotations Per Minute (RPM). It is important to note that if you set this value too high for your specific motor and voltage, the motor will simply hum and fail to move because it cannot overcome its own inertia.
The actual movement occurs using the step() function. This function is "blocking," meaning the Arduino will pause all other code execution until the motor has finished moving the specified number of steps. If you pass a positive number, the motor turns one way; a negative number turns it the other. While simple, this blocking nature makes Stepper.h unsuitable for complex projects where the Arduino needs to read sensors or handle user input while the motor is in motion.
Advanced Motion Control with AccelStepper
For professional or complex projects in 2026, the AccelStepper library is the industry standard. Unlike the basic library, AccelStepper is non-blocking and supports acceleration and deceleration, which are critical for preventing motor stalls and reducing mechanical wear.
The Run Logic
The most significant difference in AccelStepper code is the run() function. Instead of telling the motor to "move 500 steps now," you set a target position using moveTo() and then call run() repeatedly inside the main loop. Each time run() is called, the library checks if it is time to send a single pulse to the motor to stay on track with the calculated acceleration curve.
This approach allows the Arduino to handle other tasks simultaneously. However, it requires that your loop() function remains fast and free of delay() calls. If your loop is slow, the pulses will be irregular, leading to jittery motor movement.
Acceleration Profiles
In 2026, as hobbyist machines become faster and more precise, managing inertia is vital. AccelStepper allows you to define setMaxSpeed() and setAcceleration(). By gradually increasing the speed from zero, the motor can achieve much higher top speeds without "slipping" or losing steps. This is particularly important for NEMA 17 or NEMA 23 motors used in DIY laser cutters or automated camera sliders.
Driver Comparison and Selection for Code Optimization
| Driver Type | Control Method | Max Current | Logic Voltage | Best Application |
|---|---|---|---|---|
| ULN2003 | 4-Pin Phase | 500mA | 3.3V / 5V | Educational toys, small flaps |
| A4988 | Step/Direction | 2.0A | 3.3V / 5V | DIY 3D printers, basic CNC |
| TMC2209 | Step/Direction | 2.8A | 3.3V / 5V | Silent operation, 2026 standard |
| TB6600 | Step/Direction | 4.0A | 5V | Heavy-duty automation, NEMA 23 |
Step-by-Step Programming Logic
When constructing your Arduino stepper motor script, follow this logical flow to ensure stability and readability:
- Header and Constants: Include your chosen library. Define the STEPS_PER_REV based on your motor's datasheet. Define your pin assignments (e.g., STEP_PIN 3, DIR_PIN 4).
- Object Instantiation: Create the motor object. If using AccelStepper with a Step/Direction driver, use the DRIVER interface constant to tell the library how to communicate.
- Setup Configuration: Inside void setup(), initialize the motor's maximum speed and acceleration. If using a basic library, set the RPM. This is also where you would initialize any limit switches or homing sensors.
- The Target Logic: Decide how the movement is triggered. Is it based on a timer, a button press, or a serial command? Use moveTo() to set a coordinate.
- The Execution Loop: In void loop(), call the movement function. Ensure no blocking code (like long delays) exists in this section, as it will disrupt the pulse timing.
Troubleshooting Common Code and Hardware Issues
Even with perfect code, stepper motors can be temperamental. If your motor is not moving as expected, evaluate these common failure points:
The Motor Vibrates but Does Not Rotate This is rarely a code logic error and almost always a wiring or power issue. Check that the four wires of the stepper motor are correctly paired. You can use a multimeter to find the two pairs that have continuity. In your code, ensure the pin numbers match the physical connections. Additionally, check the current limit on your driver; if it is set too low, the motor won't have enough torque to turn.
The Motor Overheats Stepper motors are designed to run hot, but they should not be painful to touch. If the motor is too hot, it means the driver is delivering too much current. While you cannot "code" a lower current on basic drivers (you must turn a physical potentiometer), some modern drivers like the TMC2209 allow you to set the current via UART in your Arduino code.
Inconsistent Step Counts If your motor moves 100 steps sometimes and 95 steps other times, you are "losing steps." This usually happens in the code when the acceleration is set too high or the maximum speed exceeds the motor's physical capability at the supplied voltage. Lowering the setAcceleration value in your AccelStepper configuration is the primary software fix.
Operational Limitations in 2026
While Arduino boards are powerful, they have limits when controlling multiple stepper motors at high speeds. The standard Arduino Uno, for example, can struggle to generate pulses fast enough for three or four motors running microstepping at high RPMs.
Microstepping is a technique where the driver divides a single full step into smaller "microsteps" (1/16, 1/32, or even 1/256). While this makes the movement smoother and quieter, it requires the Arduino to send 16 or 32 times more pulses for the same distance. If your code requires extremely high speeds with high microstepping, you may need to migrate to a 32-bit board like the Arduino Uno R4 or an ESP32, which can handle the interrupt timing more efficiently.
Furthermore, always remember that Arduino code is not "Real-Time" in the strictest sense. If your loop is bogged down with complex math or slow sensor readings (like some DHT temperature sensors), the motor movement will suffer. Use interrupt-based libraries or dedicated hardware timers if your project requires mission-critical precision.
Frequently Asked Questions
Which library is best for a beginner?
The Stepper.h library is best for beginners because it is simple and comes pre-installed. It allows you to get a motor moving with just a few lines of code. However, it is limited because it blocks other code from running during movement. As soon as you want to add a "stop" button or a sensor, you should switch to AccelStepper.
Can I control a stepper motor without a library?
Yes, you can control a stepper motor by manually toggling the digital pins using digitalWrite() and delayMicroseconds(). This is a great way to learn how the pulses work, but it is inefficient for complex projects. Libraries are preferred because they are optimized for timing and offer features like acceleration that are difficult to write from scratch.
Why does my stepper motor make a high-pitched noise?
High-pitched noise is common in stepper motors and is often caused by the "chopper" frequency of the motor driver or the current holding the motor in place. If the noise is present while moving, it may be due to resonance. Using a driver with "SilentStepStick" technology (like the TMC2209) and configuring it for higher microstepping in your code can significantly reduce or eliminate this noise.
How do I make my stepper motor move faster?
To increase speed, first ensure your code uses acceleration to ramp up the velocity. Second, increase the voltage supplied to the motor driver (within the driver's limits). Higher voltage helps the current overcome the motor's inductance faster, allowing for higher RPMs. Finally, ensure your Arduino's clock speed can handle the pulse rate required for your desired speed and microstepping level.
Do I need to "home" my stepper motor in the code?
Stepper motors do not know their own position when they are powered on. If your project requires knowing where the motor is (like a 3D printer or a clock), you must include a "homing" sequence in your code. This involves moving the motor toward a limit switch until it is triggered, at which point you set the internal coordinate to zero using the setCurrentPosition(0) function.
Practical Recommendation for Next Actions
To begin, identify your motor's steps per revolution and your driver type. Start by implementing the standard Stepper.h library to verify your wiring is correct. Once the motor spins reliably in both directions, transition your code to the AccelStepper library. This will provide the smoothness and non-blocking performance required for modern 2026 hardware projects. For further technical documentation on specific library methods, consult the official Arduino Reference or the AccelStepper Documentation.