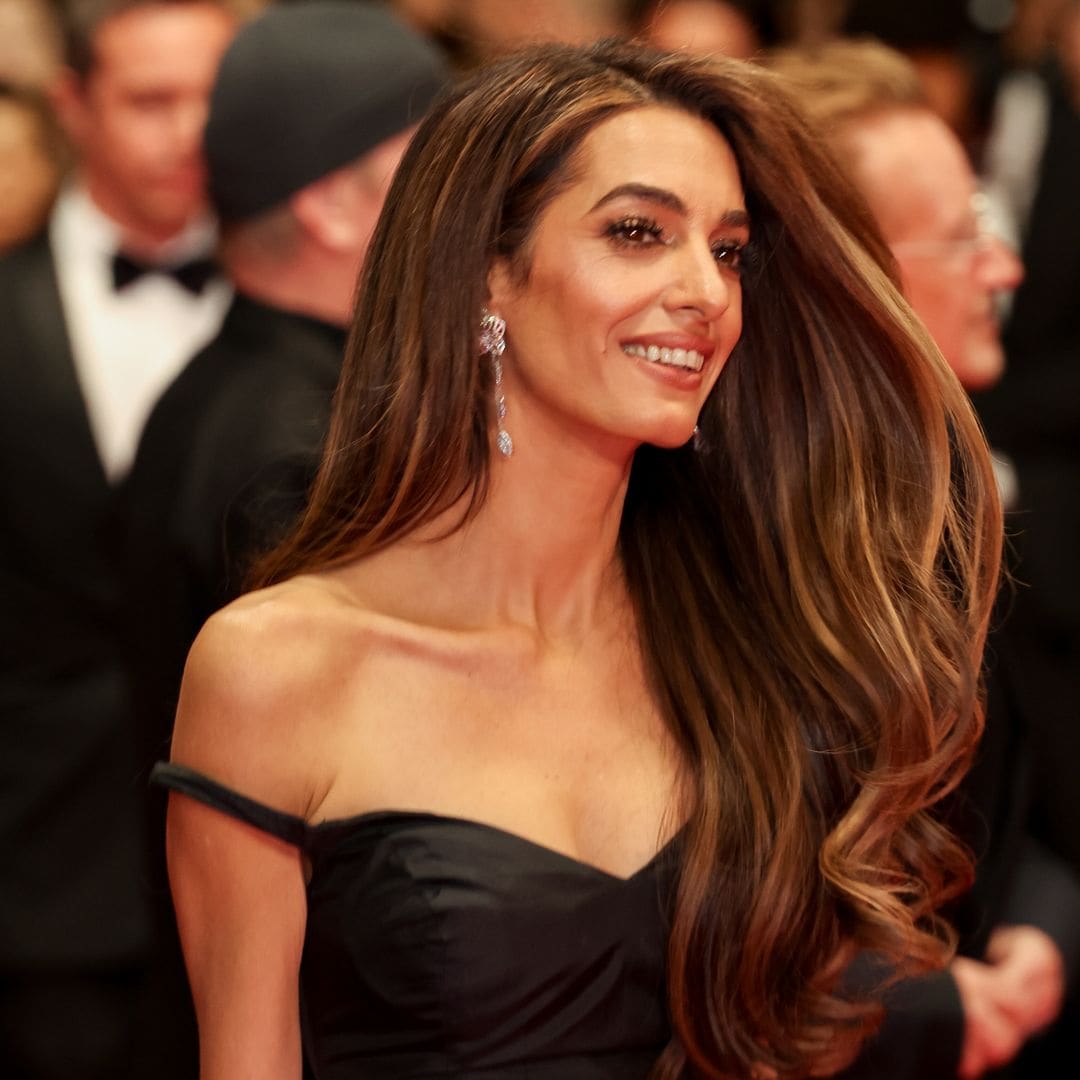
Amal Clooney’s signature 2024 hair aesthetic features a rich, dark chocolate base illuminated by warm amber and caramel macchiato balayage highlights, styled into a high-shine, dynamic "Italian blowout." Spearheaded by celebrity hairstylist Dimitris Giannetos, this iconic look combines long, strategic face-framing layers with maximum root volume and soft, polished waves.
The Evolution of Amal Clooney’s Hair Aesthetic
While human rights attorney Amal Clooney has long been celebrated for her thick, dark locks, her hair aesthetic evolved significantly throughout 2024. Transitioning away from the flatter, almost monochromatic dark espresso shades of previous years, her modern aesthetic emphasizes warmth, multidimensional reflection, and fluid movement.
This evolution centers on creating contrast that enhances skin tone while retaining the luxurious weight of dense brunette hair. Rather than opting for global lightening or harsh highlights, her look relies on precision color placement and thermal styling that prioritizes structural integrity and high light reflectivity.
- Deep Espresso Base (Level 3-4)
- Warm Amber Balayage
- Caramel Macchiato Ribbons
- Glossed Italian Blowout Finish
The "Caramel Macchiato" and Warm Amber Palette
The standout color update introduced by colorist Dimitris Giannetos involves hand-painted ribbons of warm amber, honey, and soft caramel woven through her natural dark brown base. Often referred to in editorial beauty circles as "caramel macchiato" or "nutte caramel," this coloring approach creates distinct visual advantages:
- Dimensional Contrast: Placing warm tones around the face and middle lengths prevents dark hair from looking heavy or flat under bright studio or outdoor light.
- Warm Under-Tones: Honey and amber tones complement warm and neutral skin undertones, adding optical brightness to the complexion without drastic bleaching.
- Low-Maintenance Growth: Because the highlights are integrated using a subtle balayage sweep rather than root-level foils, the regrowth line remains soft and diffused.
The Modern Italian Blowout
Alongside the color refinement, the structural styling shifted toward what stylists term the "Italian Blowout." Characterized by brushed-out volume, soft ends, and a side-swept fringe, this style bridges vintage Studio 54 glamour with modern, touchable movement. Unlike stiff, heavily sprayed updos, the Italian blowout relies on internal tension during blow-drying and large-barrel thermal setting to maintain elasticity and bounce throughout the day.
Deconstructing the Cut: Structure, Density, and Layers
To replicate Amal Clooney’s overall silhouette, the hair must be cut with specific structural mechanics. Her style requires density at the perimeter to maintain a healthy, full appearance, balanced by subtle internal layers that reduce bulk and encourage movement.
| Hair Cut Architecture | Details |
|---|---|
| TOP / CROWN | Long, internal blended layers for weightless volume without surface disruption. |
| FACE-FRAMING | Soft curtain layers starting at jawline or collarbone, blending downward into lengths. |
| PERIMETER | Heavy, blunt-cut base (chest to waist line) maintaining dense bottom edge. |
Perimeter and Internal Layering
The foundation of this cut is a long, slightly curved perimeter that sits between lower-chest and waist length. Key perimeter characteristics include:
- Blunt Base Weight: The bottom edge remains relatively thick, giving the illusion of maximum hair density. Thin, overly feathered ends should be avoided.
- Internal Point-Cutting: Long layers are incorporated through the mid-lengths using point-cutting techniques. This removes excess weight from dense hair types without creating obvious visual "steps" in the cut.
- Crown Elevation: Subtle crown layering allows root lifters to elevate the top section without sacrificing length in the back.
Face-Framing and Curtain Mechanics
The face-framing architecture is crucial for framing the cheekbones and jawline. The shortest layers typically begin right at the jawline or collarbone, cascading down toward the front length.
When styled away from the face, these layers create an effortless "swept" wave. When styled inward, they contour around the neck. The front fringe area is kept long enough to be tucked behind the ear or swept into a deep side part depending on the occasion.
Technical Color Breakdown: The Salon Guide
Achieving this multidimensional brunette requires a clear consultation with a professional colorist. Simply asking for "caramel highlights" can result in overly stripey or excessively cool-toned results. Use the technical specifications below to guide your appointment.
- Natural Base: Level 3 (Dark Brown) to Level 4 (Medium Brown)
- Balayage Placement: Level 6-7 Lift
- Toning / Gloss Stage: Warm Amber / Gold-Copper
- Final Result: Multi-Tonal Warmth
Color Base and Highlight Specifications
- Base Shade Preservation: Maintain a natural level 3 (Dark Brown) to level 4 (Medium Brown) base. If gray coverage is required, a neutral-warm permanent color should be used to avoid flat, opaque tones.
- Lightening Technique: Use a combination of open-air balayage and subtle babylights. Highlights should focus heavily on the mid-lengths, ends, and face-framing strands, starting 2–3 inches down from the scalp to preserve root depth.
- Target Lift: Lift the lightened sections to a warm level 6 (Light Brown) or level 7 (Dark Blonde). Excessive lifting to pale yellow (level 9–10) undermines the rich, honeyed character of this look and damages hair structure.
- Toning/Glossing Formula: Tone the lightened pieces using a demi-permanent gloss containing warm gold, amber, and light copper undertones. Avoid ash or violet toners, which dull brunette brilliance and make highlights look muddy.
Step-by-Step Guide: Recreating the Voluminous Blowout
Replicating this look at home requires proper product layering, tension drying, and thermal setting.
- Step 1: Prep: Damp hair application of heat protectant & volumizing mousse.
- Step 2: Dry: Rough dry to 80%, then section & tension dry with ceramic round brush.
- Step 3: Set: Roll sections into 2-inch velcro rollers; set with cool air.
- Step 4: Seal: Unroll, brush out gently, and apply shine serum to mid-lengths/ends.
Required Tools and Equipment
- Professional-grade blow dryer with a narrow concentrator nozzle
- 2-inch or 2.5-inch ceramic or boar-bristle round brush
- Set of 2-inch jumbo velcro rollers or a large-barrel (1.5–2 inch) curling iron
- Sectioning clips
- Flexible-hold finishing spray and high-shine glossing serum
Step 1: Wash and Prep
- Wash hair with a hydrating, sulfate-free shampoo to preserve color vibrancy. Apply a lightweight conditioner to the mid-lengths and ends, rinsing thoroughly with cool water to seal the cuticle.
- Towel-dry hair by gently pressing with a microfiber towel—never rub briskly, as this causes micro-frizz.
- Apply a heat protectant spray uniformly from root to tip. Layer a volumizing spray or lightweight mousse at the roots for structural lift.
Step 2: Tension Blow-Drying
- Rough-dry the hair on medium heat until it is approximately 75% to 80% dry.
- Divide the hair into four clean quadrants using sectioning clips: two front side sections, a crown section, and an occipital rear section.
- Working in 1- to 2-inch sub-sections starting at the nape of the neck, place the round brush under the hair near the root. Direct the concentrator nozzle downward along the hair shaft to keep the cuticle smooth.
- Pull the brush upward and outward with firm tension, rolling the brush at the ends to create a soft, inward or outward curl.
Step 3: Setting the Volume
- While each blown-out section is still hot from the dryer, immediately roll it around a 2-inch velcro roller, moving away from the face at the top and sides.
- Secure each roller with a clip at the root base.
- Allow the rollers to cool completely for 15 to 20 minutes. This cooling stage is critical; heat reshapes the hydrogen bonds in the hair, while cooling locks the new shape in place.
- If using a curling iron instead of rollers, wrap large 2-inch sections away from the face, pin the curls to the scalp with clip grips, and let them cool fully.
Step 4: Finishing and Polishing
- Gently remove the rollers section by section, starting from the bottom and working up to the crown.
- Flip your head upside down and gently shake the roots with your fingertips to break up the roller sections.
- Flip back up and gently comb through the lengths using a wide-tooth comb or a soft boar-bristle paddle brush to blend the waves into a continuous, glossy cascade.
- Emulsify two drops of lightweight hair oil or shine serum between your palms and smooth over the ends to eliminate flyaways.
- Finish with a light mist of medium-hold hairspray applied from an arm's length away.
Hair Type Compatibility & Customization Matrix
Not all natural hair textures respond identically to high-volume styling techniques. Use this reference matrix to adjust products and methods according to your specific hair type.
| Hair Type & Profile | Primary Challenge | Cut Modification | Product Customization | Styling Adjustment |
|---|---|---|---|---|
| Fine / Low Density | Loses volume quickly; highlights can look sparse. | Keep perimeter blunt; limit long layers; cut soft framing at chin level. | Alcohol-free root-lifting mousse; light volumizing spray; avoid heavy oils. | Use smaller (1.5-inch) rollers to create tighter curl memory that relaxes into volume. |
| Medium / Normal Density (Ideal match) | Easy to style; holds shape well. | Standard long layers with chin-to-collarbone face-framing. | Thermal spray, lightweight gloss serum, medium-hold finishing spray. | Standard 2-inch round brush blowout followed by jumbo velcro rollers. |
| Coarse / Thick / Resistant | High volume, tendency toward bulk and frizz. | Deep point-cutting throughout mid-lengths; generous slide-cut layers. | Rich leave-in cream, heavy anti-humidity smoothing balm, argan oil finish. | High-tension drying with a boar-bristle brush; finish with a flat iron smoothing the roots. |
| Curly / Textured (Types 3A-3C) | Requires straightening before forming blowout wave. | Long layers to disperse weight; avoid short crown layers to prevent mushrooming. | Heat-protectant blow-dry cream, anti-humidity sealants, rich oil polish. | Blow-dry straight using a tension method or paddle brush prior to hot-roller setting. |
Daily Maintenance and Hair Health Preservation
Maintaining long, color-treated hair with consistent heat styling requires a strict maintenance schedule. Excessive thermal exposure without proper moisture replenishment leads to split ends, dullness, and pigment fading.
- Daily: Apply lightweight oil to ends; sleep on silk/satin pillowcase.
- Weekly: Apply deep conditioning mask; run bond-building treatment.
- Bi-Weekly: Wash with clarifying shampoo to remove styling product buildup.
- Every 6-8 Wks: Haircut trim (1/2 inch) & gloss refresh at salon.
Protecting Color-Treated Brunette Tones
Brunette highlights are prone to brassiness (excessive orange or red tones) over time due to UV exposure, hard water minerals, and heat styling.
- Sun Protection: UV rays break down hair dye molecules and degrade internal protein structures. Apply a leave-in conditioner with UV filters before prolonged outdoor exposure.
- Water Quality: Hard water contains mineral deposits (calcium, magnesium, iron) that dull hair clarity and turn caramel highlights brassy. Installing a filtered shower head helps preserve warm amber clarity.
- Gloss Refreshing: Schedule a demi-permanent gloss treatment every 4 to 6 weeks at your salon to restore lost warm pigments and reseal the cuticle layer.
Heat Damage Prevention Protocols
- Temperature Control: Never exceed 365°F (185°C) when using hot tools on color-treated hair. Higher temperatures degrade keratin proteins and accelerate color loss.
- Bond Maintenance: Integrate an at-home bond-building treatment into your routine once per week to repair disulfides broken during bleaching and heat styling.
- Nighttime Protection: Sleep on a 100% mulberry silk or satin pillowcase. Silk produces significantly less friction than cotton, preventing overnight tangling, mechanical breakage, and cuticle roughness.
Common Mistakes to Avoid
- Over-Bleaching the Highlights: Lifting brunette hair past a warm golden caramel stage strips away natural warm undertones, leaving hair looking straw-like, damaged, and overly blonde.
- Skipping the Cool-Down Phase: Removing rollers or brushes while the hair is still warm causes the blowout to collapse within an hour. Always verify that sections are completely cool to the touch before brushing out.
- Using Overly Heavy Products on Fine Hair: Applying heavy silicone oils or dense butter-based creams near the roots weighs down hair, preventing the signature lift at the crown.
- Cutting Too Many Short Surface Layers: Excessive short layers on top destroy the sleek, heavy perimeter look characteristic of Amal Clooney's style, resulting in a shagged or feathered appearance rather than an elegant blowout silhouette.
Frequently Asked Questions
What exact hair color shade does Amal Clooney use?
Amal Clooney’s base is a natural Level 3/4 dark chocolate brown. Her highlights are customized balayage tones featuring warm amber, honey, and caramel macchiato hues lifted to a Level 6 or 7 and finished with a warm gloss.
How do I ask my stylist for Amal Clooney's haircut?
Request a long-length haircut with a thick, blunt perimeter edge to preserve density. Ask for internal point-cut layers through the mid-lengths for movement, along with long, face-framing curtain layers that begin around the jawline or collarbone.
Can I achieve this blowout look without using velcro rollers?
Yes. You can achieve volume by using a large 1.5-inch or 2-inch barrel curling iron. Wrap large sections away from the face, pin each curl against your head with double-prong clips while hot, let them cool completely, and comb through with a paddle brush.
How long does an Italian blowout typically last?
A professionally executed Italian blowout with proper cooling sets can last 2 to 4 days, depending on your scalp oil production and local humidity. Protect the volume overnight by gathering your hair into a loose top knot secured with a silk scrunchie.
Will warm amber highlights work on dark hair without turning orange?
Yes, provided they are properly lightened to a Level 6 or 7 and toned with a controlled demi-permanent formula containing amber and gold tones. Unwanted harsh orange results occur when hair is under-lightened and left untoned.
Summary Checklist for Achieving the Look
To achieve and maintain this refined brunette style:
- Consult with your colorist for a Level 4 chocolate base with Level 6–7 warm amber/caramel balayage.
- Request a long perimeter cut with point-cut internal layers and collarbone-length face framing.
- Prep damp hair with heat protectant and lightweight root-volumizing spray.
- Blow-dry in small sections using high tension and a large ceramic round brush.
- Set hot sections immediately in 2-inch rollers and allow them to cool completely.
- Gently brush out volume and finish with a drop of glossing serum on the ends.
- Refresh with a salon gloss every 6 weeks and maintain with weekly deep-conditioning treatments.