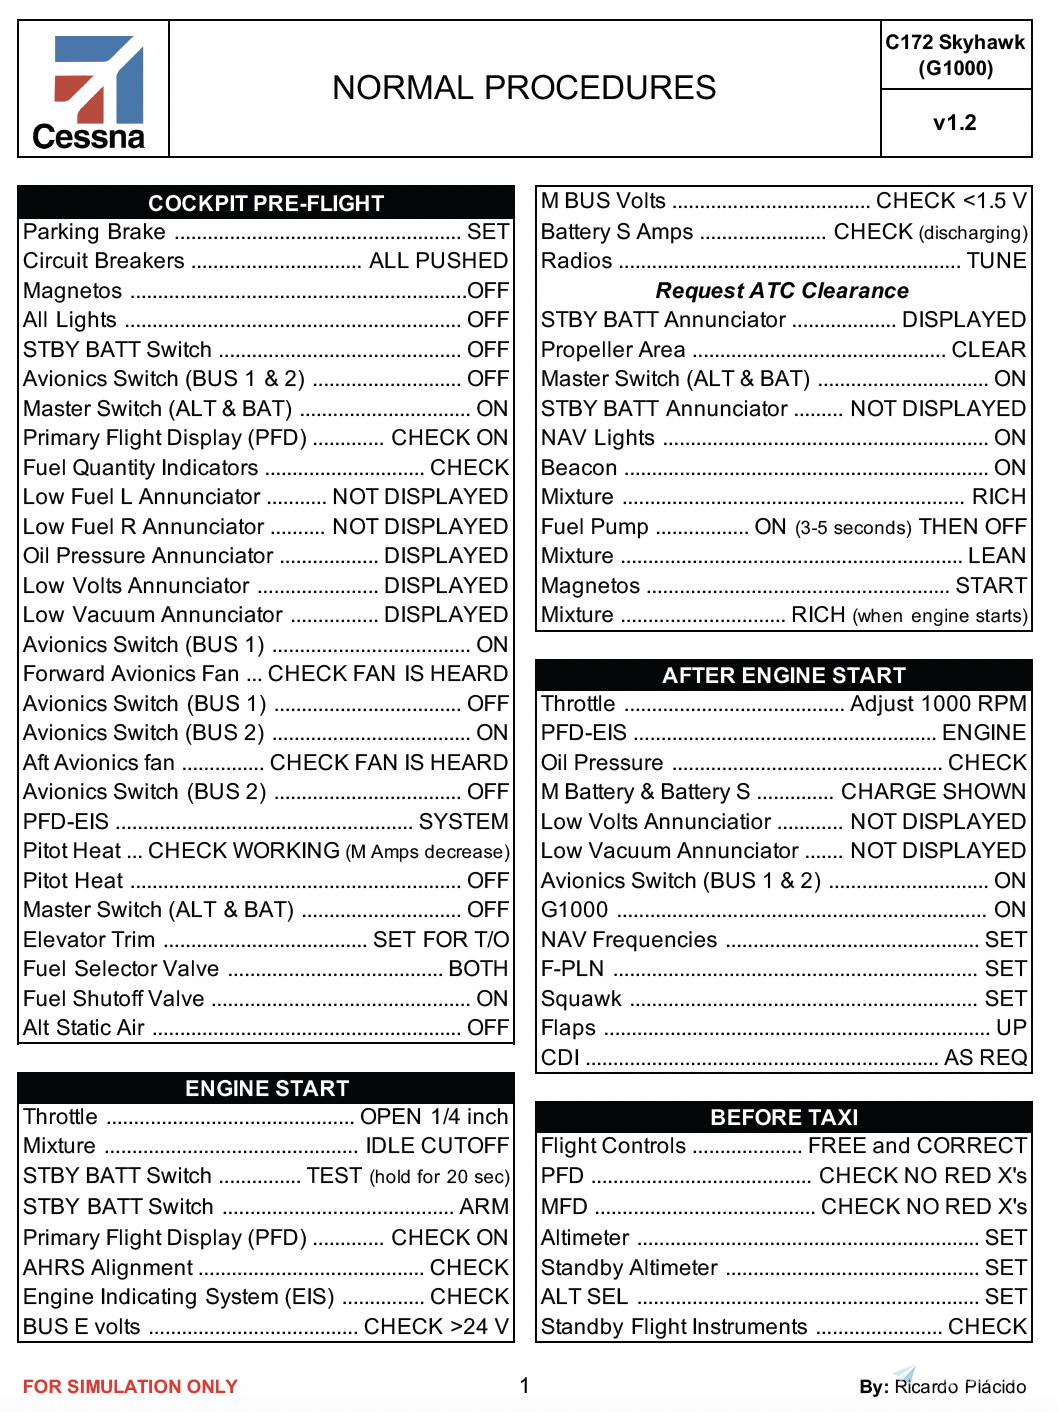
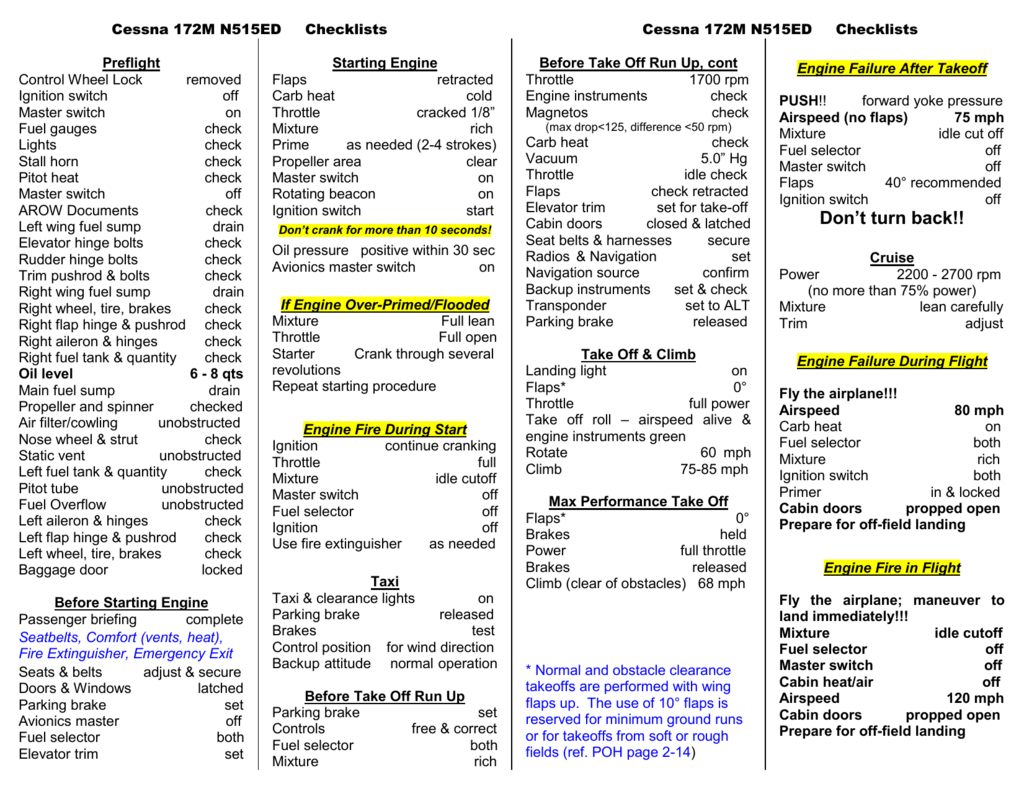
The 5 key steps in a Cessna 172 checklist encompass the preflight inspection, interior and electrical setup, engine start procedures, run-up checks, and the final pre-takeoff alignment. Executing these systematic verification protocols ensures aircraft airworthiness, optimal engine performance, and absolute safety before leaving the ground.
Introduction to Cessna 172 Operational Safety
Operating one of the most prolific aircraft in aviation history requires absolute adherence to standardized operational procedures. The Cessna 172 Skyhawk has served as the backbone of flight training and private aviation for decades. Because human memory is inherently fallible under high-workload conditions, the aviation industry relies entirely on structured checklists.
Using a checklist is not a sign of inexperience; rather, it represents the hallmark of a professional pilot. The transition from climbing into the cabin to lifting off the runway involves managing complex mechanical, aerodynamic, and electrical systems. By dividing this workflow into structured phases—often divided into preflight, before start, start, taxi, run-up, and takeoff—pilots minimize the risk of missed items, system failures, or catastrophic oversights.
Understanding the structural framework of these procedures requires examining the standard operating rhythm defined by manufacturers and refined by flight instructors worldwide. While specific model years and configurations—such as the transition from older analog six-pack instrumentation to modern Garmin G1000 glass cockpits—introduce minor variations, the core philosophy remains constant. Every movement of a switch, check of a fluid level, and verification of a control surface maps directly to an underlying aerodynamic or mechanical requirement.
Below is an examination of the 5 key steps in a Cessna 172 checklist, designed to provide deep technical context, operational rationale, and best practices for safe flight execution.
Step 1: The Comprehensive Preflight Walkaround
The preflight inspection represents the first and most critical line of defense against mechanical failure. Conducted systematically from a specific starting point—traditionally beginning at the cabin entrance and moving counter-clockwise around the airframe—this external examination verifies the physical integrity of the aircraft.
Empennage, Control Surfaces, and Fuel Management
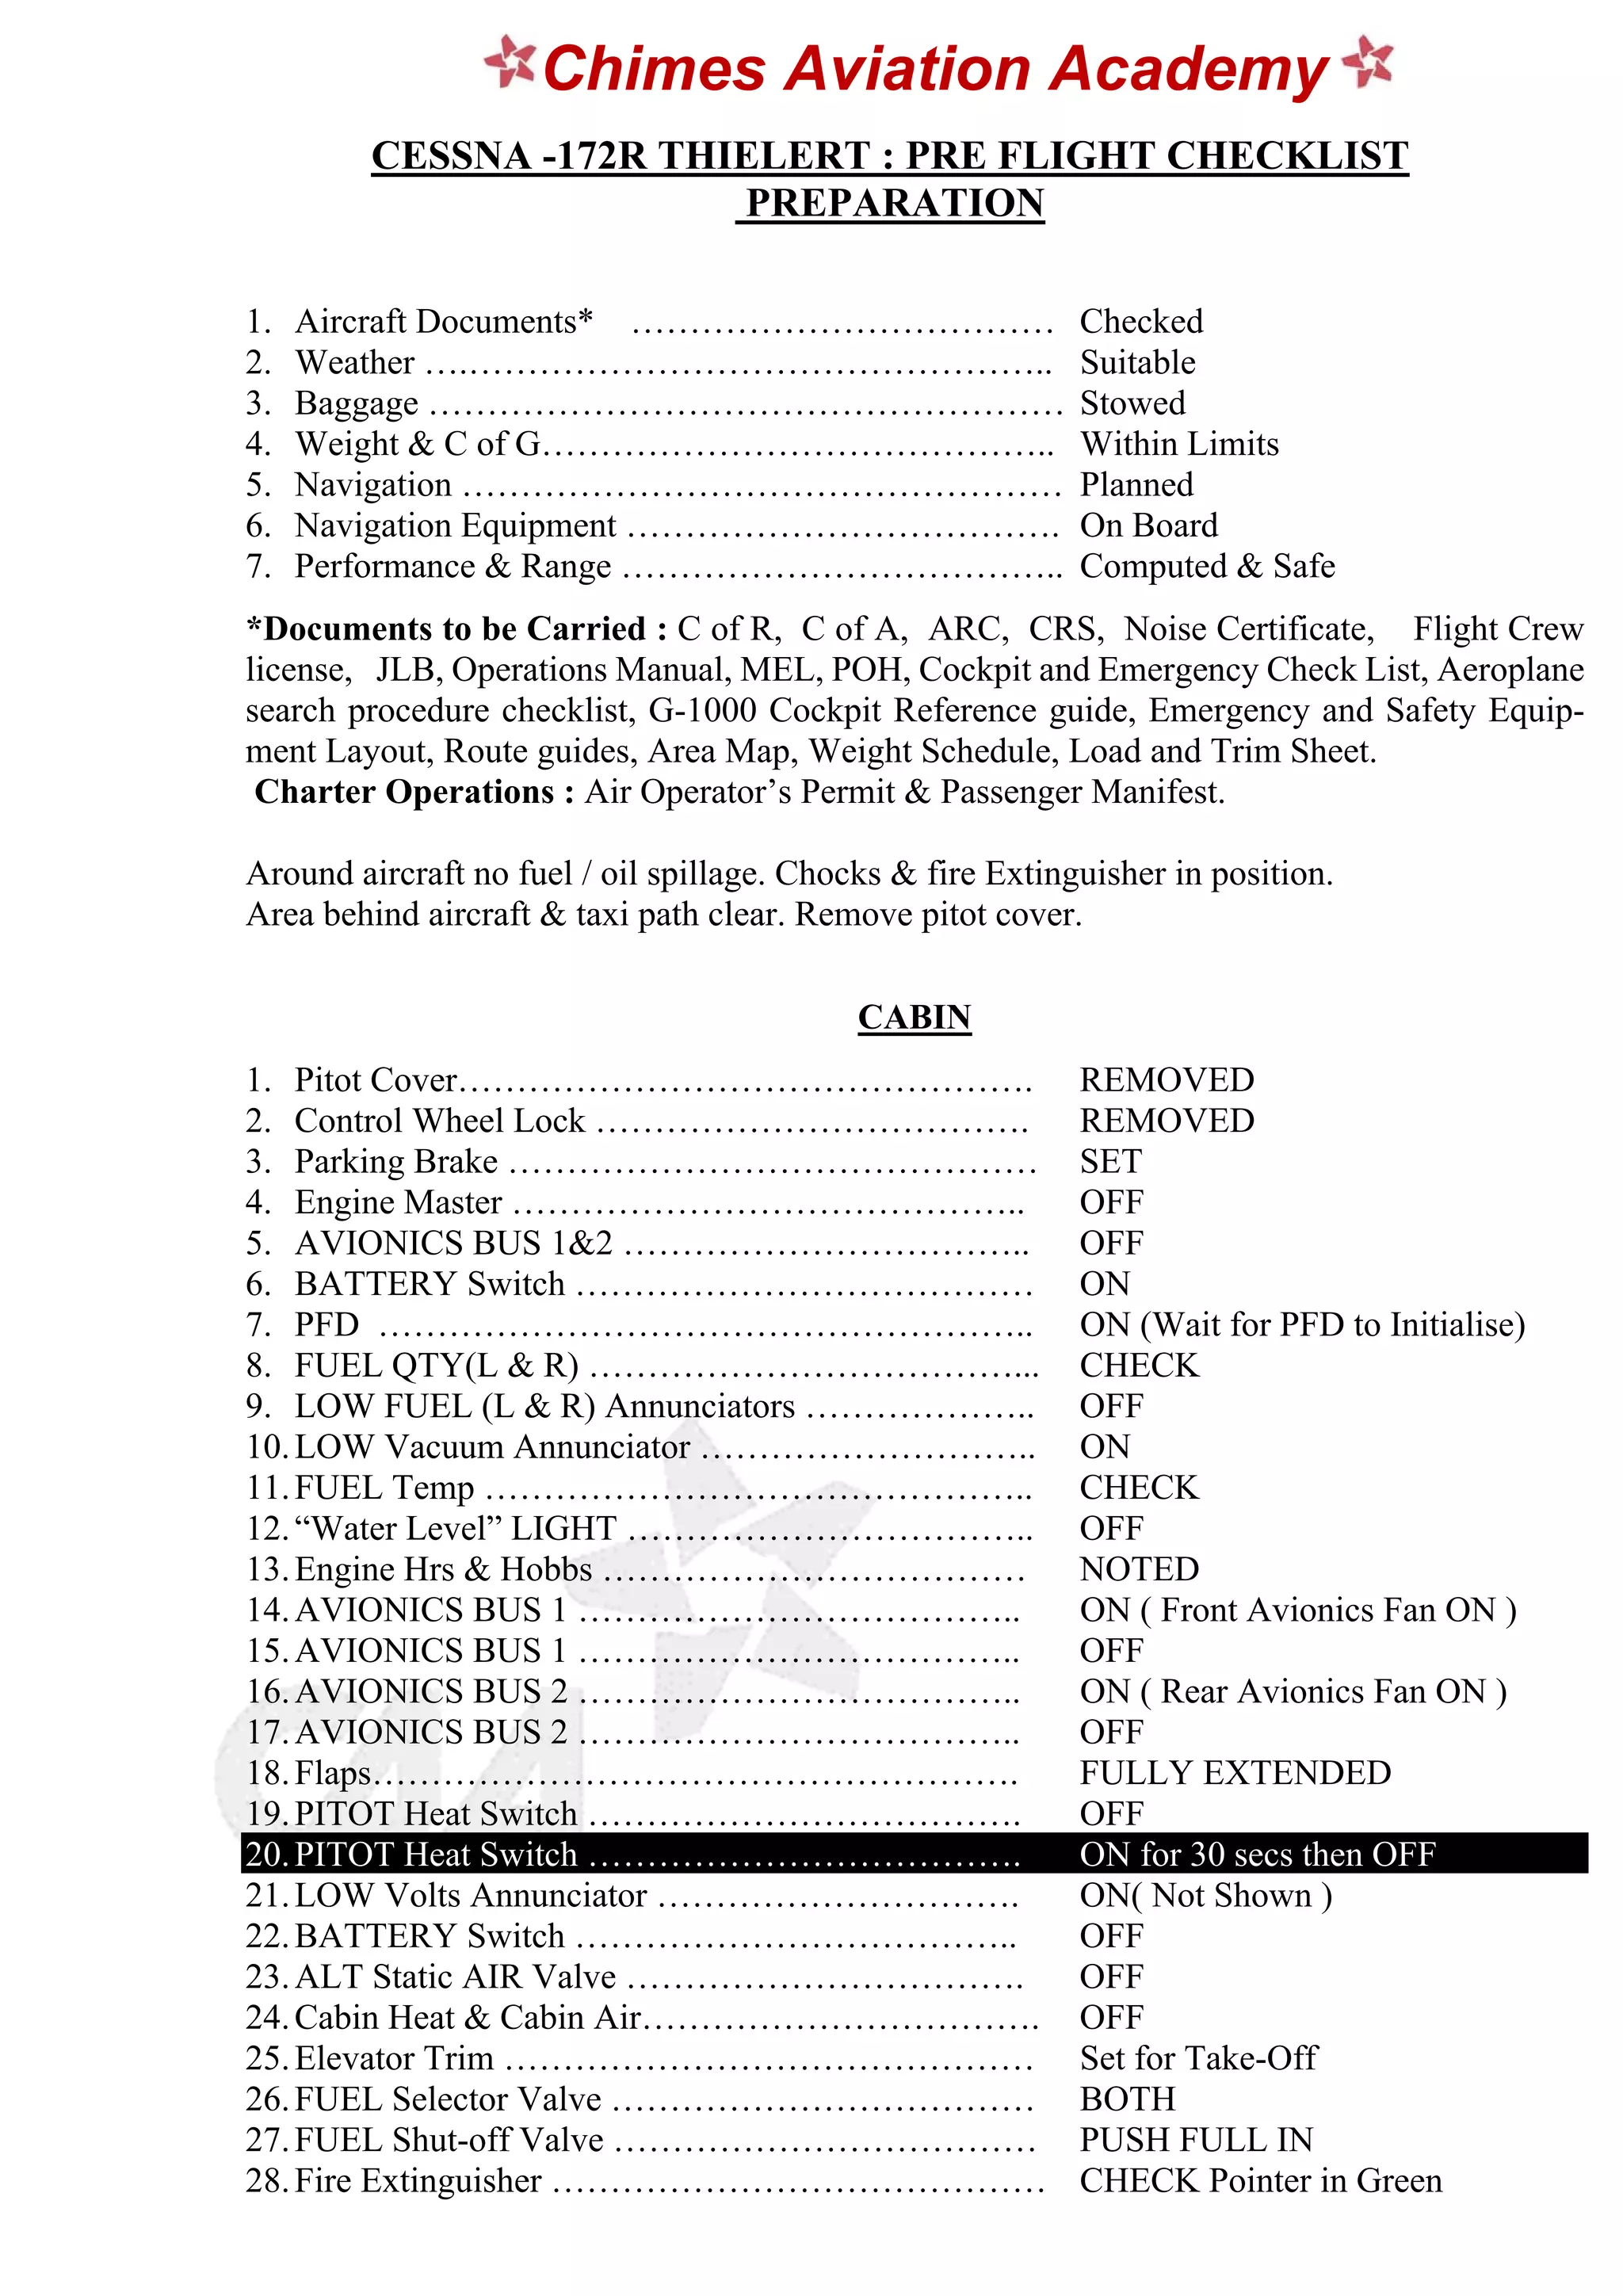
The inspection begins in the cabin by verifying that the ignition switch is off, the master switch is on to check fuel quantity indicators, and then the master switch is turned off again. The pilot then checks the empennage, inspecting the horizontal stabilizer, elevators, vertical fin, and rudder for structural cracks, loose rivets, and secure hinge attachments. Static system vents must remain clear of obstructions or insect nests.
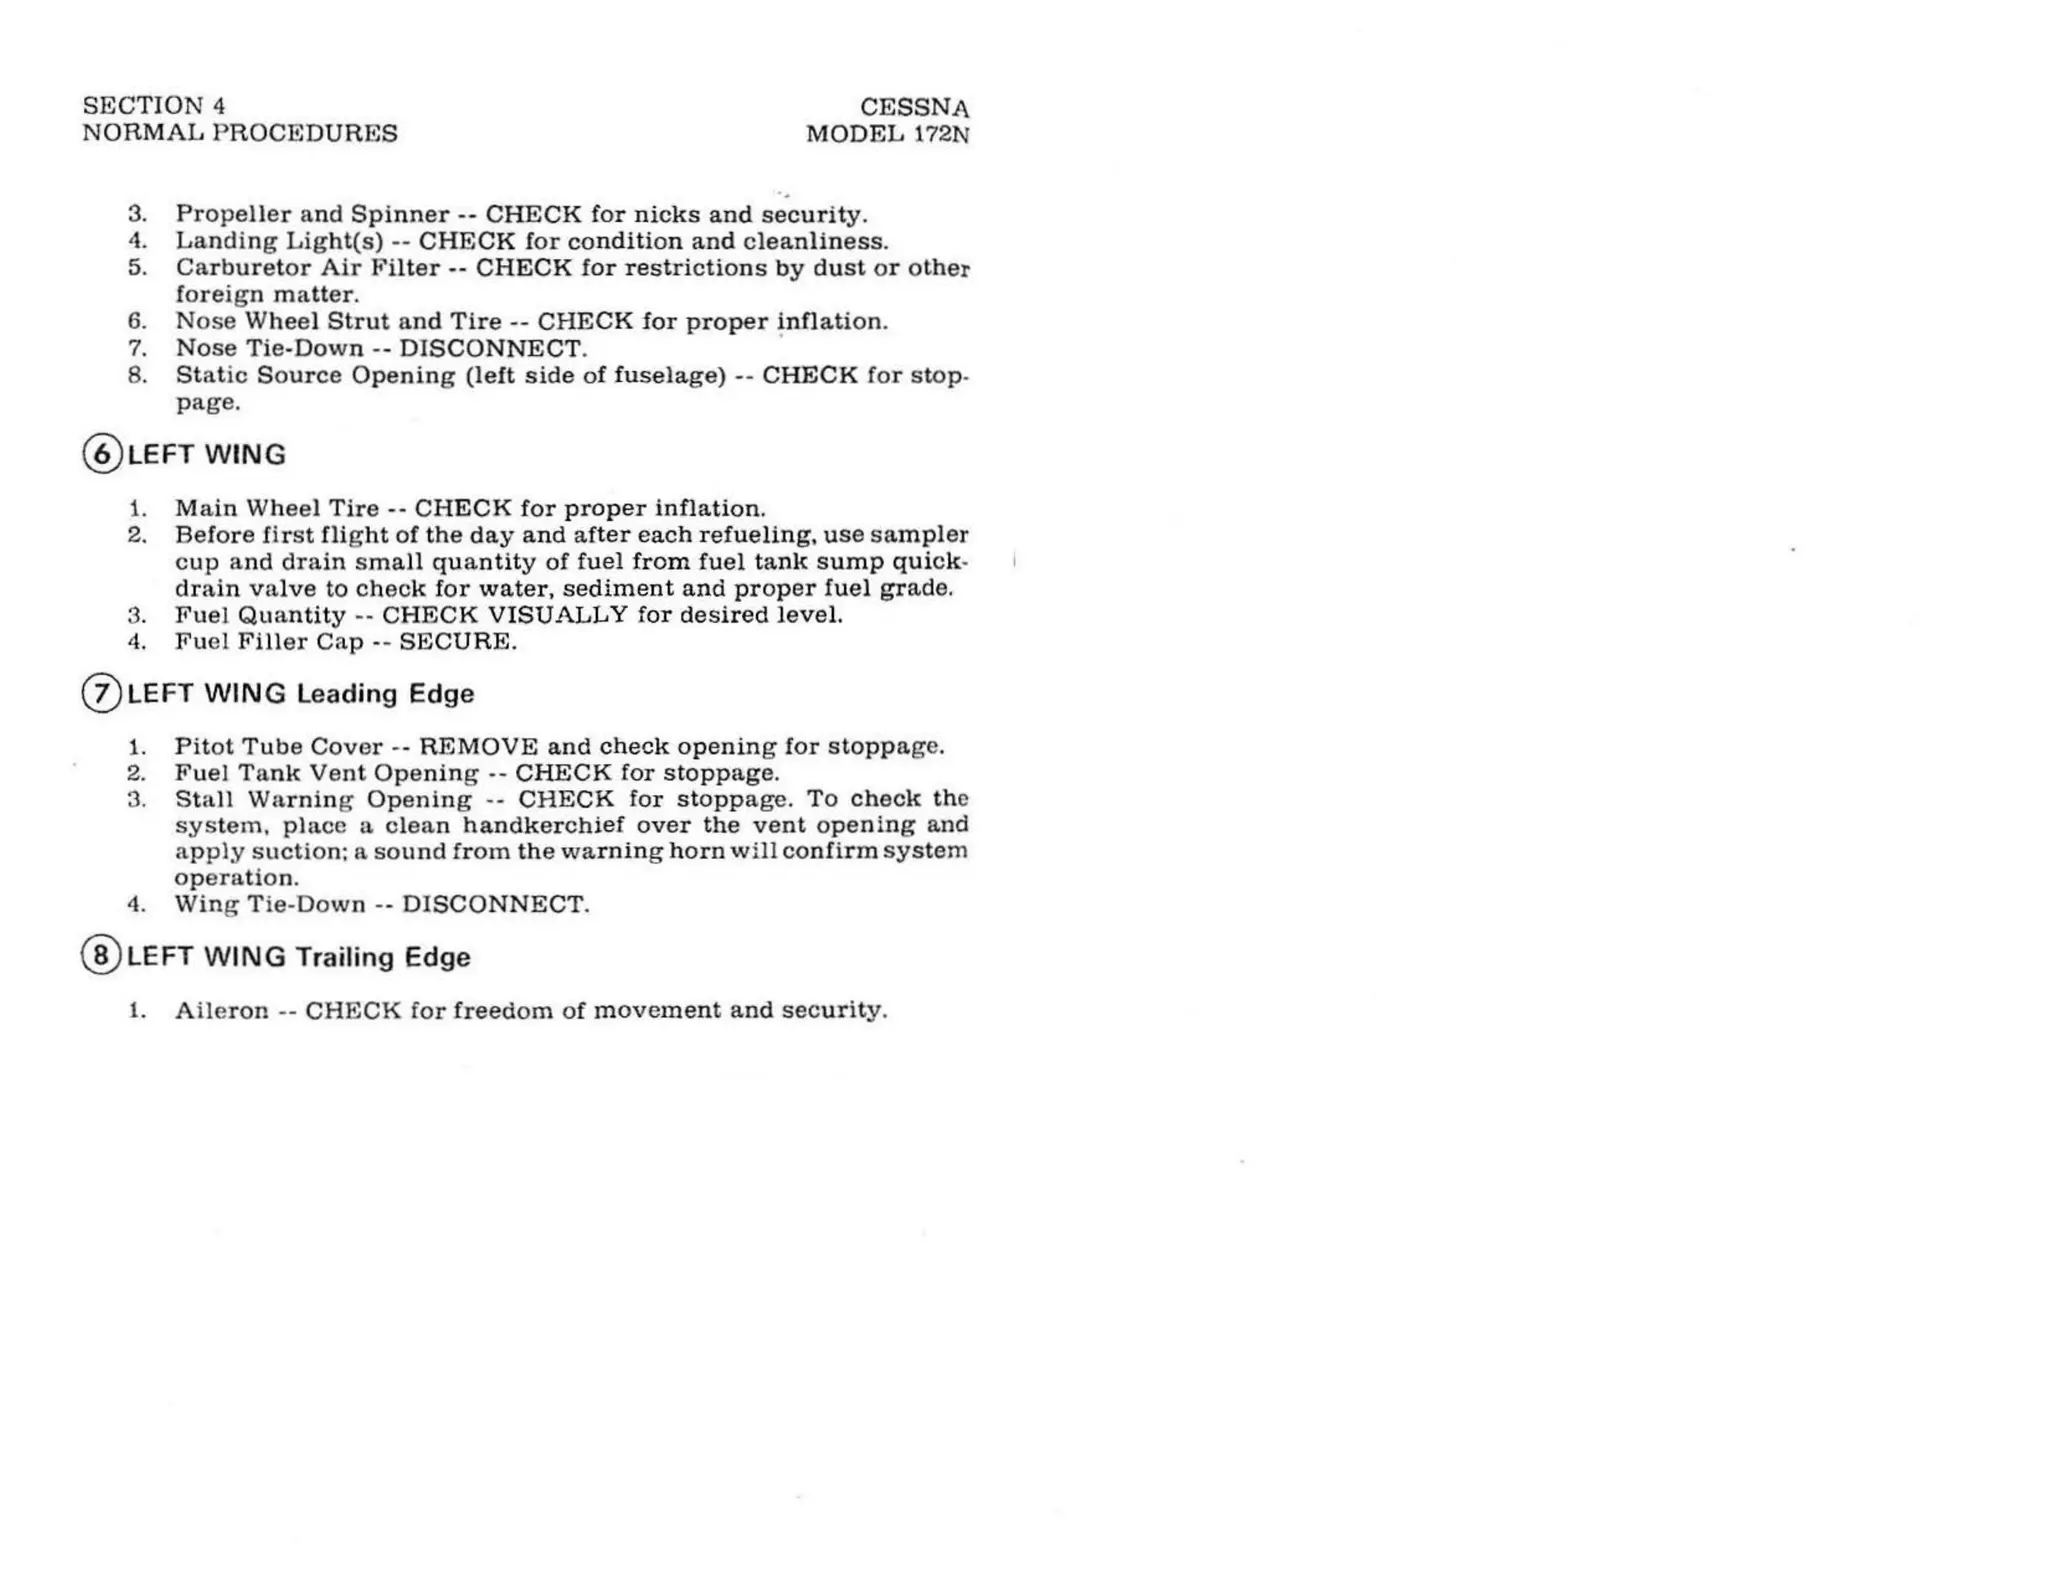
Moving to the wings, the pilot examines the fuel tank vents, fuel caps, and tie-down loops. A vital task during this phase is sump draining. Using a fuel strainer, the pilot draws samples from the wing tanks and the fuel strainer valve located beneath the fuselage. This step detects water, sediment, or incorrect fuel grades—a contamination check that prevents engine starvation.
Landing Gear, Control Locks, and Powerplant
The landing gear assembly requires a close look at tire inflation pressures, brake line integrity, and strut extension. Any oil pooling or hydraulic leaks around the brake calipers must be addressed immediately. The control surfaces—ailerons and flaps—are checked for freedom of movement and security of hinges and pushrod connections.
At the front of the aircraft, the cowling houses the Lycoming engine. The oil dipstick must be removed and wiped clean, then reinserted to verify that oil levels meet the minimum operational threshold specified in the Pilot's Operating Handbook (POH). The propeller blades are inspected for nicks, cracks, or oil leaks around the hub. Finally, the air inlet filter must be checked for foreign object debris.
Step 2: Interior Setup, Cabin Security, and Electrical Architecture
Once the pilot and passengers are seated, the focus shifts inward. This phase prepares the cockpit environment, verifies ergonomics, and powers up the electrical bus in a controlled sequence to protect sensitive avionics from voltage spikes.
Seat Adjustment, Seatbelts, and Doors
Every occupant must secure their seatbelt and shoulder harness, adjusting them for comfort and absolute security. The pilot checks that all doors are fully closed and latched. In a high-wing aircraft like the Cessna 172, an unlatched door can pop open during takeoff roll, creating aerodynamic distraction and cabin noise that requires immediate return to land.
The control wheel freedom of movement is tested by sweeping the yoke through its full pitch and roll axis, ensuring no obstructions interfere with the cables. The rudder pedals are likewise pushed to ensure full travel without binding.
Avionics Master Management and Fuel Valves
Modern avionics suites, such as the Garmin G1000 integrated flight deck, are sensitive to electrical surges generated during engine ignition. Consequently, the standard procedure requires both the main Battery (BAT) and Alternator (ALT) master switches to be managed correctly, with the avionics master switch initially in the "OFF" position.
The fuel shutoff valve is verified to be in the "ON" position. Circuit breakers are scanned to ensure none have popped out unexpectedly. Setting the altimeter to the current local barometric pressure ensures accurate altitude reporting from the moment the aircraft moves.
Step 3: Engine Start Procedures and Initial Systems Monitoring
Starting an internal combustion aircraft engine requires a precise sequence of fuel priming, throttle positioning, and starter engagement. Deviating from this sequence can lead to flooded cylinders, starter motor damage, or engine fires.
Priming and Ignition Sequence
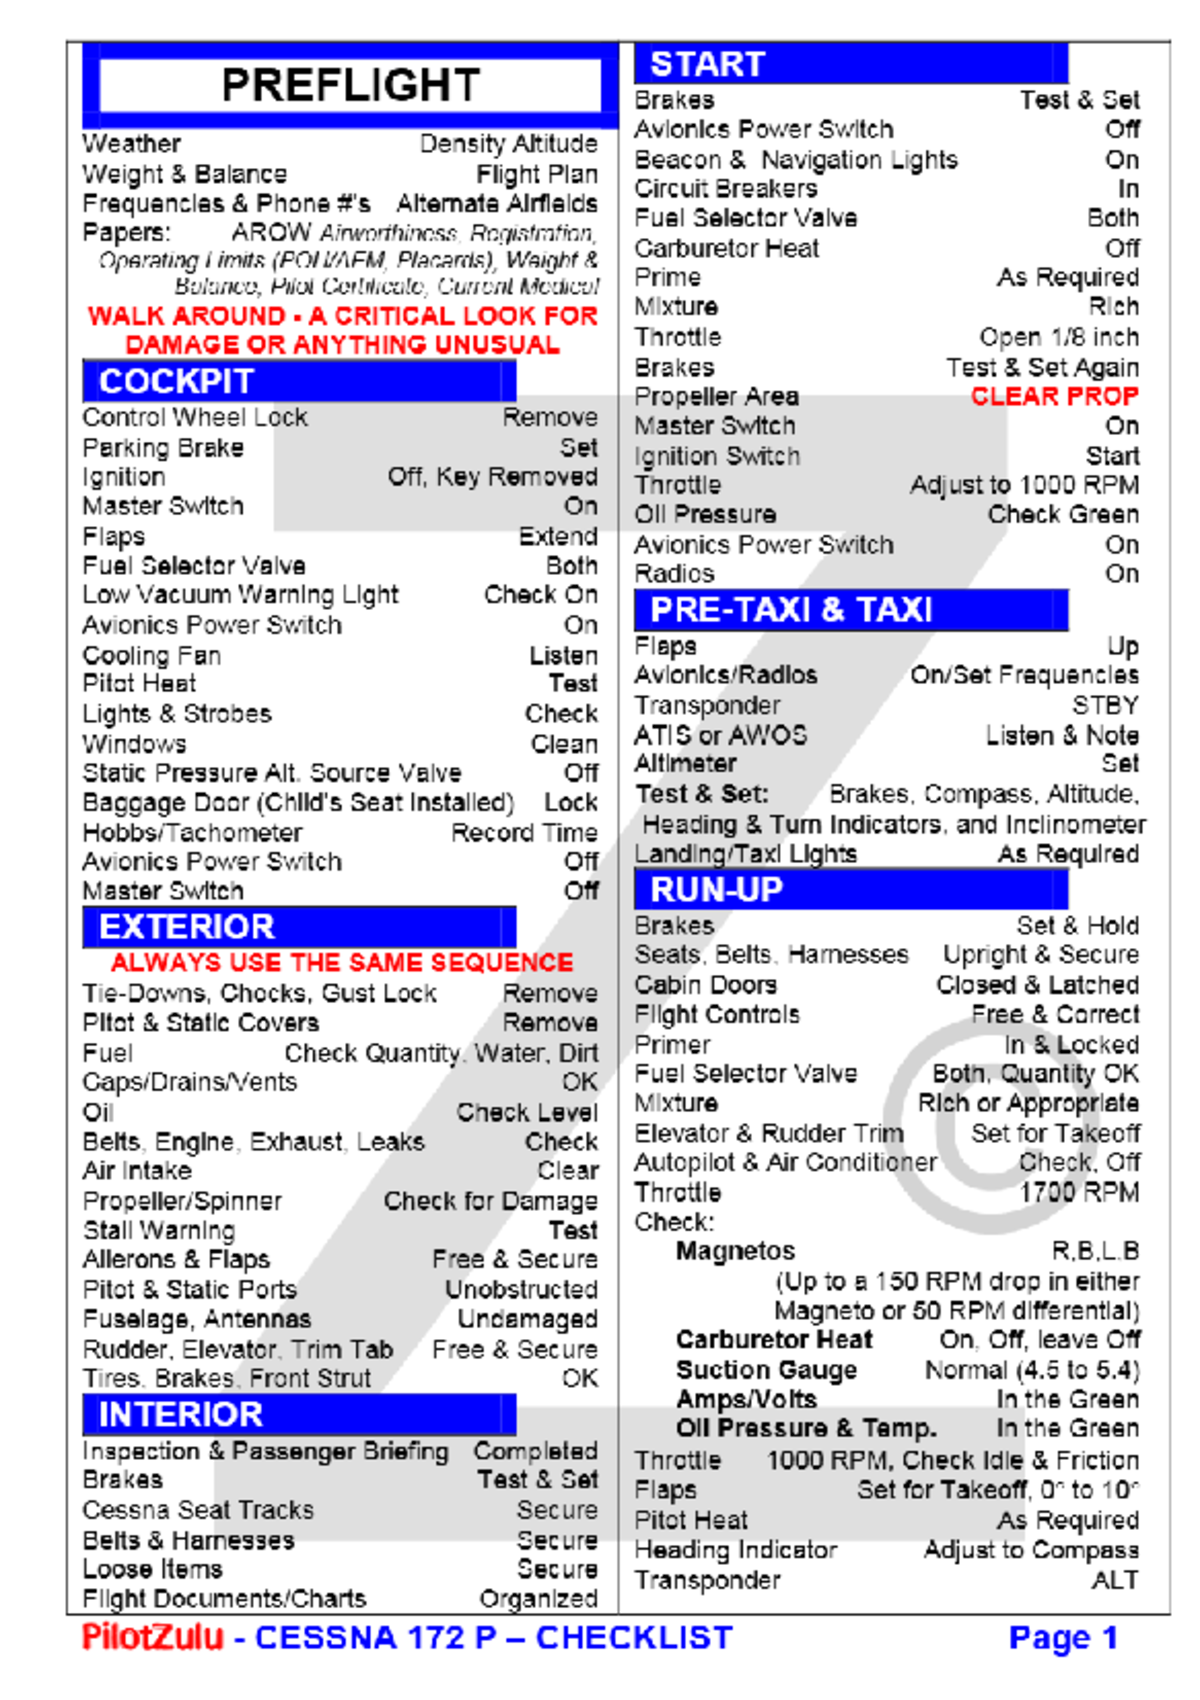
Depending on whether the engine is cold, warm, or equipped with fuel injection versus a carburetor, the priming technique varies. For a carbureted Cessna 172, the throttle is opened approximately one-quarter inch, the mixture is pushed to rich, and the auxiliary fuel pump (if electric) or manual primer is utilized to introduce fuel to the intake manifold.
| System Component | Initial Setting / Action |
|---|---|
| Master Switch | ON (to check fuel quantity, then OFF if needed) |
| Avionics Master | OFF (protected against transient voltage) |
| Fuel Shutoff Valve | ON |
| Mixture | RICH (or leaned for density altitude if high) |
| Propeller Area | CLEAR (verbal warning shouted before cranking) |
Once the area is visually scanned and cleared by shouting "Clear prop!", the key is rotated to the "START" position. As the engine catches, the pilot immediately releases the key to the "BOTH" ignition position and monitors the oil pressure gauge.
Oil Pressure Verification and Post-Start Checks
Within 30 seconds of engine start in summer (or up to 60 seconds in cold winter conditions), the oil pressure gauge must register in the green arc. Failure to observe rising oil pressure demands immediate engine shutdown to prevent catastrophic bearing failure.
With the engine running smoothly at an idle speed of approximately 1,000 RPM, the avionics master switch is turned on. Radios, transponders, and navigation systems initialize. The alternator output is verified by checking the ammeter or electrical page on the multi-function display to ensure the battery is charging.
Step 4: The Pre-Takeoff Run-Up Routine
The run-up is a stationary diagnostic test performed just prior to entering the active runway. Its purpose is to stress-test the ignition system, verify engine parameters, and ensure all flight controls remain responsive before committing to flight.
Magneto Checks and Carburetor Heat
The aircraft is taxied to the run-up area and positioned facing into the wind to assist with engine cooling. The parking brake is firmly set. The throttle is advanced to 1,700 RPM.
The primary diagnostic performed here is the magneto check. The ignition switch is turned from "BOTH" to "L" (Left magneto), noting the RPM drop on the tachometer. The switch is returned to "BOTH," then switched to "R" (Right magneto), noting the drop. A normal drop should not exceed 150 RPM, and the differential between left and right should not exceed 50 RPM. This verifies that both independent ignition systems and their respective spark plugs are functioning correctly.
Next, carburetor heat is pulled to the "ON" position (on carbureted models). A slight drop in RPM indicates that heated air is entering the intake, confirming that the carburetor heat muff is operating correctly and clearing any potential ice. The control is then pushed back to cold. Suction gauges, engine temperatures, and fuel flow indicators are scanned to ensure all values remain safely within green arcs.
Flight Controls and Trim Settings
With the engine proving healthy, the pilot reviews flight controls a final time: ailerons, elevators, and rudder are moved through their full range while visually verifying that the control surfaces respond correctly in the slipstream. The elevator trim wheel is set to the takeoff position, usually marked on the cabin indicator, and flaps are configured for takeoff (typically 0 to 10 degrees depending on runway length and obstacle clearance requirements).
Step 5: Final Line-Up and Takeoff Clearance Verification
The final step bridges ground operations and flight. This concise verification ensures that no missed items compromise the aircraft during the critical transition of takeoff roll and initial climb.
The Final Checklist Scan
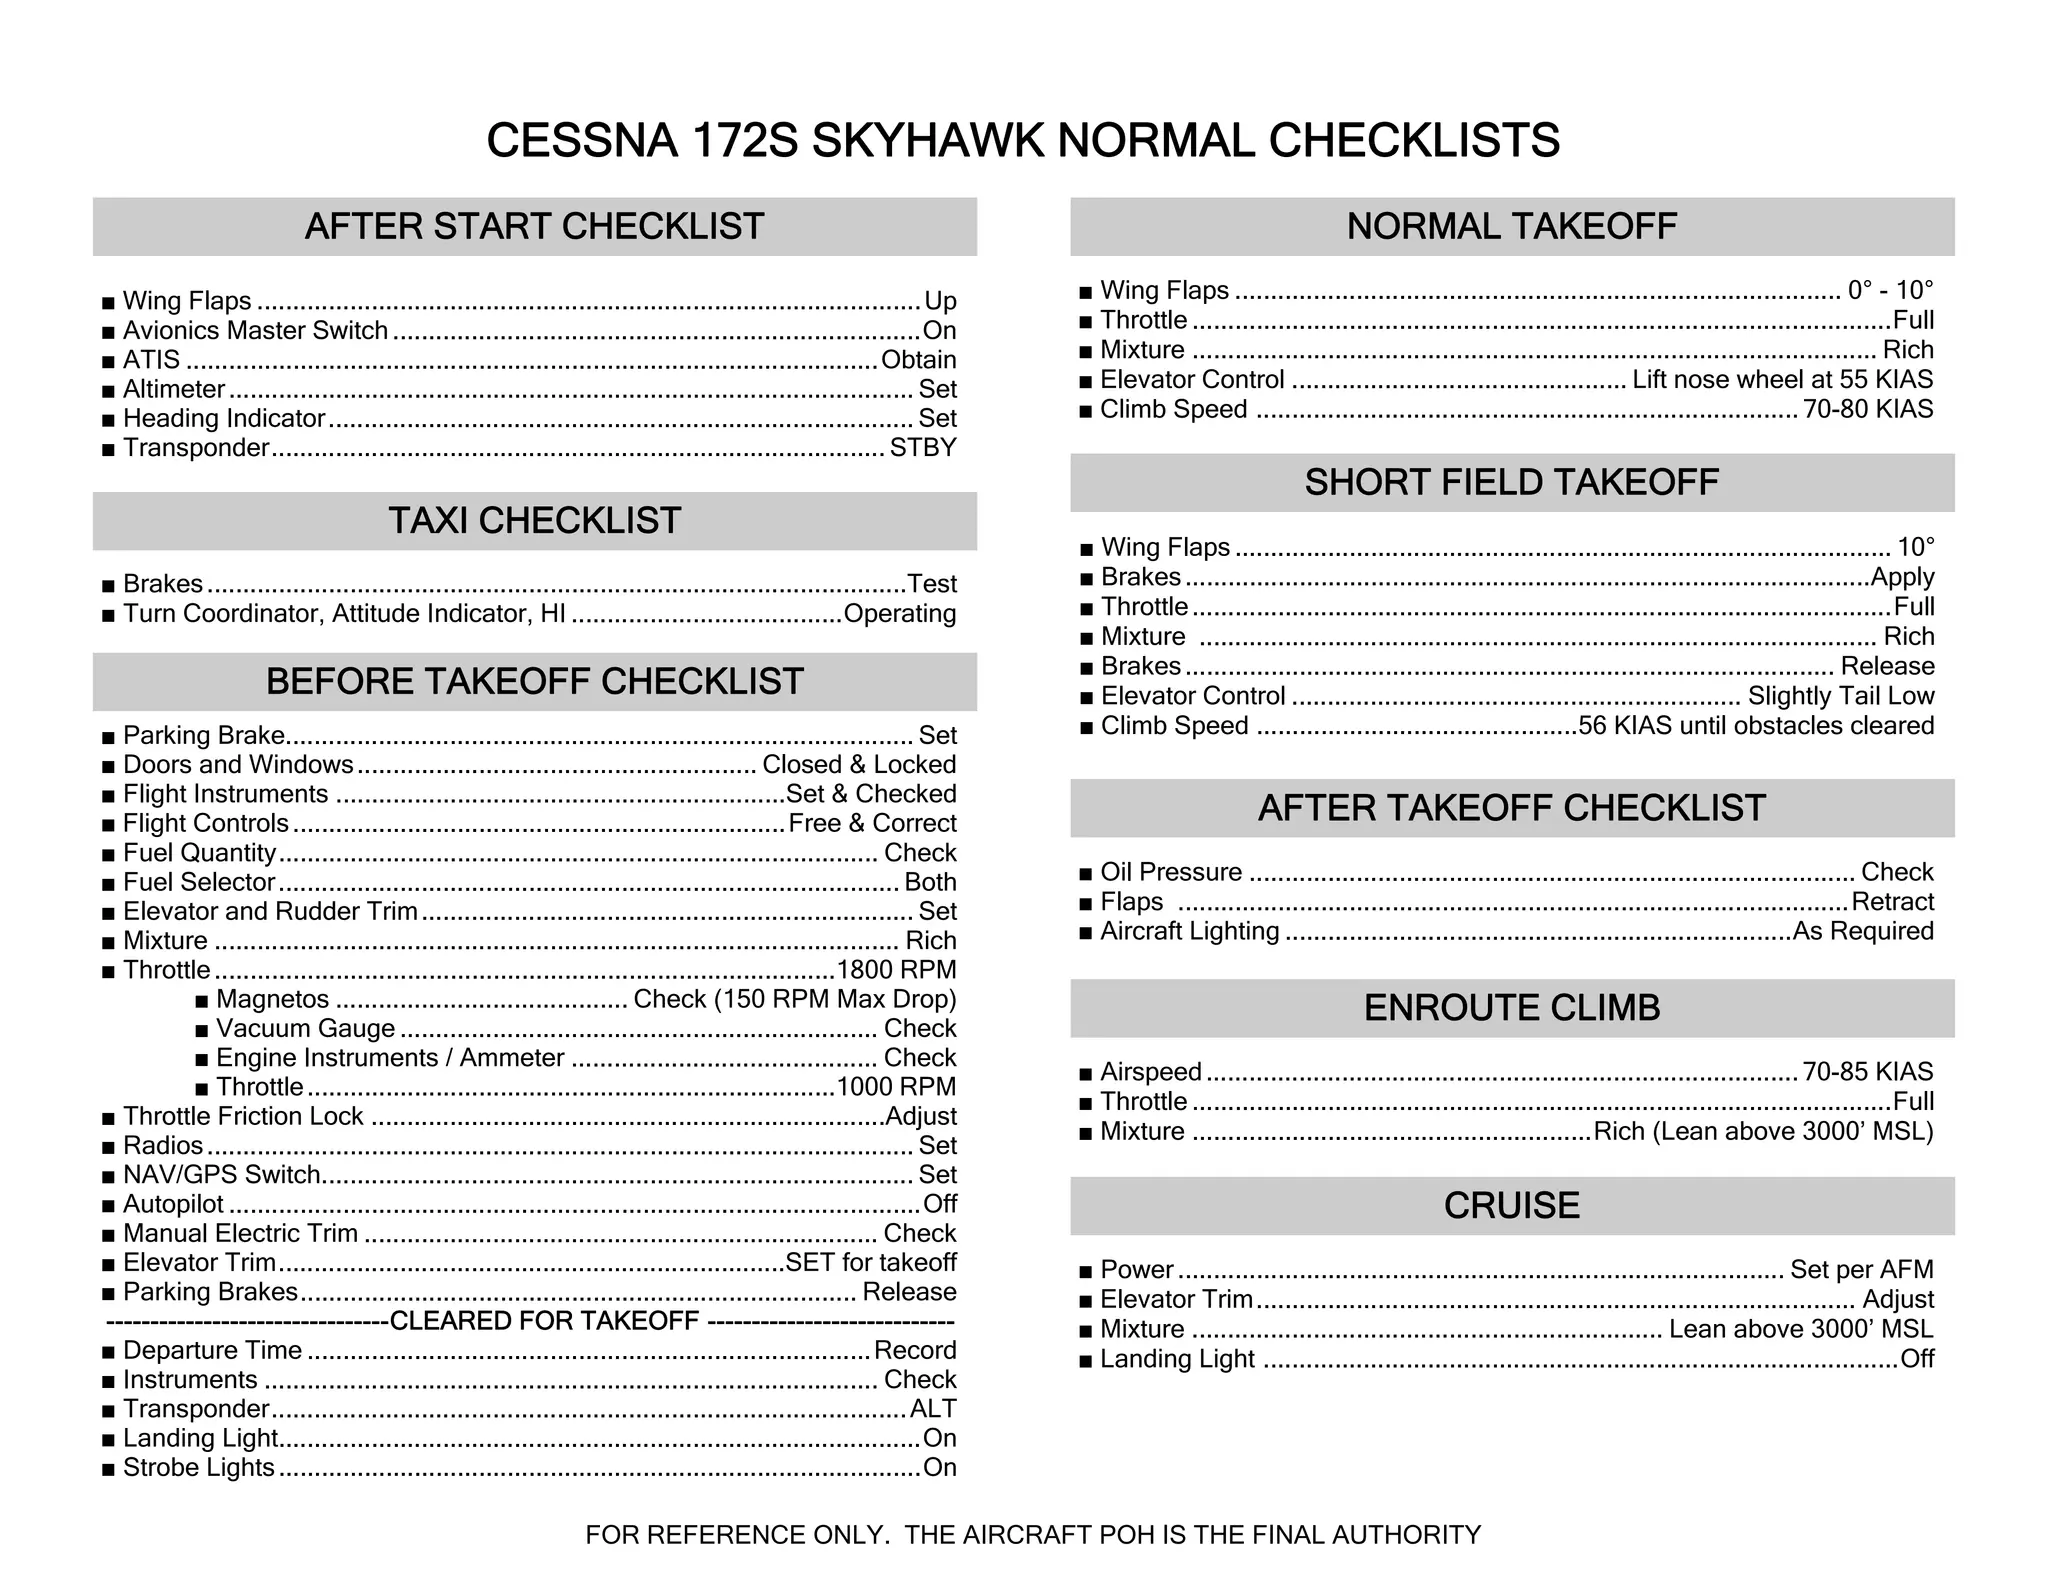
Before rolling onto the active runway, the pilot completes a final memory or card-based scan:
- Doors and Windows: Closed and locked.
- Flight Instruments: Altimeter verified against field elevation, heading indicator aligned with compass.
- Engine Instruments: Temperatures and pressures in the green.
- Radios and Navigation: Departure frequency set, transponder set to altitude-reporting mode (ALT).
- Lighting: Landing lights, strobe lights, and beacon turned on for visibility.
- Takeoff Briefing: A quick verbal confirmation of runway length, abort criteria, and initial climb profile.
Once clearance is received from air traffic control or verified clear on a un-controlled CTAF frequency, the aircraft is aligned with the centerline, brakes are released, and smooth, full throttle is applied.
Frequently Asked Questions
What happens if oil pressure does not rise after starting a Cessna 172?
If oil pressure does not enter the green arc within 30 seconds of engine start, the engine must be shut down immediately. Operating an aviation engine without adequate oil pressure destroys internal components within seconds due to metal-on-metal friction.
Why is the avionics master switched off during engine start?
The starter motor draws heavy electrical current, which can cause voltage spikes or fluctuations in the aircraft's electrical bus. Leaving sensitive avionics powered on during this transient phase risks damaging expensive navigation and communication equipment.
How often should fuel be sumped during preflight checks?
Fuel should be sumped during every preflight inspection before the first flight of the day, and after any refueling operation. This ensures that any condensation, water, or particulate contamination introduced into the tanks is caught before entering the engine fuel system.
What is the purpose of the magneto check during the run-up?
The magneto check verifies the redundancy of the dual ignition system. Because aircraft engines rely on two independent magnetos powering two spark plugs per cylinder for safety and efficient fuel burn, isolating each magneto proves that the engine will continue running smoothly if one system fails.
Are checklists mandatory for private pilots in a Cessna 172?
While regulations vary slightly by jurisdiction, standard operating practices and Federal Aviation Administration (FAA) guidelines strongly emphasize checklist usage. Pilot proficiency examiners and insurance underwriters require adherence to checklists during all phases of flight.
Conclusion and Operational Recommendation
Executing the 5 key steps in a cessna 172 checklist—preflight inspection, interior setup, engine start, run-up, and final alignment—forms the foundation of safe, professional aviation. Pilots should never rely on memory alone, regardless of their total flight hours. Print or digitally display the manufacturer-approved POH checklist and integrate it into a disciplined cockpit routine to ensure every flight begins with total mechanical and operational confidence.