The 2017 Honda Civic EX requires a spin-on oil filter engineered with an M20x1.5 thread pitch, an internal pressure bypass valve, and an anti-drainback valve. Selecting the correct oil filter and understanding fluid capacities—4.4 quarts for the 2.0L engine and 3.7 quarts for the 1.5L Turbo—ensures long-term engine durability and optimal performance.
Understanding the 2017 Honda Civic EX Engine Options
Maintaining a 10th-generation Honda Civic requires precise technical knowledge because the EX trim was manufactured with two distinct engine configurations depending on the body style. While both engine options use the same fundamental filter mounting thread pitch, their operating environments and thermal requirements differ.
| 2.0L Naturally Aspirated (K20C2) | 1.5L Turbocharged (L15B7) |
|---|---|
| - Body: Sedan / Coupe | - Body: Hatchback / EX-T |
| - Capacity: ~4.4 Quarts 0W-20 | - Capacity: ~3.7 Quarts |
| - Thread: M20 x 1.5 mm | - Thread: M20 x 1.5 mm |
2.0L Naturally Aspirated Inline-4 (K20C2)
Found standard in the 2017 Honda Civic EX Sedan and EX Coupe, the K20C2 is a 2.0-liter naturally aspirated 4-cylinder engine using port fuel injection and Honda's i-VTEC system. This engine generates 158 horsepower and holds approximately 4.4 US quarts (4.2 liters) of engine oil when changing both the oil and filter. The operating temperatures in the 2.0L engine remain relatively stable, placing standard mechanical demands on the oil filtration media.
1.5L Turbocharged Direct-Injection Inline-4 (L15B7)
Found in the 2017 Honda Civic EX Hatchback and EX-T variants, the L15B7 is a 1.5-liter turbocharged, direct-injected 4-cylinder engine generating 174 horsepower. This engine holds 3.7 US quarts (3.5 liters) of oil during a filter change. Turbocharged engines introduce elevated thermal stress, higher internal shaft speeds, and increased potential for fuel dilution in cold weather. As a result, maintaining a rigid oil filter replacement schedule with premium filtration media is vital for protecting the turbocharger bearings.
Technical Specifications of the 2017 Honda Civic EX Oil Filter
When purchasing an oil filter for the 2017 Honda Civic EX, generic parameters are insufficient. Engine safety depends on specific physical dimensions, pressure ratings, and internal valving.
OIL FILTER INTERNAL ARCHITECTURE
- Threaded Base Plate (M20 x 1.5 mm Threads)
- Anti-Drainback Valve (Silicone or Nitrile Gasket)
- Pleated Synthetic Media (Captures 20-Micron Debris)
- Bypass Valve Relief Spring (Rated at 9-15 PSI)
Thread Size and Mounting Pitch
The mounting hub on both the 2.0L and 1.5L Turbo engine blocks uses an M20 x 1.5 mm metric thread pattern. Installing a filter with non-metric or mismatched thread pitches can strip the threads on the engine block mounting stud, leading to severe oil leaks and expensive mechanical repairs.
Bypass Valve Pressure Rating
Engine oil filters include an internal bypass valve designed to open when the differential pressure across the filter media becomes too high. This ensures that the engine is never starved of lubrication during cold starts when oil is thick, or if the filter becomes clogged with contaminants.
- Target Rating: The internal relief valve for the 2017 Honda Civic EX is typically rated between 9 PSI and 15 PSI (nominal 12–14 PSI).
- Function: If pressure exceeds this threshold, the valve spring compresses, permitting oil to bypass the filtration element directly into the main gallery to maintain lubrication pressure.
Anti-Drainback Valve (ADBV) Materials
The anti-drainback valve is a flexible rubber flapper memory seal positioned inside the inlet holes of the filter baseplate. Its purpose is to prevent engine oil from draining out of the filter housing back into the oil pan when the engine is turned off.
- Nitrile Rubber: Commonly used in entry-level or budget oil filters. Nitrile can dry out, harden, and lose its seal over extended high-heat duty cycles.
- Silicone: Preferred for modern synthetic oil change intervals. Silicone remains pliable at extreme temperatures, preventing "dry starts" where engine components temporarily run without immediate oil pressure upon ignition.
Filter Media Composition and Micron Efficiency
Oil filter media determines what particle sizes are captured during circulation:
- Cellulose Media: Made from natural wood fibers, suitable for short intervals (up to 3,000–5,000 miles).
- Synthetic Blend Media: Combines synthetic glass fibers with cellulose to increase capacity up to 7,500 miles.
- Full Synthetic Micro-Glass Media: Features engineered synthetic mesh that captures particles down to 20 microns with 99% efficiency. Full synthetic media offers low flow resistance and is strongly recommended for 10th-generation Civics running 0W-20 full synthetic oils.
OEM vs. Aftermarket Oil Filter Options
Choosing between Original Equipment Manufacturer (OEM) parts and high-quality aftermarket equivalents depends on budget, oil change intervals, and driving conditions.
| Feature | OEM Honda | Premium Synthetic |
|---|---|---|
| Filter Media | Synthetic Blend | Full Microglass |
| Anti-Drainback | Nitrile/Silicone | Molded Silicone |
| Base End Caps | Fiber/Stamped | Stamped Metal |
| Rated Interval | Maintenance Mind. | 10,000+ Miles |
Genuine OEM Honda Oil Filters
Honda distributes primary OEM part numbers that fit the 2017 Civic EX platform:
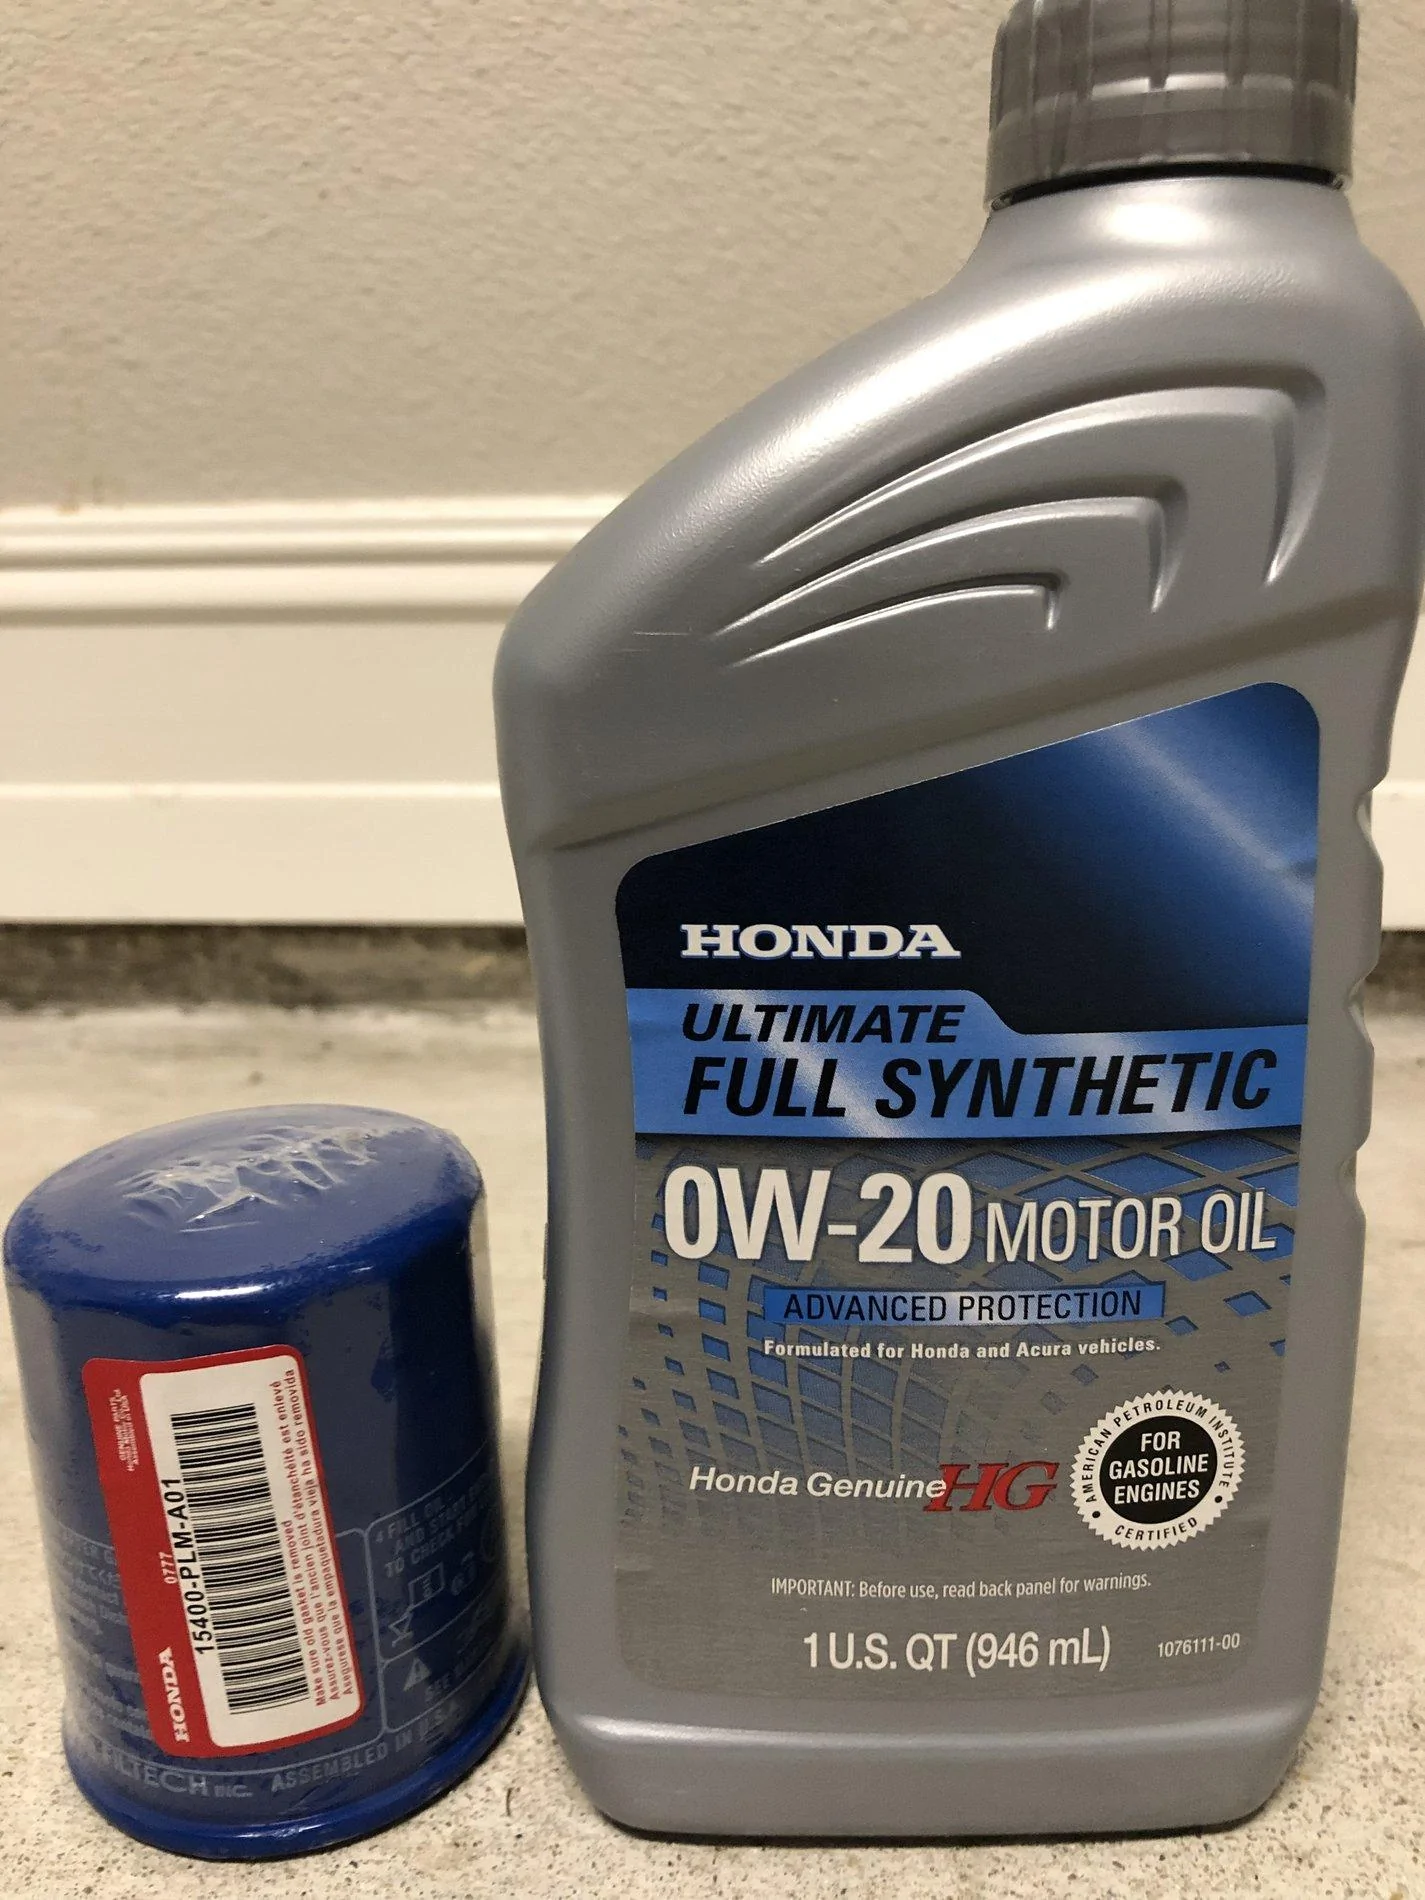
- Honda P/N 15400-PLM-A02: Manufactured under contract by Honeywell/Fram. Uses a combination synthetic-cellulose media with a cardboard/fiber end-cap structure. It is reliable for standard Maintenance Minder intervals.
- Honda P/N 15400-PLM-A01: Manufactured by Filtech. Features metal end caps and higher-density media, widely favored by Honda enthusiasts. (Availability varies as supply transitions primarily to A02).
Top Aftermarket Filter Alternatives
If OEM filters are unavailable or if you prefer extended-life filtration components, several aftermarket filters meet or exceed Honda engineering requirements:
- Wix 57356 / Wix XP 57356XP: Features a silicone anti-drainback valve, heavy-duty center tube, and high dirt-holding capacity. The XP variant is designed specifically for full synthetic oils.
- Mobil 1 M1-110A: Designed for extended drain intervals up to 10,000 or 20,000 miles, utilizing synthetic fiber filter media rated at 99% efficiency for particles larger than 30 microns.
- Fram Ultra Synthetic XG7317: Features dual-layer synthetic media, metal end caps, a silicone anti-drainback valve, and a textured non-slip grip coating on the outer shell for easy installation.
- Bosch 3323 / Distance Plus D3323: Incorporates high-density media designed to hold significantly more debris than standard conventional filters.
Tools, Hardware, and Safety Preparation
Before lifting the vehicle or removing oil drainage hardware, gather the appropriate tools to ensure a safe, efficient maintenance procedure.
REQUIRED MAINTENANCE TOOLS
- 17mm Socket (Drain Plug)
- 65mm Filter Wrench (Filter Removal)
- Flathead Screwdriver (Splash Shield Clips)
- Torque Wrench (29-30 lb-ft)
- 14mm Crush Washer (P/N 94109-14000)
- Floor Jack & Stands (Vehicle Safety)
Tool Checklist
- Floor Jack and Rated Jack Stands (or heavy-duty drive-on ramps). Never work under a car supported solely by a hydraulic jack.
- Wheel Chocks for the rear tires.
- 17mm Socket and Ratchet for the engine oil drain plug.
- 65mm 14-Flute Oil Filter Socket Cap or end-cap filter wrench (strap wrenches or adjustable oil filter pliers may also be used).
- Flat-Head Screwdriver or trim clip removal tool to remove splash guard push-pins.
- Phillips Screwdriver or 10mm socket for metallic underbody shield fasteners.
- Drain Pan with a minimum capacity of 6 US quarts.
- Torque Wrench capable of measuring 10–30 lb-ft (13–40 Nm).
- Clean Shop Rags and nitrile gloves.
Required Hardware
- Engine Oil: 0W-20 Full Synthetic Oil meeting API Service SP / ILSAC GF-6A specifications.
- New Drain Plug Washer: 14mm aluminum crush washer (Honda OEM Part Number 94109-14000). Replacing this washer during every oil service prevents slow oil pan seepage.
Step-by-Step Oil Filter Replacement Procedure
Follow these step-by-step instructions to safely drain old engine oil and install a new oil filter on a 2017 Honda Civic EX.
- Warm engine, lift vehicle safely on stands.
- Remove splash shield access panel underneath.
- Drain oil via 17mm bolt; replace washer.
- Remove oil filter; check gasket on engine base
- Lube new filter O-ring; install to contact+3/4
- Refill oil, test start, check for leaks.
1. Vehicle Elevation and Setup
- Park the vehicle on a flat, level concrete surface.
- Run the engine for 2 to 3 minutes to bring the engine oil up to operating temperature. Warm oil flows more freely and carries suspended contaminants out of the crankcase.
- Turn off the ignition, set the parking brake, and place wheel chocks behind the rear tires.
- Elevate the front of the vehicle using an approved automotive jack point and lower the car onto jack stands. Confirm stability before moving beneath the vehicle.
2. Underbody Splash Shield Removal
The 10th-generation Civic features an aerodynamic aluminum and plastic underbody shield covering the engine sump and oil filter area.
- Locate the quarter-turn metal screws on the underside of the splash shield.
- Use a flat-head or Phillips screwdriver to rotate the quarter-turn fasteners counterclockwise until released.
- Remove any plastic push-rivets securing the access door using a trim clip tool or flat-head screwdriver.
- Set the shield panel aside in a clean location.
3. Draining the Crankcase
- Position your drain pan directly beneath the engine oil pan drain plug.
- Using a 17mm socket and ratchet, turn the drain plug counterclockwise to loosen it.
- Unscrew the plug by hand, maintaining inward pressure until the last thread releases, then pull the bolt clear to avoid hot oil splashing onto your hands.
- Allow the oil to drain completely for 5 to 10 minutes until it slows to an intermittent drip.
- Remove the old aluminum crush washer from the drain bolt. Slide a fresh 14mm aluminum crush washer onto the bolt.
- Thread the drain bolt back into the oil pan by hand to avoid cross-threading. Tighten with a torque wrench to 29–30 lb-ft (39–40 Nm).
4. Oil Filter Removal and Surface Inspection
- Position the drain pan directly under the oil filter housing located on the lower engine block.
- Attach your 65mm filter socket or filter wrench and turn the old filter counterclockwise to break the initial friction seal.
- Allow residual oil to trickle down into the pan before fully unscrewing the filter by hand.
- Lower the filter downward into the pan, keeping the top facing upward to minimize spills.
CRITICAL STEP: Look closely at the mounting pad on the engine block. Verify that the old rubber filter O-ring gasket came off with the old filter casing. If the old gasket remains stuck to the engine face (a condition known as "double gasketing"), scrape or peel it off completely. Installing a new filter over an old gasket will cause immediate loss of oil pressure and severe engine damage upon startup.
5. Installing the New Oil Filter
- Wipe the metal mounting pad on the engine block clean using a fresh, lint-free shop rag. Check for dirt, grit, or aluminum burrs.
- Open your new oil filter. Take clean engine oil on your gloved fingertip and apply a thin coating across the top surface of the new rubber O-ring gasket. This lubrication prevents the rubber from twisting or bunching up during installation and guarantees an airtight seal.
- Pour a small amount of clean 0W-20 oil into the center of the filter (filling it roughly 1/3 full). This helps establish oil pressure faster during startup.
- Align the center threads of the new filter with the engine spindle thread carefully by hand. Spin the filter clockwise until the rubber gasket makes initial contact with the clean metal mounting face on the block.
- Once contact is made, tighten the filter an additional 3/4 to 1 full turn by hand. If using a specialized torque wrench socket, torque the filter to 8.7 to 12 lb-ft (12 to 16 Nm). Over-tightening will distort the O-ring or crush the filter casing, making future removal extremely difficult.
6. Refilling Oil, Leak Check, and Shield Installation
- Lower the vehicle off the jack stands so it sits level on the ground.
- Remove the engine oil filler cap located on top of the valve cover.
- Using a clean funnel, add fresh 0W-20 Full Synthetic Oil:
- 2.0L NA Engine: ~4.4 US Quarts
- 1.5L Turbo Engine: ~3.7 US Quarts
- Reinstall the oil filler cap. Start the engine and let it idle for 30 to 60 seconds. Check that the oil pressure light on the instrument cluster turns off immediately.
- While the engine runs, look under the vehicle to confirm there are no leaks around the oil filter gasket or the drain bolt.
- Turn off the ignition, wait 3 minutes for oil to drain back into the pan, pull the dipstick, wipe it clean, reinsert it completely, and pull it out again to verify the oil level sits right at the upper mark.
- Elevate the front of the vehicle safely once more, reinstall the underbody splash shield using the quarter-turn fasteners and push pins, and lower the vehicle completely.
Resetting the Maintenance Minder System
After replacing the engine oil and filter on a 2017 Honda Civic EX, the vehicle's onboard Maintenance Minder system must be reset to track the new oil life cycle.
Turn Ignition to ON (Engine OFF).
Navigate to "Maintenance" screen on display.
Press and hold Enter/Reset for 10 seconds.
Scroll to "Item A/B" or "All Items".
Press and hold Enter to reset Oil Life to 100%
Sit in the driver's seat and turn the ignition switch to the ON (II) position (press the Engine Start/Stop button twice without pressing the brake pedal).
Use the left steering-wheel controls (or the touchscreen display on EX models equipped with Display Audio) to navigate to the Maintenance Minder screen.
Press and hold the ENTER button (or press and hold the trip reset knob on instrument cluster models) for approximately 10 seconds until the Maintenance Minder screen enters reset mode.
Scroll to select Item A/B or All Due Items, depending on which screen option is presented.
Press and hold the ENTER button for another 5 seconds until the displayed Oil Life resets to 100%. Turn the ignition off.
Maintenance Matrix and Technical Specifications
This quick-reference matrix synthesizes all key specifications and operating parameters for the 2017 Honda Civic EX oil filter and maintenance service.
| Component / Parameter | 2.0L NA Engine (K20C2) | 1.5L Turbo Engine (L15B7) | Technical Notes / Torque Spec |
|---|---|---|---|
| Engine Trim Standard | EX Sedan, EX Coupe | EX Hatchback, EX-T | Check VIN or engine cover to verify |
| Filter Thread Specification | M20 x 1.5 mm | M20 x 1.5 mm | Standard metric thread size |
| Bypass Valve Relief Pressure | 9–15 PSI (Nominal 12 PSI) | 9–15 PSI (Nominal 12 PSI) | Internal relief spring rating |
| Filter Gasket Material | Silicone or Nitrile | Silicone (Recommended) | Silicone resists thermal degradation |
| OEM Filter Part Number | 15400-PLM-A02 | 15400-PLM-A02 | Filtech 15400-PLM-A01 alternative |
| Oil Capacity (with Filter) | 4.4 US Quarts (4.2 L) | 3.7 US Quarts (3.5 L) | Re-check dipstick after running |
| Recommended Oil Viscosity | 0W-20 Full Synthetic | 0W-20 Full Synthetic | API SP / ILSAC GF-6A certified |
| Drain Plug Thread Size | M14 x 1.5 mm | M14 x 1.5 mm | Requires 14mm crush washer |
| Drain Plug Torque | 29–30 lb-ft (39–40 Nm) | 29–30 lb-ft (39–40 Nm) | Replace crush washer every change |
| Filter Installation Torque | Hand tight + 3/4 turn | Hand tight + 3/4 turn | ~8.7–12 lb-ft (12–16 Nm) |
| Change Interval Range | 5,000–7,500 Miles | 5,000–7,500 Miles | Follow Maintenance Minder B code |
Troubleshooting and Common Pitfalls
Avoiding common mistakes during oil filter replacement protects your engine from immediate failure and prevents long-term reliability issues.
COMMON PITFALLS TO AVOID
- Double Gasketing: Rapid total oil failure
- Over-tightening Filter: Damaged threads / leaks
- Loose Splash Shield: Undercarriage dragging
- Reusing Crush Washers: Continuous slow fluid drips
Preventing "Double Gasketing"
The most catastrophic mistake when changing an oil filter is leaving the old filter’s rubber O-ring stuck to the engine block. When a new filter is tightened over an old gasket, oil will blow out past the double seal within seconds of starting the engine. Always inspect the removed filter to ensure its rubber ring is intact on the base casing, and wipe down the engine block face with a rag before installing the new filter.
Managing Fuel Dilution in 1.5L Turbo Engines
Direct-injection turbocharged engines run at high internal pressures. Under frequent short-trip driving conditions in cold weather, small amounts of unburnt fuel can slip past the piston rings into the engine oil pan.
- Filter Impact: Fuel dilution thins engine oil, reducing film strength and degrading the oil filter's seal components over time.
- Best Practice: Civic EX models with the 1.5L Turbo engine should use synthetic media filters with silicone anti-drainback valves, and owners should avoid pushing oil change intervals beyond 5,000 to 6,000 miles if driving short distances in winter.
Over-Tightening vs. Under-Tightening
- Over-Tightening: Distorts the filter canister body, pinches or tears the internal O-ring gasket, and locks the filter onto the engine spindle, making future removal exceptionally difficult.
- Under-Tightening: Can cause the filter to unscrew due to natural engine vibrations, leading to sudden loss of engine oil while driving.
- The Solution: Spin the filter on smoothly by hand until you feel the gasket touch the engine face, then turn it precisely 3/4 to 1 full turn further.
Frequently Asked Questions
Can I use the same oil filter on both the 2.0L and 1.5L Turbo Civic EX engines?
Yes. Both the 2.0L naturally aspirated (K20C2) and 1.5L turbocharged (L15B7) engines in the 2017 Honda Civic EX share the same M20x1.5 thread mounting specification and outer seal dimensions. Filters such as OEM 15400-PLM-A02 or aftermarket equivalents like Wix 57356 fit both engine variants. However, because turbo engines generate more heat, choosing high-efficiency filters with silicone anti-drainback valves is especially beneficial for 1.5L Turbo models.
How often should I replace the oil filter on a 2017 Honda Civic EX?
Honda recommends replacing the oil filter every time you change your engine oil, or whenever the Maintenance Minder displays Main Code B. While Main Code A technically calls for replacing only the oil, mechanics and technicians strongly advise replacing the oil filter during every single oil change interval (typically every 5,000 to 7,500 miles). Leaving an old filter on the car forces fresh oil through dirty media, reducing overall fluid cleanliness.
What happens if I forget to replace the aluminum crush washer on the drain bolt?
Reusing an old aluminum crush washer can prevent the oil drain bolt from sealing flush against the oil pan face. The washer is designed to deform once when torqued to 29–30 lb-ft, filling microscopic imperfections between the bolt head and pan. Reusing a flattened washer frequently causes minor, continuous oil drips under the engine cover.
Should I pre-fill the oil filter with oil before installing it?
Pre-filling the oil filter roughly 1/3 full with clean 0W-20 synthetic oil is a helpful step. Because the filter sits at an upward angle on the bottom of the Honda engine block, pre-filling reduces the brief period of dry engine startup while the oil pump builds gallery pressure. Take care not to overfill the filter before installation to prevent spilling oil down your hand when threading it onto the block stud.
Why is my oil filter stuck so tight during removal?
Oil filters become stuck if they were installed dry (without lubricating the top rubber O-ring with fresh oil), if they were torqued down excessively, or if they have been left on the engine past the recommended service interval. If hand pressure or standard cap socket tools slip, use an adjustable end-cap wrench or oil filter removal pliers to break the friction seal safely without puncturing the filter wall.
Practical Recommendations for DIY Maintenance
To keep your 2017 Honda Civic EX running efficiently, follow these summary guidelines:
- Verify Your Engine: Confirm whether your EX trim has the 2.0L naturally aspirated engine (4.4-quart capacity) or the 1.5L turbocharged engine (3.7-quart capacity) before buying motor oil.
- Use Synthetic Oil and Media: Pair API-certified 0W-20 full synthetic motor oil with a synthetic-blend or full-synthetic oil filter featuring a silicone anti-drainback valve.
- Inspect the Mounting Surface: Always check the old filter upon removal to verify that the original rubber gasket came off the engine block.
- Torque Accurately: Tighten the engine oil drain plug to 29–30 lb-ft with a new 14mm crush washer, and hand-tighten the oil filter 3/4 to 1 turn past initial gasket contact.
- Keep Records: Reset the Maintenance Minder system after every oil and filter change to ensure engine tracking remains accurate.