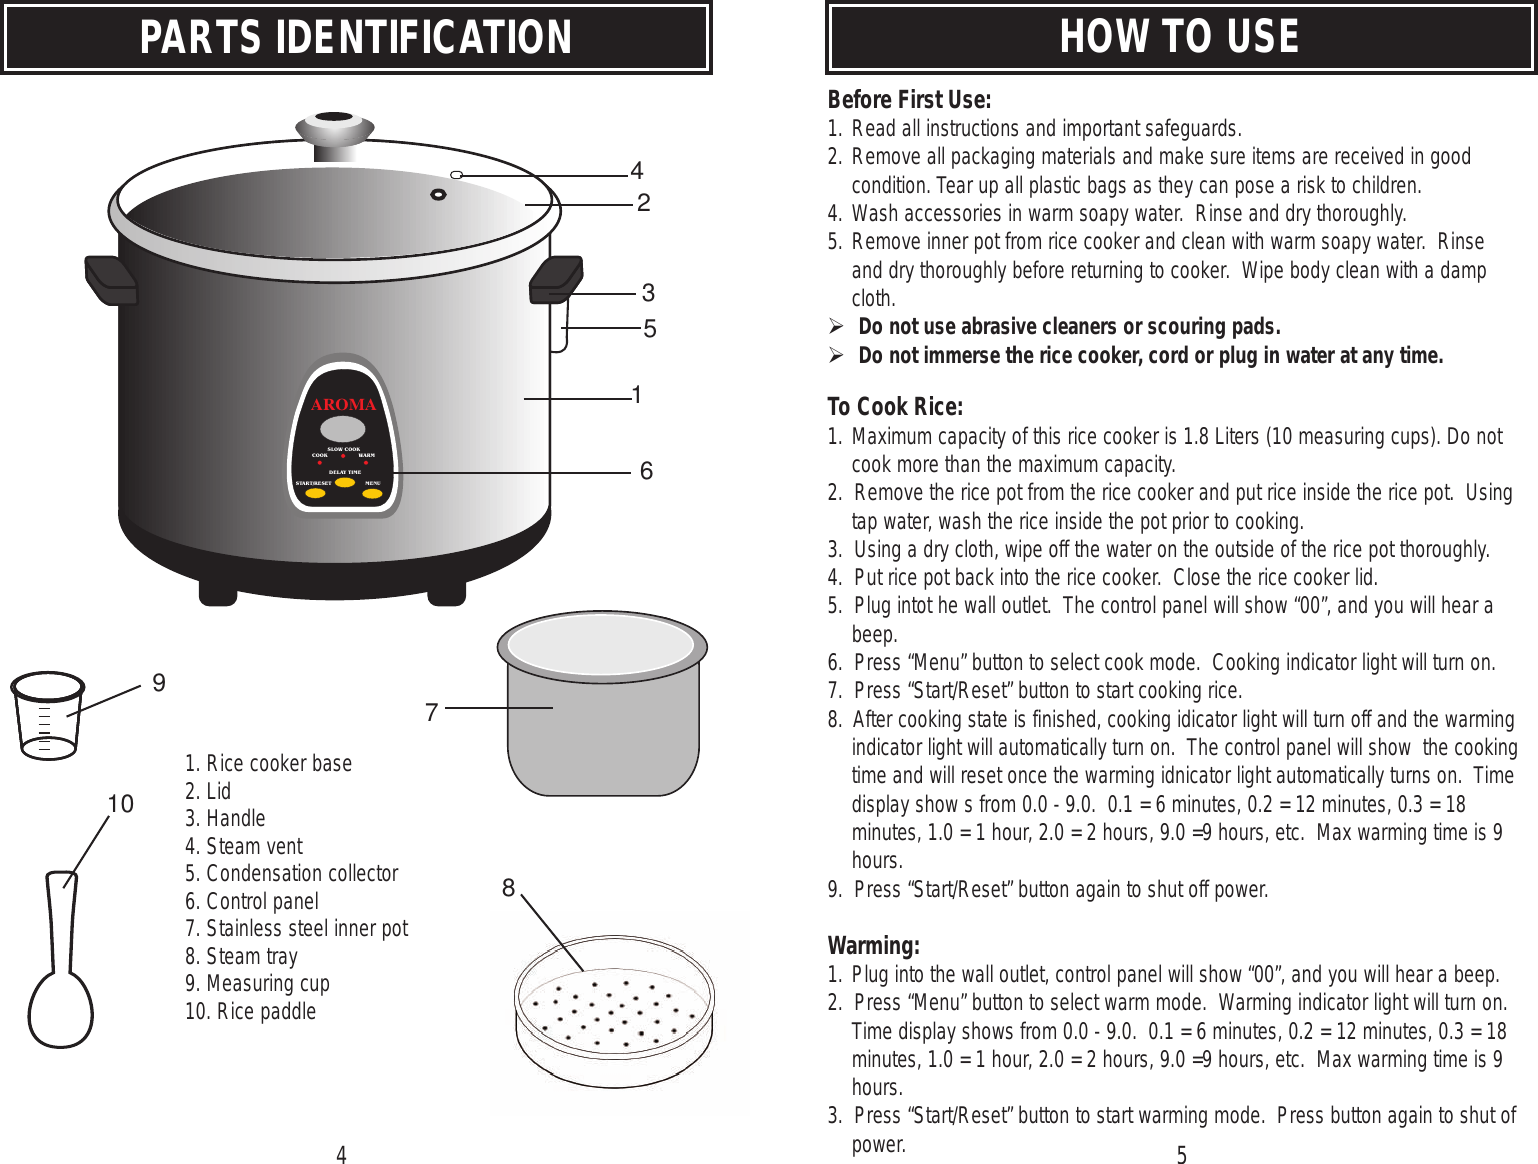
To operate an Aroma Mini Rice Cooker, measure your grains using the provided measuring cup, rinse them thoroughly, and add water to the corresponding line inside the pot. Press the cook switch down to begin; the unit will automatically transition to "Keep Warm" mode once the rice is fully cooked.
The Aroma Mini Rice Cooker has become a staple in small kitchens, dorm rooms, and for individuals seeking a compact, reliable way to prepare grains without the footprint of a full-sized appliance. While these machines are prized for their "set it and forget it" simplicity, achieving the perfect texture—neither mushy nor crunchy—requires an understanding of the specific mechanics and ratios unique to the Aroma brand. This guide provides a comprehensive breakdown of operating instructions, maintenance, and troubleshooting for the 2026 kitchen environment.
Understanding the Components of Your Aroma Mini Rice Cooker
Before beginning the cooking process, it is essential to identify the parts of your specific model. Most Aroma Mini units (typically the 2-cup to 3-cup cooked capacity models) consist of a few core components that must be handled correctly to ensure the longevity of the appliance.
The Measuring Cup (The "Aroma" Cup)
One of the most common mistakes users make is using a standard US measuring cup (240ml) instead of the cup included with the device. An Aroma measuring cup is approximately 180ml, or about 3/4 of a standard US cup. All water-to-rice ratios mentioned in the official instructions refer to this specific 180ml volume. If you have lost your original cup, you must adjust your measurements to ensure you are not overfilling the small inner pot.
The Inner Pot and Heating Plate
The inner pot is usually made of aluminum with a non-stick coating or, in some premium mini models, stainless steel. The bottom of this pot must be completely dry and free of debris before being placed into the cooker. The heating plate at the base of the outer unit uses a weight-sensitive thermostat. When the water is absorbed and the temperature rises above 212°F (100°C), the internal magnet releases, flipping the switch from "Cook" to "Warm."
The Steam Vent and Lid
The lid may be a tempered glass style or a locking plastic lid. Regardless of the style, the steam vent must remain unobstructed. In mini models, the proximity of the boiling water to the lid is much closer than in large cookers, making the vent's role in pressure regulation critical to preventing "starchy geysers" or boil-overs.
Step-by-Step Operating Instructions
Operating the Aroma Mini is designed to be a one-touch process, but the preparation phase determines the final quality of the meal.
1. Measuring and Rinsing
Measure the desired amount of rice using the provided cup. For a "mini" model, the maximum capacity is typically 1.5 cups of uncooked rice, which yields approximately 3 cups of cooked rice.
Rinsing is mandatory. Rice is coated in excess surface starch during the milling process. In a small-capacity cooker, this starch creates a thick foam that will bubble out of the steam vent and create a mess. Rinse the rice in a separate fine-mesh strainer under cold water until the water runs clear. Do not rinse the rice directly in the non-stick inner pot, as the hard grains can scratch the coating over time.
2. Adding Water and Rice
Place the rinsed rice into the inner pot. Add water according to the etched lines on the interior of the pot. For example, if you added 1.5 Aroma cups of rice, fill the water to the line labeled "1.5."
If you prefer a firmer texture, add slightly less water (about 2-3mm below the line). For softer rice, add slightly more. If you are cooking specialty grains like quinoa or brown rice, the water lines may differ, and you should refer to the specific grain ratios provided in the table below.
3. The Cooking Cycle
Wipe the exterior of the inner pot with a dry cloth. Place it into the cooker and rotate it slightly to the left and right to ensure it is making full contact with the heating plate. Close the lid and plug the power cord into a standard 120V AC outlet.
Press the switch down to the "Cook" position. The indicator light will change from orange (Warm) to red (Cook). Do not open the lid during the cooking process, as this releases the accumulated steam and heat necessary for even cooking.
4. The Rest Period
When the rice is finished, the switch will automatically "click" up to the Warm position. Do not serve the rice immediately. Allow the rice to sit on the "Keep Warm" setting for 5 to 10 minutes. This "rest period" allows the remaining steam to redistribute through the grains, ensuring the bottom layer is not sticky or scorched while the top layer remains moist.
Grain-to-Water Ratio Reference Table
The following ratios are optimized for the Aroma Mini series. Note that "Cups" refers to the 180ml Aroma measuring cup.
| Grain Type | Uncooked Grain (Cups) | Water Line in Pot | Approx. Cook Time |
|---|---|---|---|
| White Rice (Long/Medium) | 1 Cup | Line 1 | 15–20 Minutes |
| White Rice (Short/Sushi) | 1 Cup | Line 1 (plus 1 tbsp) | 18–22 Minutes |
| Brown Rice (Whole Grain) | 1 Cup | Line 1.5 | 35–45 Minutes |
| Quinoa (Rinsed) | 1 Cup | Line 1.25 | 12–15 Minutes |
| Oatmeal (Steel Cut) | 0.5 Cup | 1.5 Cups Water* | 20–25 Minutes |
*Note: For oatmeal, do not use the internal lines; use a measured volume of water to prevent overflow.
Advanced Uses: Beyond Just Rice
The Aroma Mini Rice Cooker is a versatile thermal cooker that can handle more than just white rice. Because it operates on a simple temperature-cutoff principle, it can be used for "one-pot" meals.
Steaming Vegetables and Proteins
If your mini model included a steam tray, you can steam broccoli, carrots, or even small fillets of fish or chicken while the rice cooks below. Ensure that you do not overfill the steam tray, as this can block the steam flow and lead to unevenly cooked rice. If you are only steaming (without rice), add at least 0.5 cups of water to the inner pot and manually toggle the switch to "Cook."
Soups and Chilis
The "Cook" mode is essentially a boil. You can sauté aromatics like onions and garlic in a small amount of oil at the bottom of the pot (with the lid open), then add liquid and beans to simmer a small portion of soup. You must monitor this closely, as the unit will only switch to "Warm" once the liquid is almost entirely gone. For soups, you will likely need to manually switch the unit to "Warm" once your desired consistency is reached.
Cleaning and Long-Term Maintenance
To maintain the efficiency of the heating element and the integrity of the non-stick surface, follow these cleaning protocols after every use.
- Avoid Abrasives: Never use steel wool or metal scouring pads on the inner pot. If rice is stuck to the bottom, soak the pot in warm, soapy water for 20 minutes before using a soft sponge.
- The Heating Plate: Over time, grains of rice or mineral deposits may fall onto the heating plate in the base unit. Wipe this with a damp cloth once the unit has cooled completely. Any debris here can cause the thermostat to misread the temperature, leading to undercooked rice.
- The Condensation Collector: Many Aroma models have a small plastic reservoir on the side that catches runoff when the lid is opened. Empty and rinse this after every use to prevent mold growth.
- Lid Care: If your lid has a removable inner shield (common in locking-lid models), pull it off and wash it to remove starch buildup that can clog the steam vent.
Troubleshooting Common Problems
Even with precise measurements, you may encounter issues based on altitude, water hardness, or grain age.
The Rice is Too Dry or Crunchy
This is usually caused by insufficient water or skipping the rest period. If the rice is still crunchy when the cooker switches to "Warm," add 2 to 3 tablespoons of water, stir it, and flip the switch back to "Cook." The extra moisture should finish the softening process.
The Rice is Mushy or Watery
This indicates too much water was used or the rice was not rinsed. Excessive starch makes the water "heavy" and prevents it from evaporating correctly. For the next batch, reduce the water slightly below the etched line and ensure the rice is rinsed until the water is crystal clear.
The Cooker Won't Stay in "Cook" Mode
If the switch immediately flips back to "Warm," the inner pot may not be seated correctly on the heating plate, or the pot may be too light. Ensure the exterior of the pot is dry and that you are cooking at least the minimum amount (usually 0.5 cups) to provide enough weight for the sensor.
Scorching at the Bottom
A thin, golden layer of rice (often called tahdig or guoba) is common in many rice cookers. However, if it is black or burnt, it often means the rice sat on "Keep Warm" for too long (over 2 hours) or the sugar content in your cooking liquid (such as using coconut milk or broth) caused premature browning.
Frequently Asked Questions
Can I use chicken broth instead of water?
Yes, you can substitute water with broth or stock for added flavor. However, be aware that broths containing high levels of sodium or sugar can cause the bottom of the rice to brown or "caramelize" more quickly than plain water. Always ensure the broth is clear and not a thick "cream" soup, which will trigger the sensor too early.
Why is my rice cooker bubbling over and making a mess?
Overflow is almost always caused by excess starch. In a mini rice cooker, the space between the water line and the lid is small. If the rice isn't rinsed, the starch creates a foam that expands and exits through the steam vent. For grains like oats or quinoa, adding a small pat of butter or a teaspoon of oil can help break the surface tension of the bubbles and prevent boil-overs.
Is the inner pot dishwasher safe?
While many Aroma inner pots are labeled as dishwasher safe, it is highly recommended to hand wash them. The harsh detergents and high heat of a dishwasher can degrade the non-stick coating over time, leading to sticking issues. Hand washing with a mild soap will significantly extend the life of the pot.
How long can I leave rice on the "Keep Warm" setting?
While the "Keep Warm" function can technically run for several hours, rice in a mini cooker tends to dry out faster than in larger models due to the smaller volume. For the best quality, try to consume the rice within 1 to 2 hours of it finishing the cook cycle. After 2 hours, the texture begins to degrade, and the rice may become yellowed or hard.
Can I cook brown rice in the Aroma Mini?
Yes, but you must adjust the water and expectations. Brown rice requires more water and a longer cooking time because the bran layer acts as a barrier to moisture. Most Aroma Mini instructions suggest using a 1:2 or 1:2.5 ratio for brown rice. Because the "Mini" has a limited capacity, you should generally not attempt to cook more than 1 cup of uncooked brown rice at a time to prevent overflow.
Summary of Practical Recommendations
To get the most out of your Aroma Mini Rice Cooker in 2026, prioritize the use of the included measuring cup and always rinse your grains. These two simple steps solve approximately 90% of common user complaints regarding texture and mess. Treat the inner pot with care by avoiding metal utensils and hand washing whenever possible. If you are exploring one-pot meals, remember that the cooker operates on heat-based evaporation; as long as there is liquid, it will continue to boil, making it a reliable tool for steaming and simple simmering alongside your daily rice.