A 1-inch margin is the standard amount of blank space required between the edge of a page and the main text body on all four sides: top, bottom, left, and right. In modern word processing, this 1-inch (2.54 cm) boundary ensures professional readability, provides space for physical binding, and adheres to strict academic and legal formatting standards.
Understanding the Anatomy of a 1-Inch Margin
In the context of document design and typography, a margin is the negative space—the "white space"—that surrounds the content of a page. While it might seem like "wasted" space, the margin serves as a crucial frame for your information. When we speak of a "1-inch margin," we are referring to a uniform border where the text begins exactly 6 picas or 72 points away from the physical edge of the paper.
In 2026, despite the proliferation of mobile-first reading and digital-only documents, the 1-inch margin remains the "Goldilocks" zone of formatting. It is not so wide that it wastes paper, nor so narrow that the text feels cramped or becomes difficult to read. This standard applies to the standard US Letter paper size (8.5 x 11 inches) and is the default "Normal" setting in most enterprise-level word processing software.
The Four-Way Symmetry
A true 1-inch margin setup is symmetrical. It involves:
- Top Margin: The space from the top edge of the paper to the first line of text.
- Bottom Margin: The space from the last possible line of text to the bottom edge.
- Left Margin: Often called the "inner margin" in book binding, this provides the starting point for left-to-right languages.
- Right Margin: The "outer margin" that prevents text from running off the edge of the page.
It is important to distinguish between the margin and the header/footer area. In most professional layouts, the header (containing page numbers or titles) actually sits within the 1-inch top margin, usually 0.5 inches from the edge. This allows the primary body text to still maintain that 1-inch buffer.
Why the 1-Inch Margin is the Universal Standard
The 1-inch margin did not become the industry standard by accident. Its dominance is rooted in a combination of mechanical history, human psychology, and practical necessity.
1. Readability and Eye Tracking
Human eyes find it difficult to track long lines of text across a very wide page. By implementing 1-inch margins on a standard 8.5-inch wide page, the actual text block becomes 6.5 inches wide. When using a standard 12-point font, this creates an optimal "characters per line" count (usually 65–75 characters). This range is widely considered the "sweet spot" for reading speed and comprehension because it prevents the eye from getting lost when moving from the end of one line to the beginning of the next.
2. Physical Handling and Thumb Room
When you hold a physical piece of paper, your thumbs naturally rest on the edges. Without a 1-inch margin, your thumbs would likely cover the text you are trying to read. This "thumb room" is essential for printed reports, manuscripts, and legal briefs that are meant to be handled manually.
3. Printing Constraints and "Safe Zones"
Even in 2026, most consumer and office-grade printers have a "non-printable area." This is a small physical limitation where the printer's rollers must grip the paper. If you set your margins to zero or even 0.2 inches, you risk the printer "clipping" or cutting off the edges of your text. A 1-inch margin provides a massive safety buffer, ensuring that no matter which printer you use, your content remains fully visible.
4. Binding and Notations
For academic papers or legal documents that are stapled, placed in a three-ring binder, or professionally bound, the left margin is under constant threat. A 1-inch margin ensures that even after a document is hole-punched or bound, the text remains legible and isn't swallowed by the binding (often referred to as the "gutter"). Furthermore, teachers, editors, and lawyers use that 1-inch of white space to scribble "marginalia"—important notes, corrections, and feedback.
How to Set 1-Inch Margins in 2026 Software
Setting margins is the first step in document preparation. Below are the procedures for the most common platforms used in 2026.
Microsoft Word (Desktop and Office 365)
Microsoft Word has long defaulted to 1-inch margins, but if your document has been altered, here is how to reset it:
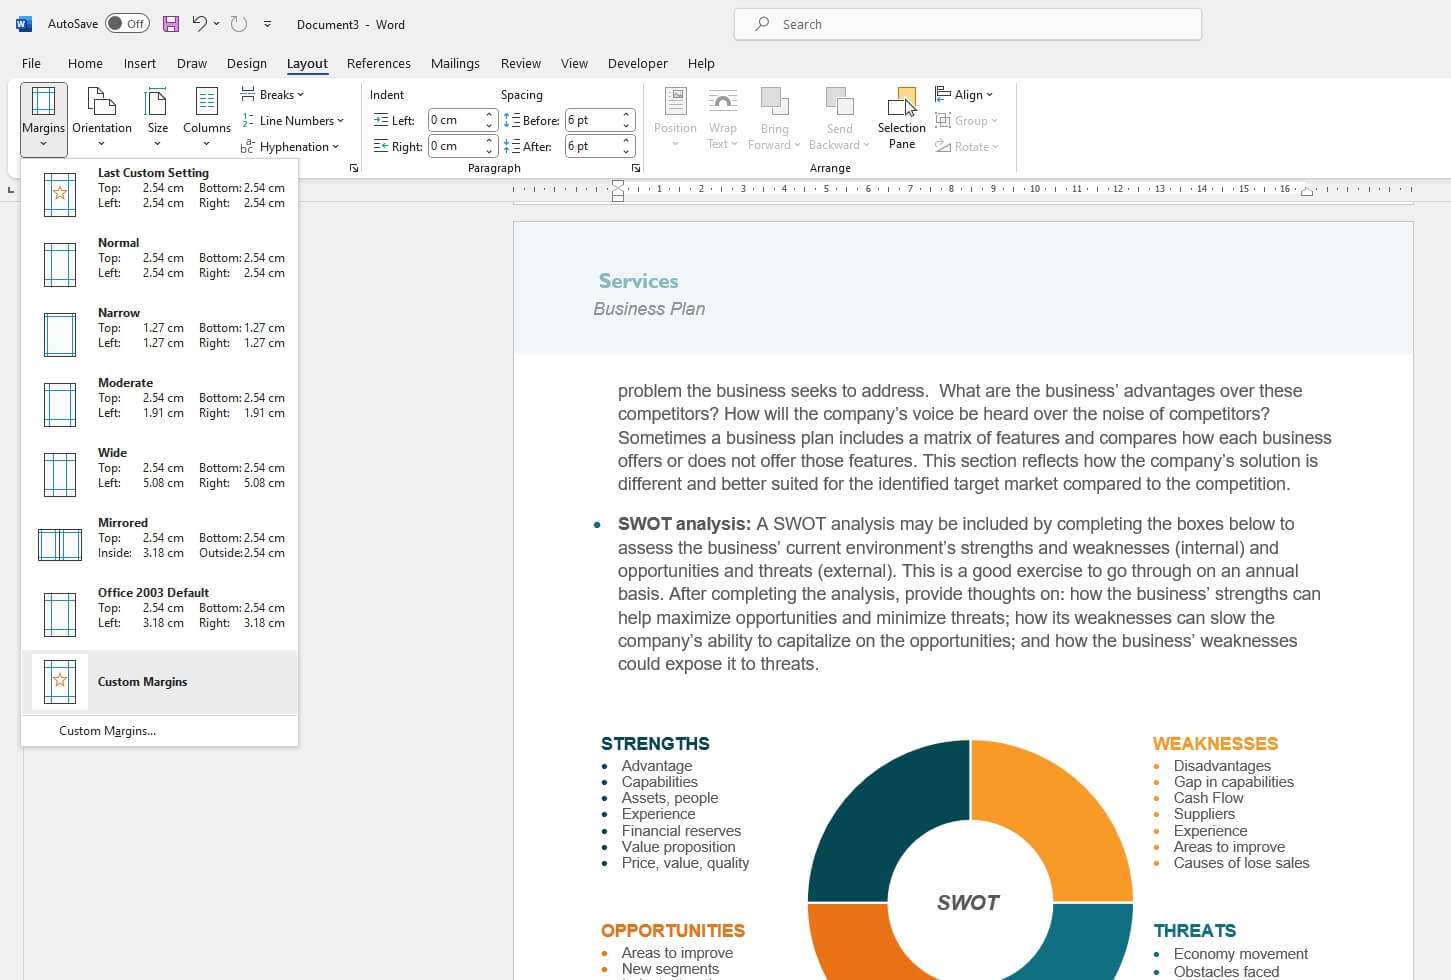
- Open your document and click on the Layout tab in the top ribbon.
- Click on the Margins button.
- Select Normal. The description below it should clearly state: Top: 1", Bottom: 1", Left: 1", Right: 1".
- If you need to apply this to only a specific section, highlight the text first, go to Custom Margins, and select "Apply to: Selected text."
Google Docs
Google Docs is the standard for collaborative writing. To adjust margins here:
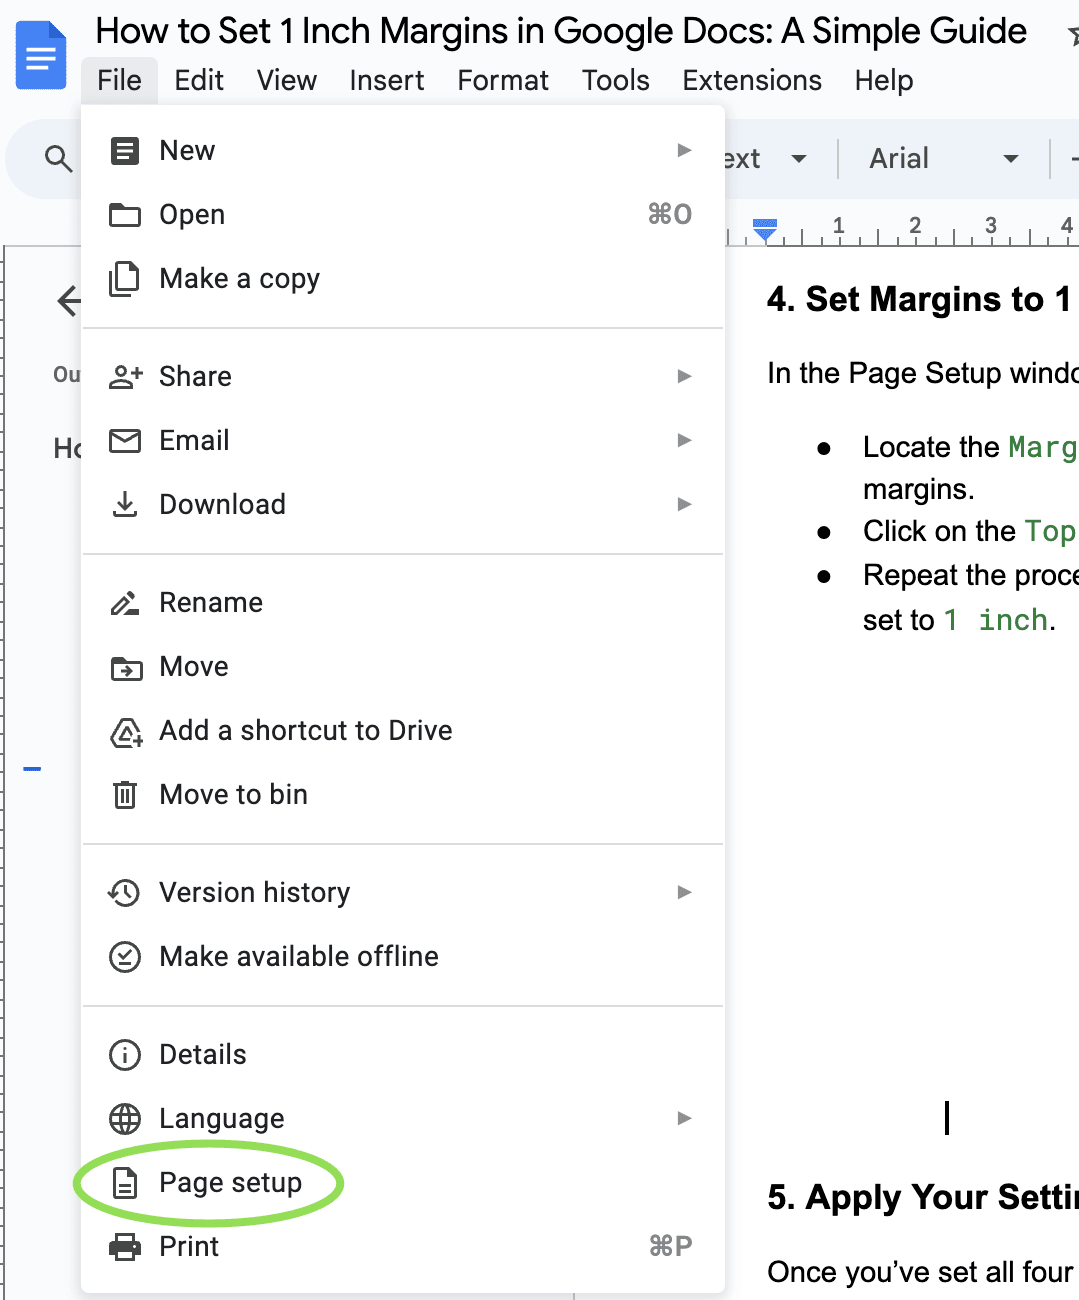
- Go to the File menu.
- Select Page setup (usually near the bottom of the menu).
- Ensure the "Pages" tab is selected.
- In the "Margins" section on the right, enter "1" into the Top, Bottom, Left, and Right boxes.
- Click OK, or click Set as default if you want every new document to start with these dimensions.
Apple Pages
For Mac and iPad users:
- Click the Document button in the toolbar (top right).
- In the Document tab, look for the Document Margins section.
- Enter "1 in" into the four margin fields.
- Note that Pages sometimes uses "points" or "centimeters" depending on your regional settings; ensure you specify "in" for inches.
Comparative Table: Margin Sizes and Their Use Cases
| Margin Type | Dimensions (All Sides) | Primary Use Case | Pros | Cons |
|---|---|---|---|---|
| Normal (Standard) | 1.0 Inch (2.54 cm) | Academic papers, business letters, manuscripts. | Maximum compatibility; high readability. | Higher paper consumption for long docs. |
| Narrow | 0.5 Inch (1.27 cm) | Resumes, flyers, internal checklists. | Fits more content on a single page. | Can be clipped by printers; looks cluttered. |
| Wide | 2.0 Inches (5.08 cm) | Poetry, specialized art books, heavy editing. | Massive space for notes; elegant look. | Text block can feel "lost" or too skinny. |
| Mirrored | 1.0" Outer / 1.25" Inner | Books, double-sided reports. | Accounts for binding "gutter" on both sides. | Complex to set up for beginners. |
Requirements for Academic Formatting Styles
If you are a student or researcher in 2026, "1-inch margins" isn't just a suggestion—it’s a grade-defining requirement. Three major styles dominate the landscape.
MLA (Modern Language Association)
Used primarily in the humanities, MLA Style is strict. It requires 1-inch margins on all sides. However, the "header" (which includes your last name and the page number) must sit 0.5 inches from the top edge. Beginners often confuse this, thinking the text must start 1.5 inches down to accommodate the header. In reality, the header floats inside the margin, and the text begins exactly at the 1-inch mark.
APA (American Psychological Association)
Common in the social sciences, APA 7th Edition (and later versions used in 2026) mandates 1-inch margins. APA is particularly sensitive to the "left-aligned" nature of text. It forbids "justified" text (where both edges are straight) because it creates irregular spacing between words, which can hinder accessibility for readers with visual impairments. The 1-inch margin combined with left-alignment is the APA hallmark.
Chicago Manual of Style
Often used in history and business, Chicago Style also defaults to the 1-inch standard. However, it is more flexible regarding the "Gutter" margin. If a thesis is being bound into a hardcover book, Chicago Style may recommend increasing the left margin to 1.25 or 1.5 inches to ensure the text doesn't disappear into the spine.
Technical Nuances: Converting Inches to Other Units
In a globalized workforce, you may encounter systems that do not use the imperial system. If you are working with developers or international colleagues, you may need to translate "1 inch" into other technical measurements.
- Metric: 1 inch is exactly 2.54 centimeters or 25.4 millimeters. Many European and Asian offices use A4 paper (which is narrower and longer than US Letter), but they still maintain the 2.54 cm margin standard for international documents.
- Points: In typography, 1 inch equals 72 points. This is the unit used by software like Adobe InDesign or Affinity Publisher.
- Picas: 1 inch equals 6 picas. Professional typesetters often use picas to define column widths and margins for high-end print media.
- Pixels: This is tricky. On a standard 96 DPI (dots per inch) monitor, 1 inch is 96 pixels. However, with high-resolution "Retina" or 4K displays common in 2026, the pixel count for one physical inch can be 300 or higher. For this reason, always set margins in "absolute units" (inches or cm) rather than pixels when the end goal is printing.
Common Mistakes When Setting Margins
Even with a "Normal" setting, errors can creep into your document. Avoid these common pitfalls to maintain a professional appearance.
1. The "Header Overlap"
A common error occurs when the "Header from Top" setting is larger than the "Top Margin" setting. For example, if your header is set to 1.2 inches but your margin is set to 1.0 inch, the header will actually crash into your body text. Always ensure your header/footer distance is smaller than your margin (0.5" is the standard).
2. Ignoring the Gutter for Binding
If you are printing a 500-page manual and using 1-inch margins, the words near the center of the book will be hard to read because they curve into the binding. In these cases, you must add a "Gutter" margin—usually an extra 0.25 to 0.5 inches—specifically to the left side (or inside edge) to compensate for the physical binding process.
3. Scaling "To Fit"
When printing a PDF, many users accidentally select "Scale to Fit" in the print dialogue. This can shrink your document by 5-10%, effectively turning your 1-inch margins into 1.1-inch or 1.2-inch margins. If precise measurements are required (such as in legal filings), always select "Actual Size" in your print settings.
4. Justification "Rivers"
While not strictly a margin setting, "justifying" your text (making it flush on both the 1-inch left and 1-inch right margins) can create white gaps called "rivers" running through your paragraphs. For the best look, stick to "Align Left" unless you are formatting a newspaper or a formal book.
Frequently Asked Questions
Does a 1-inch margin include the page number?
No. In standard academic and professional formatting, the page number sits within the margin space (usually 0.5 inches from the top or bottom edge). The 1-inch margin refers to the gap between the edge of the paper and the main body of your text or paragraphs.
How many words fit on a page with 1-inch margins?
For a standard 8.5 x 11-inch page using 12-point Times New Roman font and double-spacing (the academic standard), a 1-inch margin typically results in approximately 250 to 300 words per page. If the document is single-spaced, you can expect about 500 to 550 words.
Is 1 inch the same as "Normal" margins in Microsoft Word?
Yes. In all modern versions of Microsoft Word, including the 2026 Office suite, the "Normal" margin preset is defined as 1 inch for the top, bottom, left, and right sides.
Why do some people use 1.25-inch margins?
Prior to Word 2007, the default left and right margins were 1.25 inches. Some older legal professionals or academic institutions still prefer this wider look because it provides even more space for annotations and can make a shorter document appear slightly longer.
Can I use 1-inch margins on A4 paper?
Yes, but be aware that A4 paper is slightly narrower (8.27 inches) and longer (11.69 inches) than US Letter paper. Setting 1-inch (2.54 cm) margins on A4 paper will result in a narrower text block (5.27 inches wide) compared to US Letter (6.5 inches wide).
Do 1-inch margins apply to resumes?
While 1-inch margins are the safest "professional" choice for resumes, many career experts allow for "Narrow" margins (0.5 inches) if you have extensive experience and need to fit more information on one page. However, you should never go smaller than 0.5 inches, as it looks unprofessional and may be cut off by applicant tracking systems (ATS) when printed.
Next Steps for Perfect Formatting
To ensure your document is perfectly formatted, start by opening your Page Setup menu before you type a single word. Setting your 1-inch margins at the beginning prevents layout shifts, "widows," and "orphans" (lonely lines of text at the top or bottom of pages) that occur when you change margins after the document is finished. Once your margins are set, verify that your font size is consistent and that your alignment is set to "Left" for maximum readability. If you are submitting for a specific organization, double-check their style guide, as some high-court legal documents or specific medical journals may still require slight variations from the 1-inch standard.