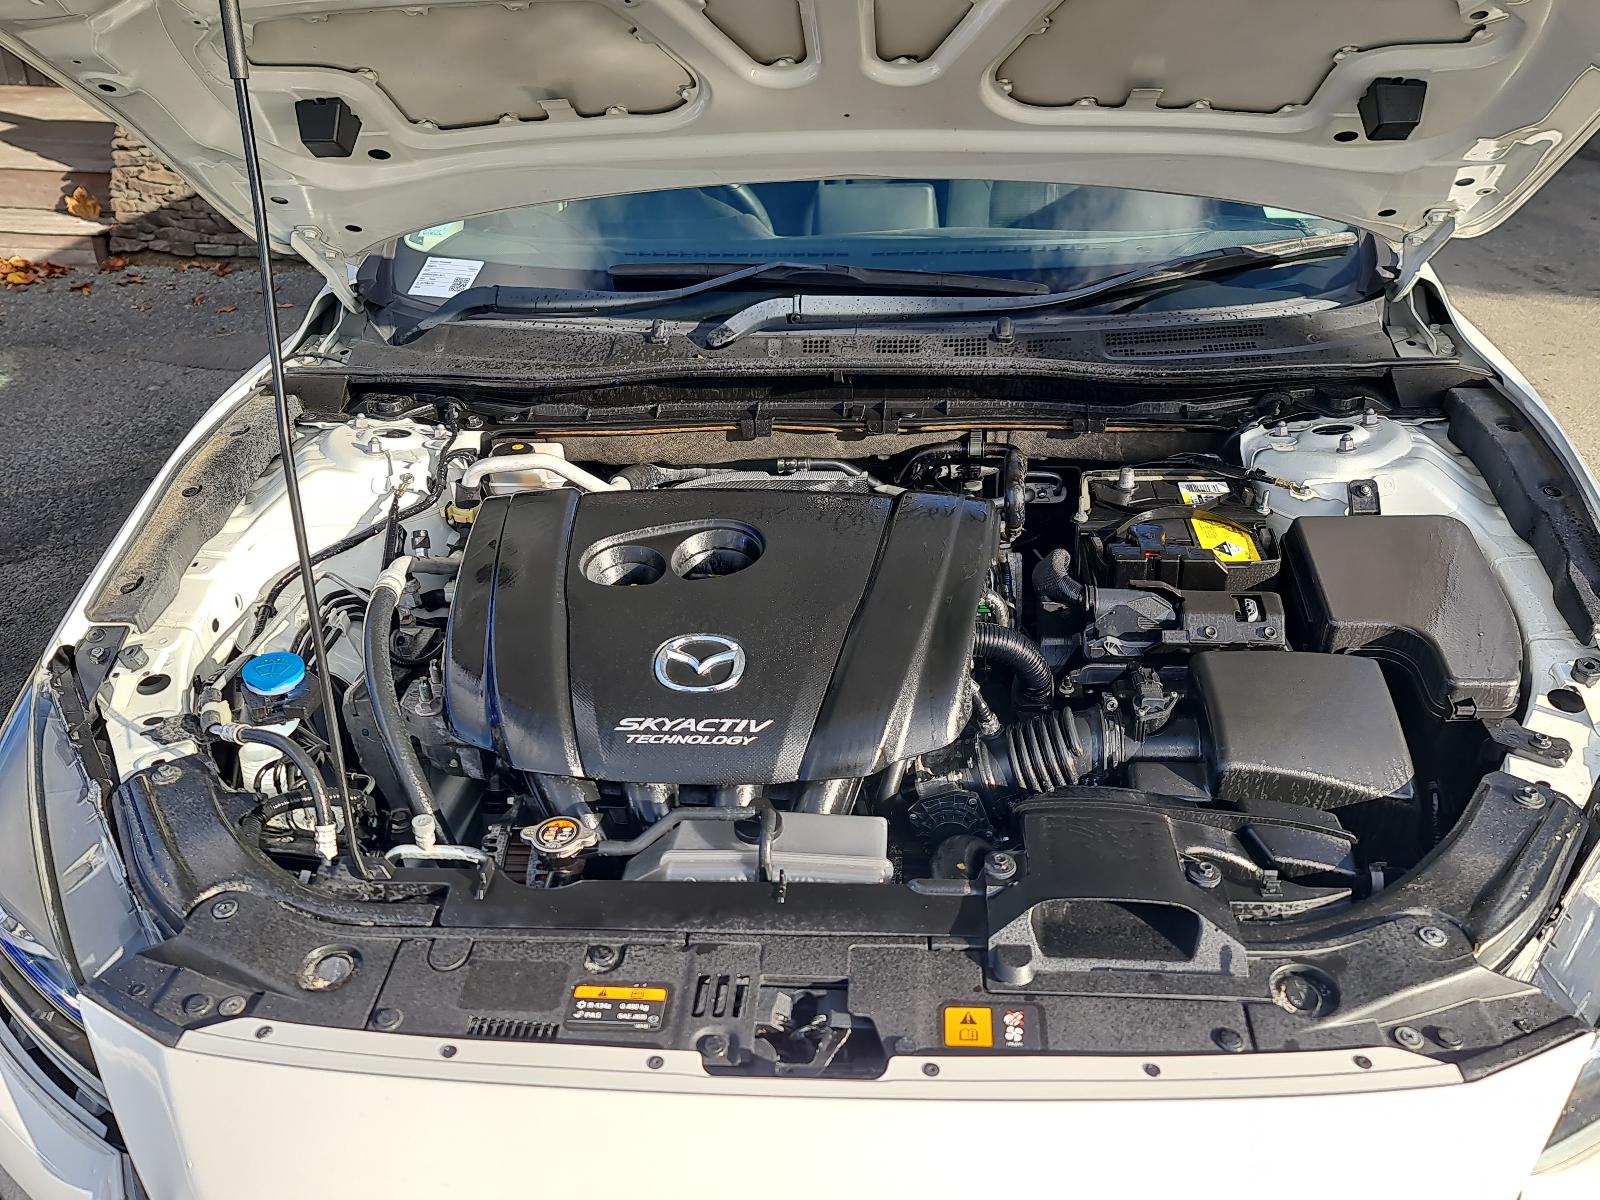
Replacing the battery in a 2015 Mazda 3 involves selecting a Group 35 or Group 47 (H5) flooded lead-acid or AGM battery, removing the cowl cover and air intake duct for physical access, disconnecting the negative terminal first, and performing a quick post-installation electronic reset to restore power features.
Replacing the car battery on a 2015 Mazda 3 is a straightforward maintenance task that most vehicle owners can complete at home with basic hand tools. As these vehicles age, their original factory batteries—and even initial replacements—will eventually lose their capacity to hold a charge, particularly during extreme seasonal temperature shifts. Knowing how to safely select, remove, and install a new battery saves time and money while keeping your Mazda 3 reliable for daily driving.
Understanding the 2015 Mazda 3 Battery Specifications
Before purchasing a replacement battery, it is vital to understand the exact electrical and physical specifications required for the third-generation Mazda 3 (model years 2014 through 2018). Installing an incorrect battery can lead to terminal mismatch, physical mounting failures, or charging system complications.
The 2015 Mazda 3 typically comes equipped with one of two battery group sizes depending on its manufacturing origin (Japan-built vehicles versus North America-built vehicles) and whether the vehicle features the i-ELOOP regenerative braking system.
Group Size Variations
- Group 35: Commonly found in North American-assembled models. It features top posts with the positive terminal on the right when facing the front of the battery.
- Group 47 (H5): Often utilized in higher trim levels or vehicles equipped with specialized electrical configurations. This is a European-style DIN case size with recessed terminals.
Always check your existing battery's physical label before buying a replacement. Measuring the physical dimensions of the tray and confirming the terminal orientation prevents installation issues.
AGM vs. Flooded Lead-Acid Batteries
Modern vehicles like the 2015 Mazda 3 rely heavily on sensitive electronics, and many models feature an idle-start-stop system or i-STOP functionality (in select global markets) or i-ELOOP.
- Flooded Lead-Acid: The traditional, cost-effective choice. It works well for base models with standard electrical accessory loads.
- Absorbent Glass Mat (AGM): Highly recommended if your Mazda 3 is equipped with advanced electrical packages or if you live in an extreme climate. AGM batteries resist vibration better, accept charges faster, and offer a longer overall service life, though they carry a higher upfront cost.
| Battery Attribute | Standard Flooded (SLI) | AGM (Absorbent Glass Mat) |
|---|---|---|
| Average Lifespan | 3 to 5 years | 5 to 7 years |
| Vibration Resistance | Moderate | High |
| Deep Cycle Recovery | Low | High |
| Price Point | Budget-friendly ($120 - $170) | Premium ($180 - $260) |
| Best Suited For | Base trims, moderate climates | High electrical load, extreme weather |
Tools and Safety Equipment Required
Gathering your tools before starting the job ensures an efficient and safe replacement process. Working under the hood of a modern car involves live electrical circuits and corrosive materials, so preparation is key.
Recommended Tool List
- 10mm Socket and Ratchet: Used for loosening the battery terminal clamps and the battery hold-down bracket.
- 10mm Deep Socket or Extension: Helpful for reaching the lower bolt on the battery tie-down wedge.
- Flathead Screwdriver: Useful for releasing plastic push-pins on the air intake duct and cowl cover.
- Wire Brush or Terminal Cleaner: For cleaning corrosion off the battery cable clamps.
- Safety Glasses and Gloves: Essential protection against battery acid and lead exposure.
- Memory Saver (Optional): A 12V OBD-II memory saver plugs into your vehicle's diagnostic port to retain radio presets and ECU memory while the main battery is disconnected.
Step-by-Step Replacement Procedure
A systematic approach ensures that you avoid short circuits, damage to sensitive sensors, or broken plastic components under the hood.
Step 1: Vehicle Preparation and Safety
Park your 2015 Mazda 3 on a flat, level surface, engage the parking brake, and turn off the ignition. Open the hood and secure it with the prop rod. Allow the engine to cool down if it has been running recently, as the battery sits adjacent to the engine block and exhaust components.
Step 2: Remove Obstructions (Cowl and Air Intake)
Unlike older vehicles where batteries sat completely exposed, the 2015 Mazda 3 engine bay nests the battery tightly beneath plastic shrouds.
- Locate the plastic air intake snorkel running from the front grille to the air filter box.
- Remove the plastic push-pins securing the intake duct using a flathead screwdriver or trim removal tool.
- Lift the air intake duct out of the way to expose the front edge of the battery.
- Depending on your specific sub-model, you may also need to unclip or shift a portion of the plastic cowl cover near the base of the windshield to gain full vertical clearance for lifting the heavy battery out.
Step 3: Disconnect the Negative Terminal First
Safety dictates that you always disconnect the negative (-) terminal before the positive (+) terminal. This prevents accidental short-circuiting of the electrical system if your wrench touches the vehicle frame while loosening a terminal.
- Locate the negative terminal (marked with a minus sign and usually featuring a black cover).
- Loosen the 10mm nut on the negative terminal clamp.
- Once loose, wiggle the clamp upward off the terminal post. Tuck the cable safely to the side so it cannot spring back and make accidental contact with the post.
Step 4: Disconnect the Positive Terminal
- Flip open the red plastic protective cover on the positive (+) terminal.
- Loosen the 10mm nut securing the positive cable clamp.
- Pull the positive clamp straight up and off the terminal post. Secure the cable away from the battery housing.
Step 5: Remove the Battery Hold-Down Bracket
The battery is secured to the floor of the engine bay by a lower wedge clamp and a long threaded rod.
- Using your ratchet with a 10mm deep socket and an extension, locate the bolt securing the plastic wedge at the base of the battery (on the side facing the engine block).
- Remove the bolt and the wedge plate. Keep track of these parts, as you will reuse them.
- Lift the thermal insulation blanket off the old battery (if equipped) to reuse it on the new unit.
Step 6: Extract the Old Battery and Prepare the Tray
Carefully lift the heavy battery straight up and out of the engine bay. Because these batteries weigh between 35 and 50 pounds, maintain a straight back and lift with your legs.
Inspect the plastic battery tray at the bottom of the compartment. Clean away any debris, leaves, or white powdery corrosion residue using a mixture of baking soda and water applied with a wire brush. Wipe the area dry with a clean shop rag.
Step 7: Install the New Battery
- Place the thermal insulating wrap around your new battery.
- Lower the new battery straight down into the tray, ensuring the positive and negative terminals match the original orientation (positive on the side closer to the passenger cabin or fender, depending on your exact build).
- Reinstall the bottom mounting wedge and tighten its 10mm bolt to secure the base of the battery. Do not overtighten, as this can crack the plastic battery casing.
- Remove any plastic protective caps from the new battery terminals.
Step 8: Reconnect Terminals (Positive First)
When reconnecting power, reverse the removal order: Positive first, then negative.
- Place the positive (+) cable clamp onto the positive terminal post. Push it down fully and tighten the 10mm nut securely. Snap the red terminal cover back into place.
- Place the negative (-) cable clamp onto the negative terminal post. Push it down and tighten the 10mm nut. You may notice a small electrical spark when the negative clamp makes contact; this is normal as capacitors in the vehicle's computer systems energize.
Step 9: Reinstall Trim and Test
Reattach the plastic air intake duct and secure all push-pins. Ensure no tools are left in the engine bay, then close the hood. Step into the vehicle and start the engine to verify that the starter cranks strongly and all dashboard warning lights extinguish normally.
Post-Installation Resets and Electronic Calibration
Because disconnecting the battery removes all electrical power from the vehicle's computers, several electronic systems on your 2015 Mazda 3 will require a quick manual reset procedure to restore full functionality.
Power Windows
The one-touch auto-up and auto-down feature for the power windows typically deactivates when power is lost. To recalibrate each window:
- Turn the ignition switch to the ON position (engine off).
- Push the window switch down until the window is completely open.
- Pull the window switch up and hold it until the window is fully closed. Continue holding the switch for approximately two to three seconds after closure.
- Test the window by pressing the auto-down and pulling for auto-up. Repeat this process for each door's window switch.
Clock and Infotainment Settings
The digital clock on the Mazda Connect screen or dashboard display will reset to default time. Navigate to the settings menu via the touchscreen or commander control knob to update the time zone and local time. Radio presets and Bluetooth device pairings are generally retained in non-volatile flash memory, but verify your audio preferences.
Steering Angle Sensor Calibration
The Dynamic Stability Control (DSC) and traction control systems may display a warning light upon initial startup after a battery replacement. This occurs because the electronic power steering module has lost its steering angle calibration.
- Start the engine.
- Turn the steering wheel all the way to the lock on the far left.
- Turn the steering wheel all the way to the lock on the far right.
- Return the steering wheel to the center position.
- Turn the vehicle off, then restart it. The warning lights should clear automatically once the computer recognizes the sensor limits.
Frequently Asked Questions
Can I replace a 2015 Mazda 3 battery myself without losing computer memory?
Yes, you can preserve vehicle memory by plugging a 12V memory saver into the OBD-II port under the driver's side dashboard before disconnecting the battery, powered by a small auxiliary 9V or 12V backup battery. However, even if you lose power completely, resetting the windows and steering angle takes less than two minutes.
How do I know if my 2015 Mazda 3 battery needs replacement?
Common signs include a slow engine crank during startup, clicking noises when turning the key or pressing the push-to-start button, dimming headlights while idling, electronic accessory glitches, and a battery age exceeding four years. A voltmeter reading below 12.4 volts with the engine off also indicates a failing battery.
Do I need to register a new battery in a 2015 Mazda 3?
No. Unlike some European luxury vehicles (such as BMW or Audi), the third-generation Mazda 3 does not feature a Battery Management System (BMS) that requires computer registration or coding when a new battery is installed. The alternator and charging system adapt automatically.
What is the warranty coverage on replacement car batteries?
Most aftermarket automotive batteries carry a replacement warranty ranging from 24 to 36 months of free replacement, followed by a prorated warranty period up to 60 or 72 months total. Keep your purchase receipt in the glove compartment or home records file to honor warranty claims if premature failure occurs.
Will a dead battery cause transmission shifting issues in a Mazda 3?
The 2015 Mazda 3 utilizes a SkyActiv-Drive six-speed automatic transmission governed by an adaptive Transmission Control Module (TCM). A failing battery or sudden power loss can reset the adaptive shift tables, causing initial shifts to feel slightly firmer or unusual as the computer relearns your driving habits over the first few dozen miles of travel.
Professional Recommendation
When your 2015 Mazda 3 requires a new battery, prioritize purchasing a reputable brand of either Group 35 or Group 47 specifications from a trusted automotive parts retailer. If your vehicle operates in heavy stop-and-go traffic or extreme hot and cold climates, upgrade to an AGM battery for superior reliability and reserve capacity. Always double-check your terminal connections for tightness and cleanliness to prevent premature charging failures.