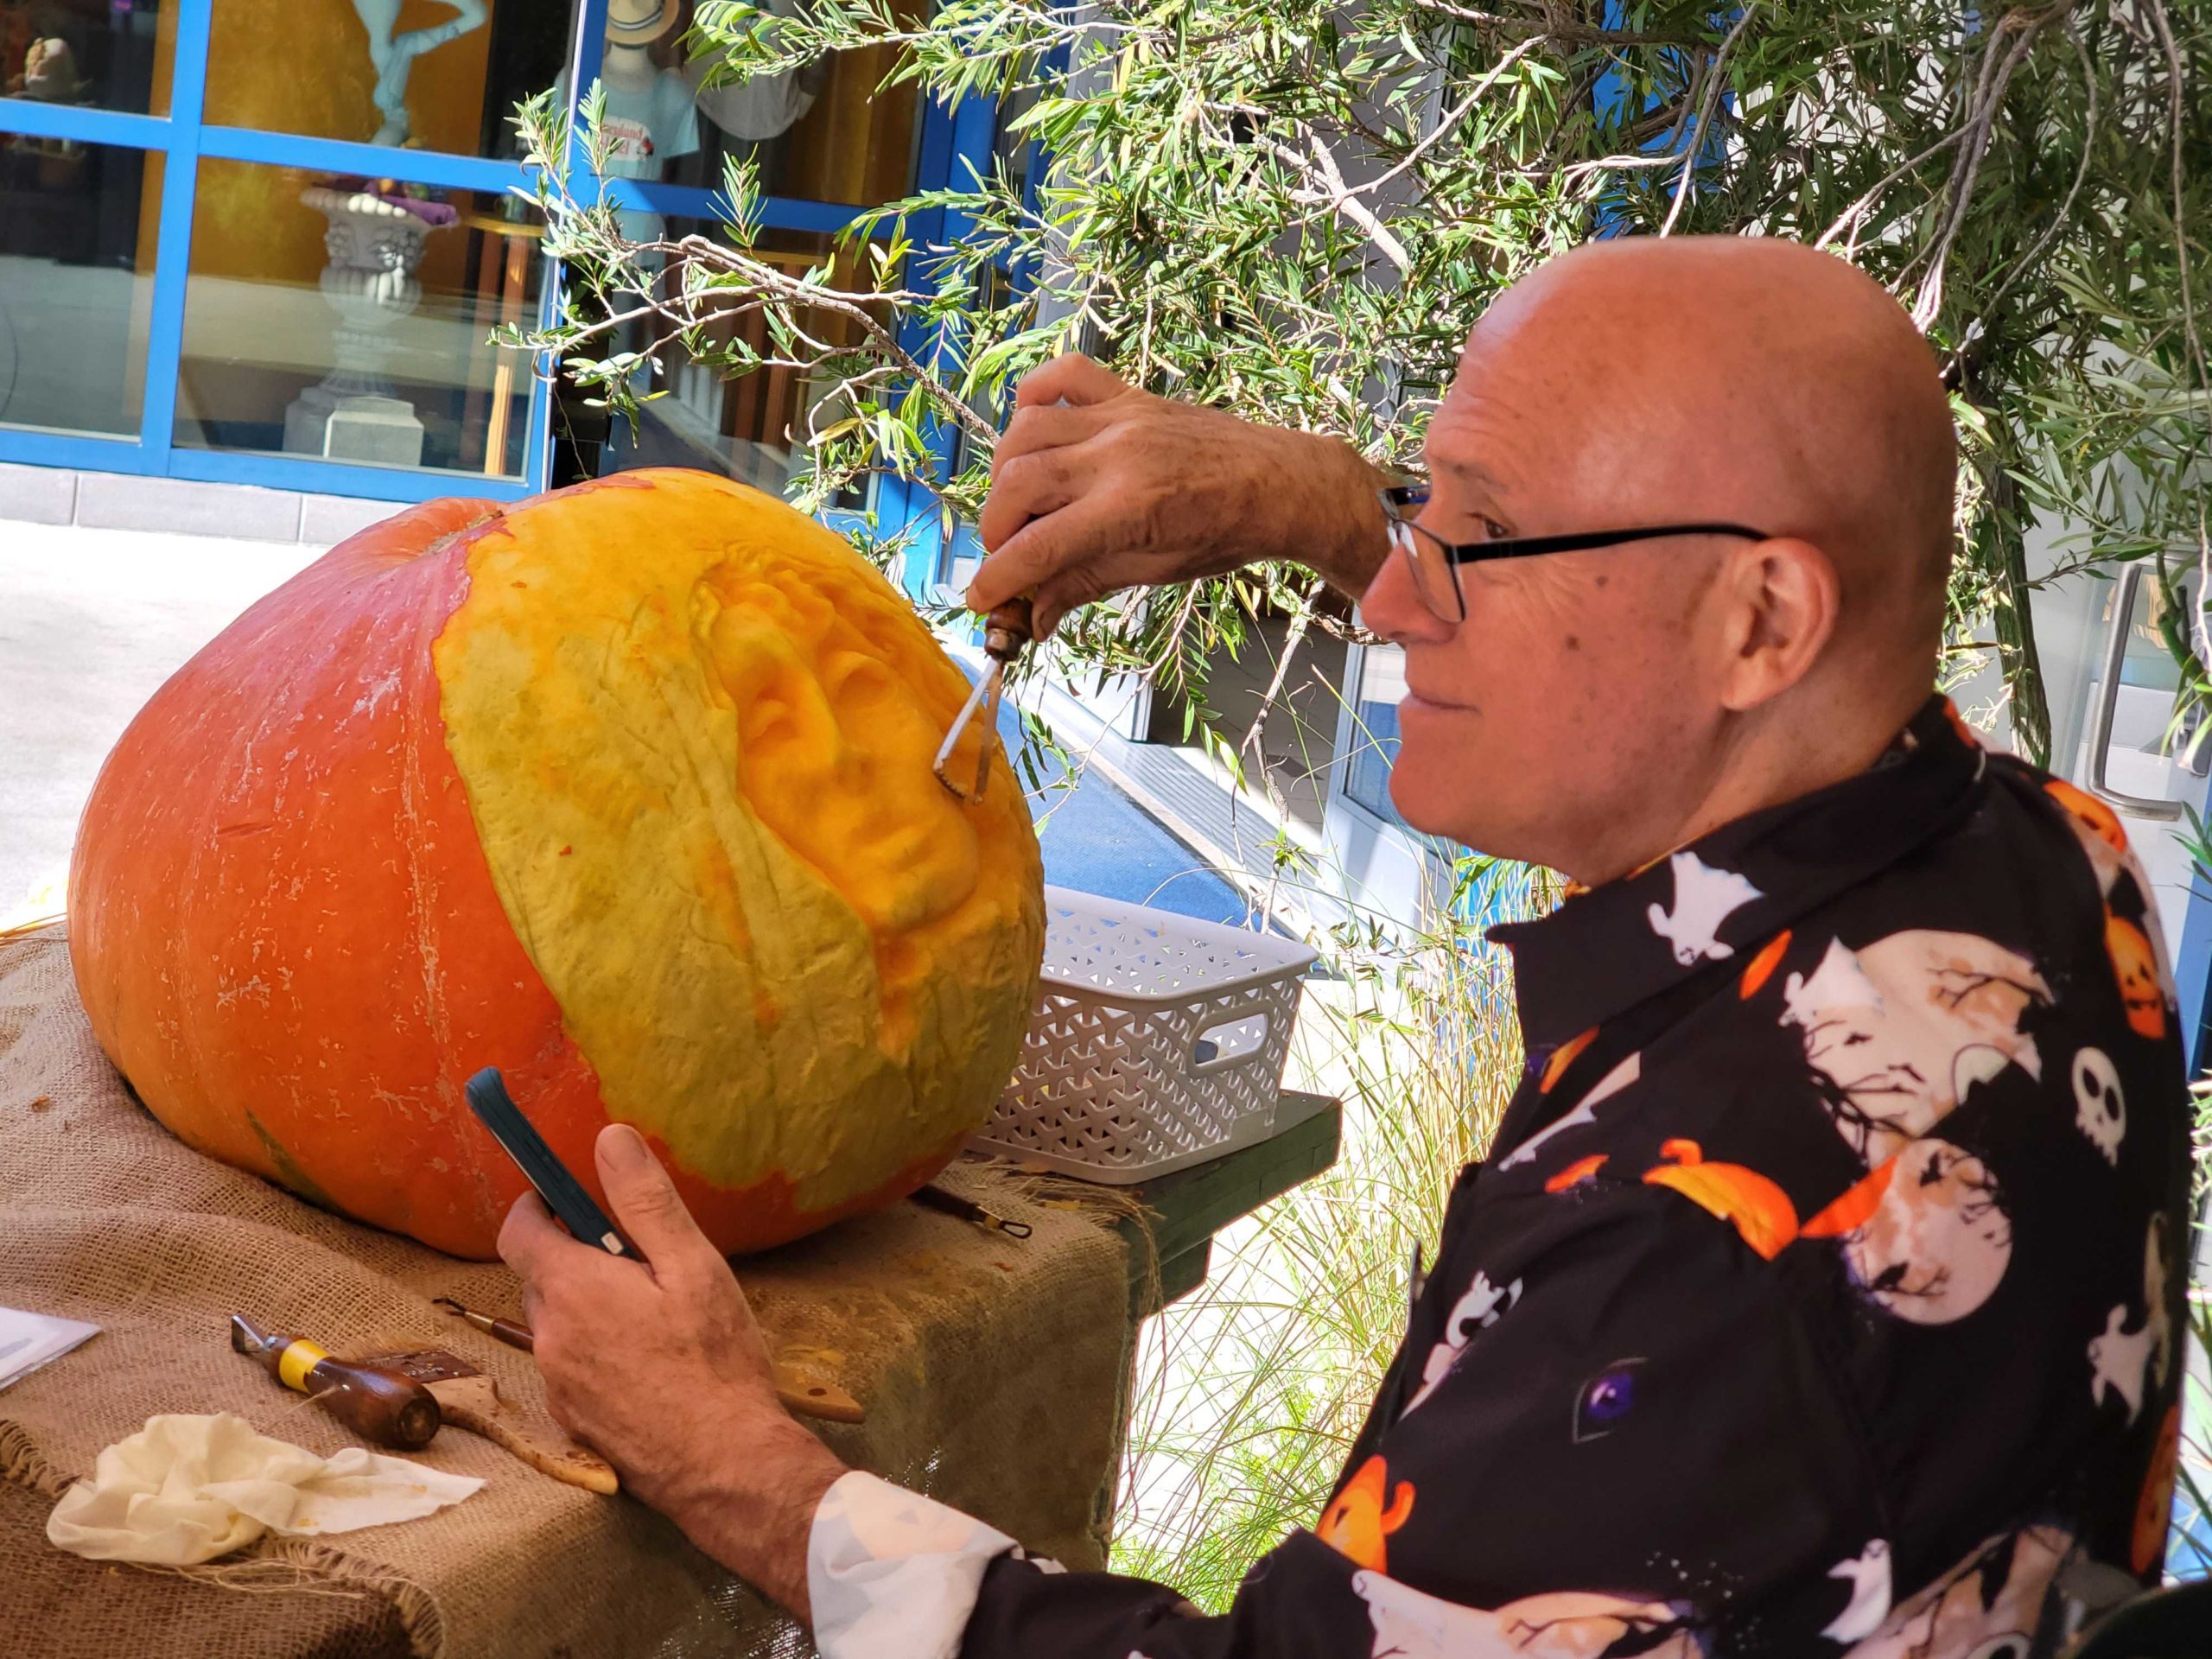
Adam Bierton is a Brooklyn-based professional sculptor, visual artist, and 3D pumpkin carver who gained national prominence after winning Season 5 of Food Network’s Halloween Wars. Moving beyond standard cut-through jack-o'-lanterns, Bierton utilizes ribbon loops, clay modeling implements, and linoleum gouges to carve expressive, hyper-realistic faces and creature features directly into the living flesh of giant pumpkins and squashes.
Who Is Adam Bierton? Career and Artistic Origins
Adam Bierton transformed a traditional holiday pastime into an internationally recognized sculptural discipline. Raised with a passion for creative expression, Bierton initially developed his visual vocabulary through photography, fine art, and traditional clay modeling. His shift into ephemeral botanical media began when he entered local pumpkin carving contests, where his background in three-dimensional spatial design immediately set his work apart from typical triangular-eye jack-o'-lantern cuts.
| Adam Bierton at a Glance | Details |
|---|---|
| Primary Medium | Pumpkins, Atlantic Giants, Squashes, Watermelon |
| Main Technique | 3D Subtractive Sculpting (Clay Loop tools) |
| Career Breakthrough | Winner, Food Network's Halloween Wars (Season 5) |
| Signature Venues | New York Botanical Garden (NYBG), Live Demos |
| Aesthetic Style | Hyper-realistic caricatures, monsters, faces |
Bierton’s national breakthrough arrived in 2015 when he competed on Food Network's Halloween Wars (Season 5). As part of the winning team, his ability to craft deep facial structures, expressive eyes, and intricate skin textures under strict time constraints showcased the potential of pumpkins as a high-art medium.
Following his television success, Bierton established long-standing partnerships with major cultural institutions, most notably the New York Botanical Garden, where he conducts live sculpting demonstrations throughout the autumn season. His work spans private commercial commissions, high-profile media appearances, educational workshops, and year-round artistic projects utilizing various perishable fruits and synthetic media.
Traditional Pumpkin Carving vs. 3D Subtractive Sculpting
To understand Bierton’s work, one must distinguish between traditional stencil carving and 3D subtractive sculpting. Traditional carving involves cutting entirely through the pumpkin wall to allow an interior light source to project outward. This method relies primarily on two-dimensional silhouettes and negative space.
In contrast, 3D subtractive sculpting leaves the pumpkin wall structurally intact. The artist treats the outer rind (epidermis) and inner flesh (mesocarp) as a solid block of clay or marble. By shaving away outer layers to reveal deeper, lighter-colored flesh beneath, the sculptor creates depth, shadow, and organic contours without ever exposing the hollow interior cavity.
TRADITIONAL STENCIL CARVING vs. 3D SUBTRACTIVE SCULPTING
- Traditional Stencil Cut:
- Outer Rind: Cut-Through Hole into Hollow Interior
- Light Source: Projects Outward through Silhouette
- 3D Subtractive Sculpting:
- Outer Rind: Shaved Epidermis (High Contrast)
- Mid-Flesh: Formed Features: Eyes, Wrinkles, Nose (Mid-Tones)
- Deep Flesh: Cavity Wall Intact (Deep Shadows / Highlights)
- Light Source: External Ambient Lighting Highlights 3D Form
The outer orange skin acts as a dark perimeter, while the yellow-orange flesh beneath provides warm mid-tones. Deep cuts that approach the inner cavity wall create light, translucent areas when illuminated from behind, or intense shadow wells under ambient lighting. This interaction between flesh density, depth, and light allows Bierton to sculpt fine micro-details such as wrinkling skin, realistic eyelids, exposed teeth, and porous cheekbones.
| Feature / Dimension | Traditional Stencil Carving | 3D Subtractive Sculpting (Bierton Style) |
|---|---|---|
| Primary Tools | Serrated saws, scoops, stencils | Ribbon loop tools, linoleum gouges, paring knives |
| Integrity of Wall | Pierced through completely | Maintained solid; interior left sealed or hollowed from back |
| Visual Depth | 2D silhouette effect | High-relief 3D anatomical volume |
| Illumination | Internal candle or LED light | External directional light or ambient illumination |
| Average Sculpt Time | 30 minutes to 2 hours | 3 to 12+ hours depending on scale |
| Display Lifespan | 3–7 days before structural collapse | 2–5 days (susceptible to dehydration and shrinkage) |
| Ideal Specimen | Medium, hollow, thin-walled pumpkin | Heavy, thick-walled specimen (e.g., Atlantic Giant) |
Essential Tools of the Master Pumpkin Carver
Bierton’s technique relies heavily on tools originally designed for ceramics, sculpture, and printmaking rather than standard hardware-store carving kits. Achieving smooth curves and detailed facial wrinkles requires precise control over blade tension and depth.
TYPICAL SUBTRACTIVE TOOLKIT FOR PUMPKIN SCULPTING:
Large Ribbon Tool: Rough skinning & blocking mass
Medium Loop Tool: Sculpting eye sockets, nose, mouth
Fine Clay Wire Loop: Wrinkles, eyelid creases, micro-texture
V-Gouge / U-Gouge: Hair strands, pores, sharp linework
Hydration Spray: Constant misting during 4-8 hr carves
Ribbon and Loop Tools: Ceramic ribbon tools featuring sharpened stainless steel loops mounted on wooden handles are Bierton’s primary instruments. Wide ribbon loops strip away the tough outer orange skin rapidly, while smaller wire loops shape brow bones, lips, and cheek contours.
Linoleum Gouges (V-Tools and U-Tools): Borrowed from printmaking, linoleum cutters allow the carver to slice precise, shallow channels into the flesh. These are essential for detailing fine wrinkles, skin pores, hair strands, and iris patterns in the eyes.
Pottery Scrapers and Ribs: Curved metal or plastic scraping tools smooth out rough tool marks left by loop tools, creating realistic, soft skin textures.
Paring Knives and Scalpels: Fine utility blades and paring knives are used to undercut features—such as separating the lips from the teeth or detaching the nostril walls from the upper lip—to produce real shadow lines.
Hydration Gear: Because open pumpkin flesh oxidizes and dries rapidly when exposed to air, a spray bottle filled with cold water or a mild citric acid solution is an indispensable tool throughout the carving process.
Step-by-Step: How Adam Bierton Sculptures Are Created
Crafting a professional 3D pumpkin sculpture requires a systematic approach to spatial planning, material preservation, and anatomical form.
3D PUMPKIN SCULPTING PROCESS:
- STEP 1: SELECTION: Choose thick-walled, heavy specimen
- STEP 2: SKINNING: Strip orange rind to expose carving flesh
- STEP 3: BLOCKING: Establish brow, nose, and mouth depths
- STEP 4: DETAILING: Cut eyes, eyelids, teeth, and skin texture
- STEP 5: HYDRATION: Seal and mist to prevent shrinkage
Step 1: Specimen Selection and Preparation
The success of a 3D sculpt depends entirely on the thickness of the pumpkin's flesh wall. Bierton selects heavy, dense pumpkins with thick, rigid walls—frequently working with Atlantic Giant varieties or thick-walled field carvers. A thick stem indicates a healthy specimen that will retain moisture longer. Before carving, the exterior is cleaned with dilute mist to remove soil and bacteria.
Step 2: Skinning the Canvas
Using a wide loop tool, the artist shaves away the waxy outer orange skin across the area where the face will sit. Removing this outer barrier exposes the moist yellow-orange flesh beneath. The contrast between the uncarved orange skin surrounding the workspace and the light inner flesh helps frame the composition.
Step 3: Blocking out Facial Structure
Before attempting fine details, the artist blocks out major anatomical planes. Bierton pushes the deepest areas of the face—such as the eye sockets, the sides of the nose, and the recess below the bottom lip—deep into the flesh using medium loop tools. Establishing these depth layers early prevents the carver from cutting too deep when detailing secondary features later.
BLOCKING DEPTH PROFILE (Cross-Section View):
- Outer Rind (Orange)
- Shaved Epidermis: Forehead / Cheek surface
- Mid-Flesh: Eye Socket
- Deep Flesh: Deepest recess (near core)
- Cavity Wall: Keep intact for stability
Step 4: Sculpting Key Features and Expression
With the planes established, attention turns to the features that define expression:
- Eyes: Spheres are carved directly out of the eye sockets. Eyelids are formed by undercutting the flesh immediately surrounding the eye sphere, creating realistic folds over the eyeball.
- Nose and Cheeks: The nose is left raised higher than the rest of the face by removing flesh around it. Nostrils are cut downward into the base.
- Mouth and Teeth: To sculpt teeth, the carver cuts a recessed channel for the mouth cavity, leaves a raised block of flesh for the jawline, and then uses small linoleum V-tools to separate individual tooth structures.
Step 5: Refining Micro-Textures and Finishing
Once the main volumes are balanced, fine wire loop tools and linoleum gouges add character marks: crow's feet around the eyes, lip lines, forehead creases, and skin texture. The sculpture is cleaned of loose shavings using a soft brush, sprayed with water to restore surface humidity, and prepared for display lighting.
Preserving Ephemeral Sculptures: Maintenance and Care
Because 3D pumpkin sculptures expose large surface areas of raw plant tissue, they lose moisture much faster than traditional hollow jack-o'-lanterns. When pumpkin flesh loses water, it shrinks and distorts fine facial details.
DEHYDRATION PREVENTION FACT SHEET:
- Primary Threats: Oxidation, Moisture Evaporation, Mold Growth
- Optimal Temp Range: 35°F to 55°F (1.6°C to 12.7°C)
- Key Preservatives: Petroleum Jelly / Vegetable Oil (Moisture Seal), Citric Acid / Dilute Bleach (Antimicrobial)
- Hydration Method: Submersion in cold water bath (1 to 2 hours)
To maximize the life of a 3D sculpt:
- Continuous Hydration During Carving: Keep a spray bottle at hand and mist exposed areas every 15 to 20 minutes while working.
- Cold Water Soaks: If a sculpture begins to shrivel or show surface wilting, submerging the entire carved pumpkin in a tub of ice-cold water for one to two hours can rehydrate the plant cells and plump up details.
- Moisture Barriers: Applying a light layer of petroleum jelly, mineral oil, or specialized anti-transpirant vegetable spray seals the exposed flesh against atmospheric drying. This should only be done after all carving is completely finished, as oil makes the surface too slick for tools.
- Temperature Control: Keep carved specimens in a cool environment (ideally between 35°F and 55°F). Heat dramatically accelerates bacterial decay and flesh breakdown.
Beyond Halloween: Year-Round Botanical Sculpting
While Adam Bierton is best known for his autumn pumpkin carves, his techniques apply across a wide variety of botanical and non-traditional media. During spring and summer seasons, he adapts his subtractive sculpting methods to watermelons, cantaloupes, squashes, and pineapples. Watermelon sculpting presents a unique artistic challenge due to its distinct color layers: dark green skin, white rind, and rich red fruit center.
WATERMELON COLOR-LAYER MAPPING FOR 3D SCULPTING:
- Outer Dark Green Skin: Hard silhouettes, dark shadows, background contrast
- White Inner Rind: Bone structures, teeth, facial highlights, skin mid-tones
- Red Flesh Center: Mouth cavity, open wounds, interior depth, vibrant accents
Commercial clients also commission Bierton for permanent installations using high-density polyurethane foam, synthetic resin, and clay. These durable materials allow his signature caricature styles to be displayed indefinitely in museum exhibits, seasonal displays, and commercial advertising campaigns.
Frequently Asked Questions
How long does a 3D sculpted pumpkin last compared to a standard carved pumpkin?
A 3D sculpted pumpkin typically maintains optimal detail for 2 to 5 days depending on ambient humidity and temperature. Because a large surface area of raw flesh is exposed without the outer rind's protection, it dehydrates faster than a traditional jack-o'-lantern, though it is less prone to sudden structural collapse since the walls remain thick and unpierced.
Does Adam Bierton cut the top off or gut the pumpkin before carving?
Not always. In many 3D relief carves, the interior cavity is left intact and completely sealed, which helps the pumpkin retain structural rigidity and internal moisture. When illumination from within is required, Bierton hollows the pumpkin from the back or bottom rather than the top, preserving the natural stem and structural top crown.
What tools are best for beginners wanting to try 3D pumpkin sculpting?
Beginners should start with a basic ribbon loop tool set designed for pottery or clay sculpting, alongside a standard paring knife. A small U-gouge linoleum cutter is also helpful for fine lines. High-end specialized equipment is not required to practice basic subtractive carving techniques.
What type of pumpkin is best for 3D relief carving?
Heavy, dense pumpkins with thick walls are essential. Varieties such as Atlantic Giants, Cinderella (Rouge Vif d'Etampes) pumpkins, or heavy commercial field carvers offer the deep flesh needed to carve prominent noses, brows, and mouth cavities without breaking into the hollow center.
How does Adam Bierton prevent carved pumpkins from turning brown?
Browning is caused by oxidation when cellular enzymes react with air. Misting the freshly carved flesh with a solution of water mixed with lemon juice or citric acid slows down oxidation, preserving the natural yellow-orange tone of the flesh during long carving sessions.
Recommended Next Steps for Aspiring Carver Artists
To start practicing 3D subtractive carving using Adam Bierton’s techniques:
- Acquire Pottery Ribbon Tools: Obtain a set of medium and small steel loop tools from an art supply retailer.
- Select Dense Produce: Start with small butternut squash or honeydew melons, which have consistent flesh density and are available year-round for practice.
- Practice Depth Mapping: Focus first on shaving away skin to form basic geometric shapes before attempting complex facial anatomy.
- Study Real Anatomy: Use references of human expressions, bone structures, and caricatures to guide depth cuts, keeping spray bottles nearby to maintain surface moisture throughout your build.