Solving a 3x3 Rubik's Cube is one of the most rewarding mental challenges, transforming a seemingly impossible puzzle into an orderly system of intuitive logic and algorithmic patterns. While advanced speedcubing methods require memorizing dozens of algorithms, beginners can master the puzzle by breaking the process down into five clear, manageable phases. By focusing on layer-by-layer progression rather than trying to solve the entire cube at once, anyone can learn how to solve a standard Rubik's Cube reliably, quickly, and without confusion.
Understanding the Rubik's Cube Anatomy and Terminology
Before diving into the steps, it is essential to understand how a 3x3 Rubik's Cube is constructed. A standard cube consists of 26 individual smaller pieces attached to an internal core. However, from a solver's perspective, these pieces fall into three distinct categories:
- Center Pieces: These are the six single-colored pieces located in the direct center of each face. Crucially, center pieces never move relative to each other. They define the permanent color of each face (e.g., the white center is always opposite the yellow center).
- Edge Pieces: These are the twelve pieces that feature two distinct colors and reside between the center pieces on the outer edges of the faces.
- Corner Pieces: These are the eight pieces that feature three distinct colors and occupy the corners of the cube.
Standard Notation
To follow any reliable 3x3 guide, you must understand basic move notation. When holding the cube facing you, standard notation uses single letters to represent a 90-degree clockwise rotation of a specific face:
- F (Front): The side directly facing you.
- B (Back): The side opposite the front.
- U (Up): The top face.
- D (Down): The bottom face.
- L (Left): The left face.
- R (Right): The right face.
If a letter is followed by an apostrophe (e.g., $R'$ or $U'$), it indicates a counter-clockwise (prime) 90-degree turn. If a letter is followed by the number 2 (e.g., $F2$), it indicates a 180-degree half-turn.
The 5-Step Solution Framework
The structured 5-step method streamlines the learning process by isolating specific layers and piece orientations. Below is a detailed breakdown of each phase required to bring the scrambled cube to a complete, solved state.
Step 1: Solve the White Cross and Align Centers
The foundation of the beginner method begins on the white face. Your goal is to form a white cross on the bottom (or top, depending on your starting preference, though white is universally standard) while ensuring the secondary color of each edge piece matches the adjacent center piece.
- Find Edge Pieces with White: Locate any edge piece on the cube that features white.
- Bring to the Equator or Top: Maneuver the piece so it rests in the middle layer without disrupting other solved elements.
- Align with Centers: Rotate the top layer until the side color of the white edge piece matches the center piece on the corresponding side (e.g., matching the red side of a white-red edge with the red center).
- Drop to the Base: Turn that face 180 degrees ($F2$ or $R2$) to drop the edge piece down to the white face, forming the first leg of the cross.
- Repeat: Do this for all four white edge pieces, verifying that the side colors match their respective centers.
Step 2: Complete the First Layer Corners
With the white cross established on the bottom, the next objective is to fill in the four white corner pieces, completing the entire first layer of the cube.
- Scan the Top Layer: Look at the top layer for any corner piece that contains white.
- Position Above Target: Rotate the top layer until the target white corner is positioned directly above the space it needs to occupy in the bottom layer.
- Execute the Right-Hand Algorithm: Hold the cube so the target corner is on the top-right-front. Perform the fundamental sequence known as the "Right-Hand Algorithm": $$R \ U \ R' \ U'$$
- Repeat Until Seated: Repeat this four-step sequence continuously until the corner piece drops into the bottom layer with the white sticker facing downward and the side colors aligned with the adjacent centers. If a white corner is trapped in the bottom layer incorrectly, use the same algorithm to eject it to the top layer first.
Step 3: Solve the Second Layer (Middle Edges)
At this stage, the bottom third of your cube is completely solved, and the white face remains intact. You will now flip the cube upside down so that the completed white layer is on the bottom, and the yellow face is now on top.
Your goal is to populate the middle layer's four edge positions.
- Find Non-Yellow Top Edges: Look at the top (yellow) layer for an edge piece that does not have yellow on either of its facets.
- Form the T-Shaped Alignment: Rotate the top layer until the front-facing color of that edge matches its corresponding center piece, forming a large vertical "T" shape on that face.
- Determine Direction: Look at the top color of that edge piece. Decide whether it needs to move to the right slot or the left slot in the middle layer.
- Execute the Insertion Algorithm:
- To move an edge to the Right: $U \ R \ U' \ R' \ U' \ F' \ U \ F$
- To move an edge to the Left: $U' \ L' \ U \ L \ U \ F \ U' \ F'$
- Repeat: Complete this for all four middle layer edges. If a middle-layer edge is stuck in the wrong position or flipped, substitute it with any random edge from the top layer using the algorithm to dislodge it.
| Target Slot | Primary Direction | Associated Algorithm Sequence |
|---|---|---|
| Middle Right | Right insertion | $U \ R \ U' \ R' \ U' \ F' \ U \ F$ |
| Middle Left | Left insertion | $U' \ L' \ U \ L \ U \ F \ U' \ F'$ |
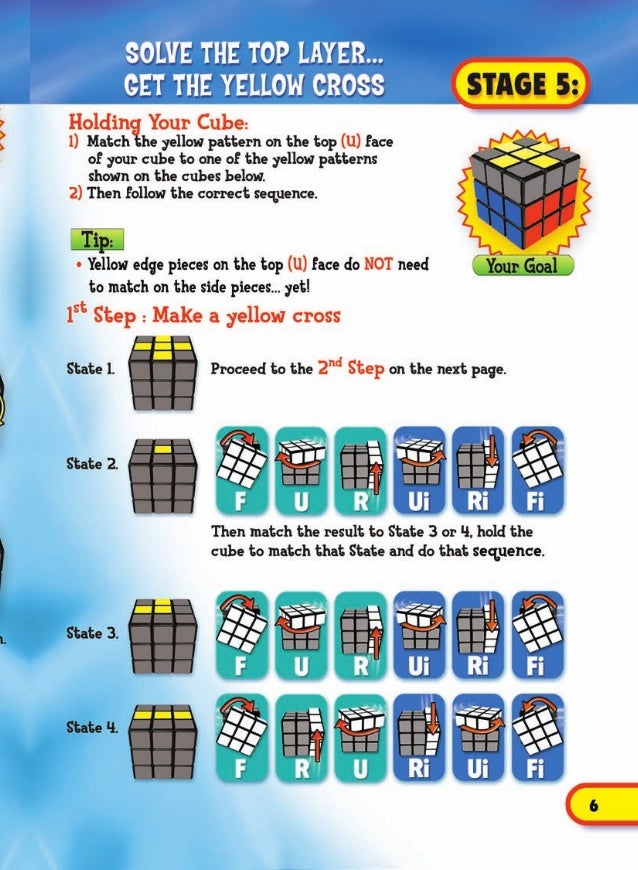
Step 4: Form the Yellow Cross on the Top Layer
With the bottom two layers fully solved, attention shifts entirely to the final (top yellow) layer. The first milestone here is creating a yellow cross on top, regardless of whether the side edge colors match just yet.
Look at the top yellow face. You will typically see one of four patterns:
- Dot (Only the center): If you see only the center yellow piece, perform the cross algorithm once to transition to the "Hook" shape.
- Hook (L-shape / 9:00 position): Position the yellow corner and two connected edges so they resemble an L-shape pointing to the top-left (like clock hands pointing to 9 and 12). Perform: $$F \ (R \ U \ R' \ U') \ F'$$
- Bar (Straight Line): If the yellow edges form a horizontal line across the center, orient the line horizontally and perform the same algorithm: $$F \ (R \ U \ R' \ U') \ F'$$
- Cross: If a full yellow cross is already visible, proceed directly to the next step.
Step 5: Orient and Permute the Final Layer (Corners and Edges)
The final phase requires putting the remaining yellow pieces into their correct final positions. This is done in two distinct sub-steps: positioning the corners, orienting the corners, and finally positioning the remaining edges.
Permute Final Corners (PBL)
- Scan the top layer corners to see if any two adjacent corners share the same matching side colors (forming a "headlight" pair).
- If you find headlights, turn the top layer until those headlights face the back of the cube ($B$).
- If no headlights exist, perform the corner permutation algorithm from any angle to create them, then reposition them to the back.
- Execute the algorithm: $$R' \ F \ R' \ B2 \ R \ F' \ R' \ B2 \ R2$$
Permute Final Edges
- Inspect the top edges. You will typically find three unsolved edges and one solved edge, or four unsolved edges.
- If one edge is solved, place that solved face against the back ($B$).
- Determine whether the remaining three edges need to cycle clockwise or counter-clockwise.
- Clockwise Cycle: $R \ U' \ R \ U \ R \ U \ R \ U' \ R' \ U' \ R2$
- Counter-Clockwise Cycle: $R2 \ U \ R \ U \ R' \ U' \ R' \ U' \ R' \ U \ R'$
Once the edges fall into place, your 3x3 Rubik's Cube is fully solved.
Common Mistakes and Troubleshooting
Beginners frequently encounter roadblocks during their first few solves. Recognizing these common errors saves frustration and accelerates learning:
- Inverting the Cube Mid-Process: Accidentally tilting the cube upside down while working on the middle or top layers destroys the alignment of the bottom layers. Always keep the white layer firmly on the bottom until Step 3 is complete.
- Misinterpreting Prime Notations: Confusing clockwise turns with counter-clockwise prime ($'$) turns will reverse your progress. Remember that a prime symbol means moving the face counter-clockwise when looking directly at that specific face.
- Forcing Incorrect Corner Insertion: Trying to force a corner piece into a slot without running the Right-Hand Algorithm the correct number of times will misorient the piece. Always complete the entire four-move sequence until the white sticker faces downward.
Frequently Asked Questions
What is the easiest method to learn for beginners?
The Layer-by-Layer (LBL) method outlined in this 5-step guide is widely recognized as the most reliable approach for beginners. It avoids heavy memorization by relying on fundamental muscle memory algorithms that manipulate individual pieces without dismantling previously solved layers.
How long does it take to learn how to solve a Rubik's Cube?
Most beginners can achieve their first solved cube within two to four hours of dedicated practice using a written guide. Once the muscle memory for the algorithms develops, average solve times typically drop below two minutes.
Do I need an expensive speedcube to learn?
No. While modern magnetic speedcubes offer smoother corner-cutting and faster turning mechanics, standard Rubik's brand cubes or budget-friendly alternative puzzles purchased today work perfectly fine for learning the foundational beginner method.
Why do my middle layer edges keep popping out?
Middle layer edges usually dislodge because you selected the wrong insertion algorithm (using a left-hand insertion when a right-hand insertion was required) or because you failed to align the edge with its matching center piece to form the initial "T" shape.
Can any scrambled 3x3 Rubik's Cube be solved?
Yes. Every standard, legally scrambled 3x3 Rubik's Cube can be solved in 20 moves or fewer—a mathematical threshold known as God's Number. However, the beginner method utilizes a predictable series of steps that may take anywhere from 50 to 100 total moves.
Practical Next Actions
To solidify your skills after reading this guide, take your scrambled cube and practice Step 1 repeatedly until you can form the white cross without referencing notes. Once that feels natural, progress one step at a time through the remaining four layers. Keep a printed cheat sheet of the algorithms nearby, practice consistency over speed, and enjoy the process of mastering the world's most iconic puzzle.