Performing a fresh installation of Windows 10 using a USB drive is the most effective way to resolve persistent performance issues, clear out accumulated system clutter, remove stubborn malware, or prepare a machine for a new user. This process wipes the target drive clean, installs a pristine copy of the operating system, and gives your hardware a clean slate.
Understanding the Fresh Install Process
A fresh installation—often referred to as a clean install—is fundamentally different from upgrading an existing operating system or resetting Windows via the built-in recovery settings. When you perform an in-place upgrade or a standard reset, Windows attempts to preserve user files, installed applications, and customized configurations. Over time, however, these settings accumulate corrupted registry entries, outdated drivers, and residual files from uninstalled programs that degrade system responsiveness.
By utilizing a bootable USB installation medium, you bypass the existing operating system entirely. You format the primary partition, erasing all data on that drive, and deploy a direct image from Microsoft’s installation servers. This ensures that no legacy software conflicts or system file corruption carry over to the new environment.
Before beginning this procedure, you must understand that everything stored on the drive where Windows is installed will be permanently deleted. This includes personal documents, photos, downloads, desktop items, and application data. Preparation is the key to a successful deployment; backing up critical files to an external drive, cloud storage, or a secondary internal disk is non-negotiable.
Prerequisites and System Requirements
Before downloading files or modifying hardware settings, ensure your computer meets the necessary baseline requirements and that you have the required tools on hand.
Hardware and Software Requirements
- A functional computer with internet access: Used to download the Windows 10 installation media creation tools.
- A blank USB flash drive: Minimum capacity of 8 GB. Note that the creation process will erase all existing data on this flash drive.
- Windows 10 system requirements: A 1 GHz or faster processor, at least 1 GB of RAM for 32-bit or 2 GB for 64-bit systems, 32 GB of available storage space, and a DirectX 9 graphics device with a WDDM 1.0 or higher driver.
- Product Key: While Windows 10 often activates automatically if the motherboard has a digital license linked to your Microsoft account or OEM hardware, having your 25-character product key ready prevents activation delays.
Preparation Checklist
- Verify that all important files from the target computer are backed up safely.
- Gather your hardware driver information, particularly network card drivers (Wi-Fi or Ethernet), in case Windows Setup does not natively recognize your motherboard's network chipset.
- Ensure your computer remains plugged into a reliable power source throughout the entire process. Laptops losing power midway through a BIOS update or operating system deployment can experience catastrophic hardware bricking or partition corruption.
Step 1: Creating the Bootable Windows 10 USB Drive
The first active step in the installation journey is turning a standard flash drive into a bootable installation medium. Microsoft provides a dedicated utility specifically for this purpose.
- Insert your 8 GB (or larger) USB flash drive into a working Windows computer.
- Navigate to the official Microsoft software download page and locate the Media Creation Tool for Windows 10. Click Download tool now.
- Once the download completes, run the executable file (
MediaCreationTool.exe) as an administrator. Accept the applicable licensing terms and notices. - When prompted with the question, "What do you want to do?", select Create installation media (USB flash drive, DVD, or ISO file) for another PC, then click Next.
- Verify the language, architecture, and edition settings. By default, the tool matches the architecture of the machine you are currently using. If you are creating this USB for a different PC, you can uncheck "Use the recommended options for this PC" to manually adjust these parameters, though keeping the default 64-bit architecture is standard for modern hardware. Click Next.
- Select USB flash drive and click Next.
- Choose your specific USB drive from the list of removable drives. Ensure you select the correct letter designation to avoid wiping another external drive by mistake. Click Next.
- The tool will now download the official Windows 10 installation files directly from Microsoft's servers and write them to your flash drive. This process can take anywhere from 10 to 30 minutes depending on your internet connection speed and write performance. Once finished, the prompt will state that your USB flash drive is ready. Click Finish.
Step 2: Configuring BIOS/UEFI Boot Priority
To boot from the newly created USB drive rather than your internal hard drive, you must instruct your computer's motherboard firmware (BIOS or UEFI) to change the boot device order.
- Leave the USB flash drive plugged into the target computer.
- Restart or power on the computer.
- Immediately begin pressing your computer's specific Boot Menu Key or BIOS Setup Key repeatedly as the manufacturer logo appears. Common keys include F12, F11, F8, F2, or the Delete key, depending on your motherboard manufacturer (e.g., Dell, HP, ASUS, Lenovo, MSI).
- Once inside the BIOS/UEFI utility or the one-time Boot Menu, locate the Boot Order or Boot Priority tab.
- Move the USB Storage Device (sometimes listed under UEFI USB or removable devices) to the absolute top of the boot priority list.
- Save your changes and exit (commonly achieved by pressing F10). The computer will automatically restart and read the boot sector of your USB drive.
Step 3: Executing the Windows 10 Installation
With the computer successfully booted from the USB drive, the Windows Setup environment will load.
| Installation Phase | Primary Objective |
|---|---|
| Setup Initialization | Load language, keyboard layouts, and boot files |
| Partition Management | Format existing partitions and clear old data |
| File Deployment | Copy installation files from USB to local drive |
| Out-Of-Box Experience (OOBE) | Configure user accounts, privacy, and networking |
Initial Language and Setup Configuration
- When the Windows Setup window appears, select your preferred language, time and currency format, and keyboard or input method. Click Next.
- Click the Install now button in the center of the screen. The setup program will display a brief "Setup is starting" notification.
- When prompted to activate Windows, enter your 25-character product key. If you are reinstalling Windows 10 on a machine that already had an activated copy, click I don't have a product key. Windows will automatically re-activate digitally once the installation completes and connects to the internet, provided the hardware configuration remains fundamentally unchanged.
- Select the specific edition of Windows 10 that matches your license (e.g., Windows 10 Home or Windows 10 Pro). Selecting the wrong edition will prevent proper activation later. Click Next.
- Read and accept the license terms by checking the box, then click Next.
Partition Management and Drive Formatting
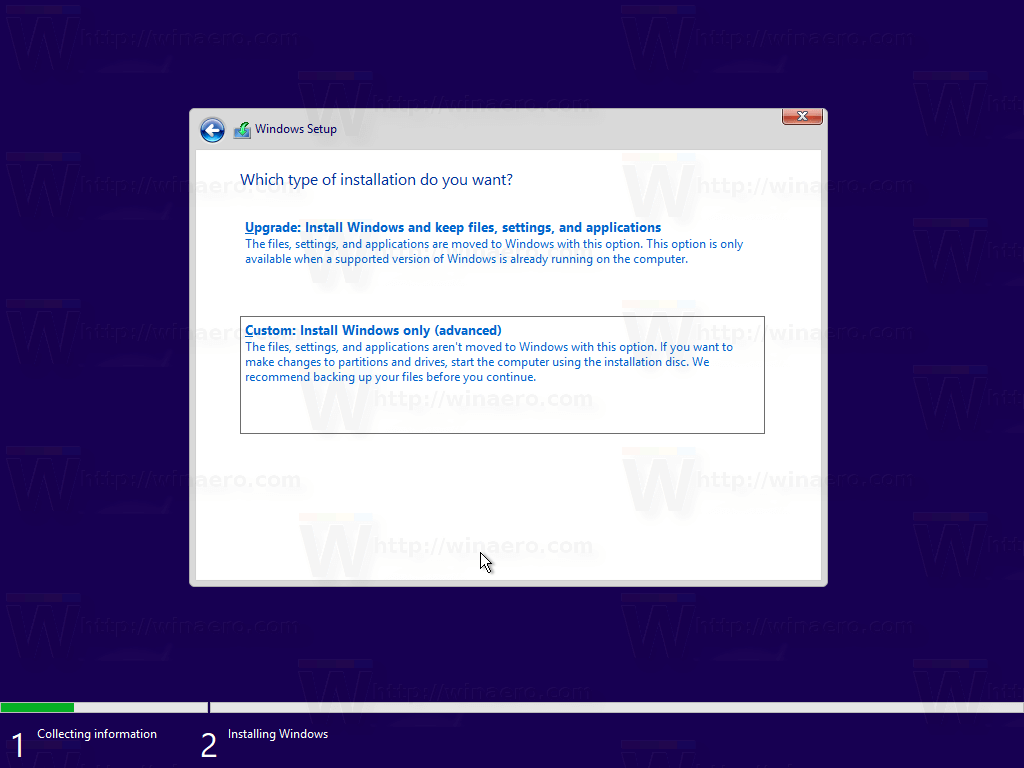
- You will be presented with two installation options: Upgrade: Install Windows and keep files, settings, and applications or Custom: Install Windows only (advanced). Because this is a fresh install guide, select Custom: Install Windows only (advanced).
- You will now see a list of existing drives and partitions on your system. To ensure a truly clean install free of lingering system files or malware remnants:
- Highlight each partition on your primary drive (Drive 0) one by one and click Delete until the entire drive displays as "Unallocated Space."
- Caution: Ensure you do not select or delete a secondary data drive if your system has multiple physical disks installed.
- Select the Unallocated Space where you want Windows installed and click Next. Do not bother manually formatting or partitioning the space; let the setup wizard automatically create the necessary system partitions.
- The installation process will begin. It copies files from the USB drive, gets files ready for installation, installs features, installs updates, and finishes up. Your computer will automatically restart several times during this phase.
Step 4: Completing the Out-Of-Box Experience (OOBE)
Once the final system restart concludes, Windows enters the Out-Of-Box Experience (OOBE). This is where you configure your personal preferences, network connectivity, and user profile.
- Select your region and keyboard layout based on the regional prompts.
- Connect to your wireless network when prompted. If you are using a wired Ethernet connection, Windows may bypass this prompt or check for updates immediately.
- Choose whether to set up the computer for Personal use or Organization.
- Sign in with your Microsoft account or create a local account if preferred. Using a Microsoft account synchronizes your settings, links your digital license, and integrates Microsoft services, whereas a local account keeps your profile entirely offline and bound to the local machine.
- Create a secure password and set up security questions if using a local account, or configure a PIN if using a Microsoft account.
- Configure your Privacy Settings by toggling diagnostic data, location services, diagnostic tracking, and tailored experiences according to your preferences. Disabling unnecessary telemetry options can enhance privacy.
Step 5: Post-Installation Drivers and Verification
After reaching the Windows 10 desktop for the first time, your system is operational, but critical post-installation tasks remain to ensure stability, security, and performance.
Updating Drivers and Windows Update
- Open Settings by pressing the Windows Key + I, navigate to Update & Security, and click Windows Update.
- Check for updates and install all available cumulative updates and optional hardware drivers. Windows Update will automatically pull most necessary motherboard, graphics, and peripheral drivers.
- Visit your computer manufacturer’s official support website (or components manufacturer like NVIDIA, AMD, or Intel) to download the latest dedicated graphics drivers, chipset drivers, and network interface card drivers for optimal performance.
System Verification
- Verify system activation by navigating to Settings > Update & Security > Activation. Ensure the status reads "Windows is activated with a digital license."
- Check Device Manager (right-click the Start Menu and select Device Manager) to confirm that there are no missing hardware drivers designated by yellow warning triangles.
Frequently Asked Questions
Will a fresh install erase all my files?
Yes. A fresh installation completely formats the target drive partition, erasing all operating system files, user profiles, applications, and personal data. Always back up critical data to external storage before starting.
Do I need a product key to reinstall Windows 10?
If your computer previously had an activated copy of Windows 10, you generally do not need to enter a product key during installation. The motherboard's hardware ID is registered on Microsoft's activation servers, and Windows will automatically re-activate once connected to the internet.
How long does a Windows 10 USB fresh install take?
The entire process—including creating the USB media, formatting the drive, copying installation files, and completing the initial setup—typically takes between 30 to 60 minutes, depending heavily on your computer's storage drive speed (SSD vs. HDD) and internet connection.
Can I use a Mac to create a Windows 10 bootable USB?
Yes, you can use a Mac to download the official Windows 10 ISO file and use either Apple's built-in Boot Camp Assistant or manual command-line formatting tools to write the ISO to a USB flash drive, though using a native Windows PC simplifies the process.
What should I do if my computer fails to boot from the USB drive?
Verify that your USB drive was created successfully using the official Media Creation Tool. Additionally, enter your motherboard BIOS/UEFI settings to ensure that Legacy Boot or Secure Boot settings are properly configured to recognize external USB installation media.