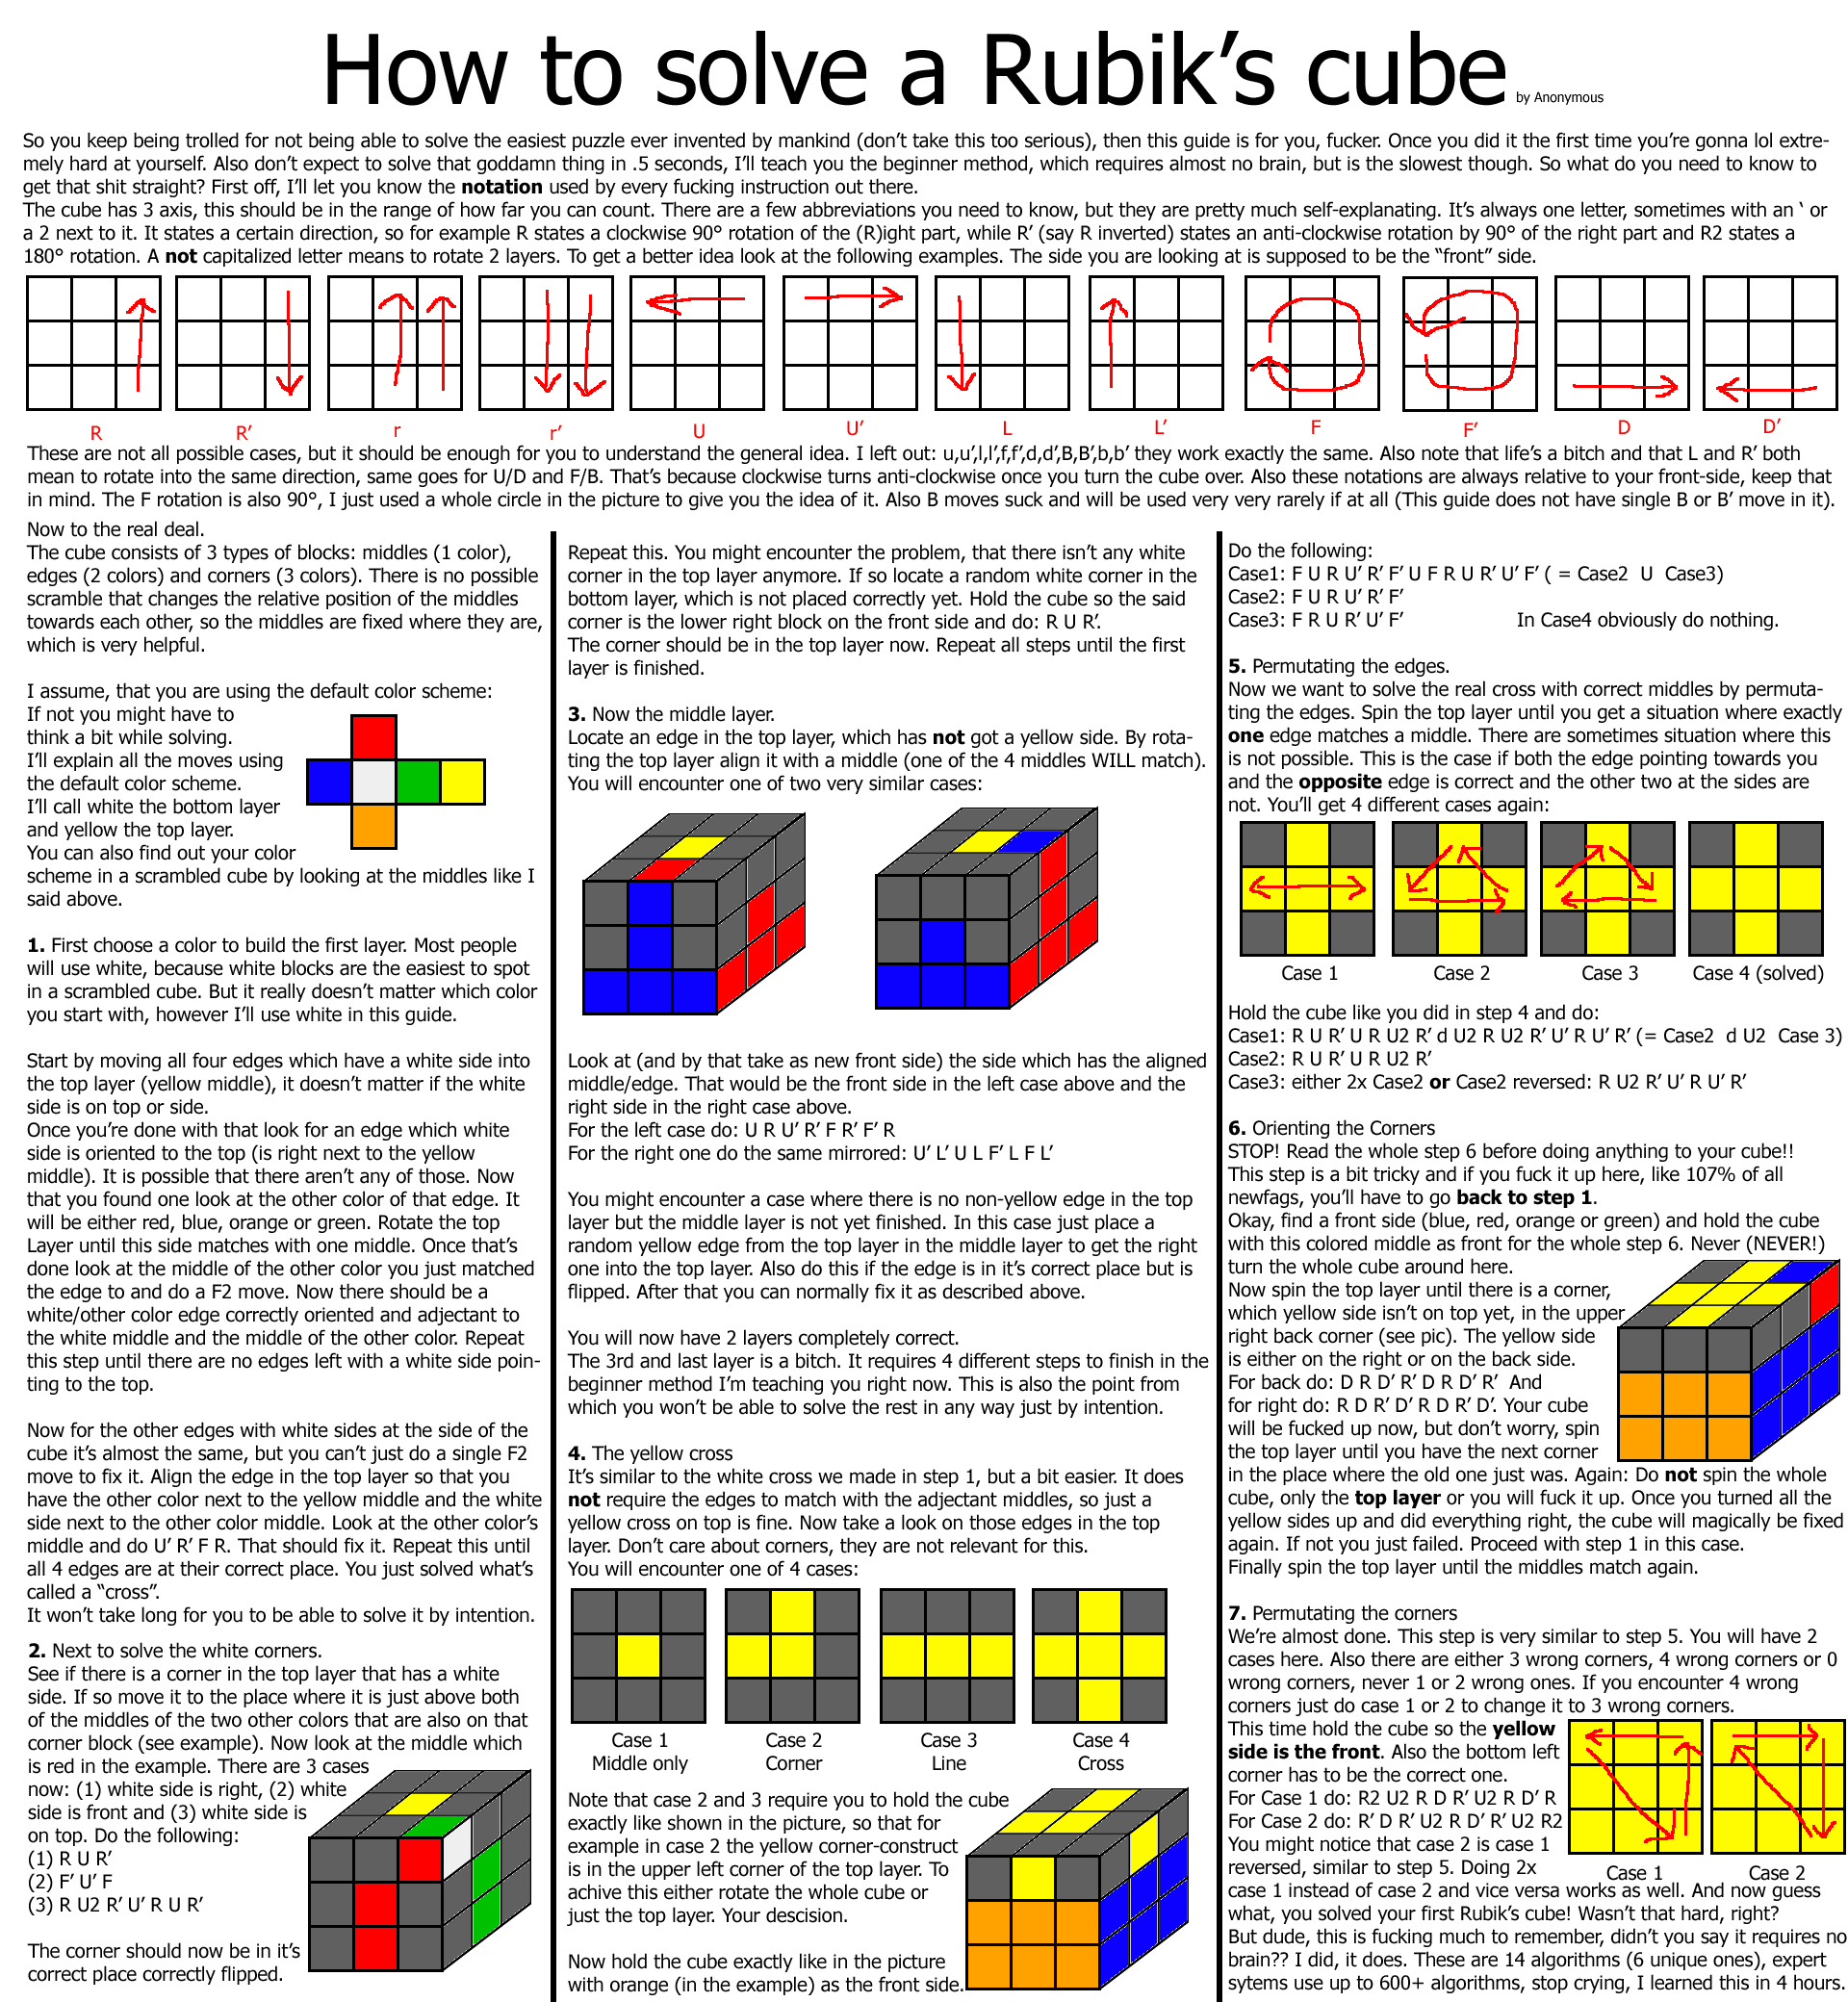
To solve a 3x3 speed cube, you must master the Layer-by-Layer method, which breaks the puzzle into manageable stages: creating a cross, completing the first layer, solving the middle edges, and orienting the final layer. By applying specific sequences of moves called algorithms and understanding notation, anyone can transition from beginner to speedcuber.
The 3x3 speed cube is more than just a toy; as of 2026, it remains a global phenomenon that bridges the gap between mechanical engineering and competitive sport. Whether you are using a state-of-the-art magnetic flagship cube or a budget-friendly model, the logic of the solve remains identical. The following guide provides a comprehensive, technical roadmap to mastering the 3x3, focusing on the most efficient beginner-to-intermediate path: the Layer-by-Layer (LBL) method.
Understanding the Anatomy and Mechanics of the 3x3 Cube
Before attempting your first solve, you must understand that you are not moving individual colored stickers, but rather mechanical pieces. A standard 3x3 cube consists of three types of pieces, each with unique properties and constraints.
The Center Pieces
There are six center pieces, each fixed to the internal core. These pieces have only one visible color and never move in relation to each other. The center piece determines the color of the entire face. On a standard color scheme, white is opposite yellow, green is opposite blue, and red is opposite orange. If the white center is on top, and the green center is facing you, the red center will always be on your right.
The Edge Pieces
There are 12 edge pieces, each located between the corners. These pieces have two colors. Edges can be rotated and moved to different positions, but an edge piece can never become a corner piece.
The Corner Pieces
There are eight corner pieces, each having three colors. These are the most mobile pieces and are located at the vertices of the cube. Like edges, corners are restricted to their specific type; a corner piece will always be a corner.
Master the Cube Notation
To follow any step-by-step guide or algorithm, you must learn the universal notation established by the World Cube Association (WCA). Each letter represents a 90-degree turn of a specific face in a clockwise direction. A "prime" symbol ( ' ) indicates a counter-clockwise turn.
- R (Right): Turn the right face clockwise.
- L (Left): Turn the left face clockwise.
- U (Up): Turn the top face clockwise.
- D (Down): Turn the bottom face clockwise.
- F (Front): Turn the face facing you clockwise.
- B (Back): Turn the back face clockwise.
An "i" or a prime (e.g., R') means you turn that face counter-clockwise as if you were looking directly at that face. A "2" (e.g., U2) means you turn that face 180 degrees. Understanding this notation is the single most important prerequisite for speedcubing, as it allows you to execute moves with muscle memory rather than visual tracking.
Step 1: The White Cross (The Foundation)
The goal of this first stage is to place the four white edge pieces around the white center. However, there is a catch: the non-white side of the edge piece must match the center piece of the adjacent face.
The "Daisy" Strategy
For absolute beginners, the easiest way to form the cross is to create a "Daisy" first.
- Find the yellow center and hold the cube so the yellow center is on top.
- Find the four white edge pieces and move them so they surround the yellow center, regardless of the side colors.
- Once you have a white "Daisy" on the yellow face, look at the side color of one white edge piece.
- Rotate the top layer (U) until that side color matches the center piece of the side face.
- Turn that face 180 degrees (F2) so the white edge moves to the bottom, joining the white center.
- Repeat for all four edges.
By the end of this step, you should have a white cross on the bottom of the cube, with the side colors of the edges perfectly aligned with the red, blue, orange, and green centers.
Step 2: Completing the First Layer (White Corners)
Now that the cross is set, you must place the four white corner pieces. This will complete the entire white face and the first "row" of colors on the side faces.
- Hold the cube with the white cross on the bottom (white center facing down).
- Find a corner piece in the top layer that has white on it. Let’s say it is the White-Red-Green corner.
- Rotate the top layer until this corner is directly above the spot where it needs to go (between the red and green centers).
- Execute the "Right-Hand Algorithm" until the corner is correctly oriented in its slot: (R U R' U').
You may need to perform this sequence once, three times, or five times depending on how the corner is rotated. Repeat this for all four corners. If a corner is already in the bottom layer but in the wrong spot or rotated incorrectly, use the R U R' U' algorithm once to bring it to the top layer, then proceed as usual.
Step 3: Solving the Middle Layer (Edges)
With the first layer complete, you now focus on the four edge pieces of the middle layer. These are edges that do not have any yellow on them.
- Keep the white face on the bottom.
- Find an edge piece in the top layer that does not have yellow. For example, the Green-Orange edge.
- Rotate the top layer until the color facing you matches its corresponding center (creating a vertical "T").
- Determine if the piece needs to move to the right slot or the left slot.
To move the edge to the right:
- U R U' R' U' F' U F
To move the edge to the left:
- U' L' U L U F U' F'
This step requires precision. If you find an edge piece is already in the middle layer but flipped or in the wrong spot, simply "insert" a random yellow edge piece into that spot using one of the algorithms above. This will "kick" the correct piece back to the top layer, allowing you to insert it properly.
Step 4: The Yellow Cross
Now we move to the top layer. The goal is to create a yellow cross on the top face without disturbing the two layers we have already solved. At this stage, you will see one of four patterns on the yellow face (ignoring the corners):
- A dot: Only the center is yellow.
- An "L" shape: The center and two adjacent edges are yellow.
- A horizontal line: The center and two opposite edges are yellow.
- The Cross: All four edges are yellow.
To progress through these patterns, use the following algorithm: F (R U R' U') F'.
- If you have the Dot, perform the algorithm once to get the L-shape.
- If you have the L-shape, rotate the top layer so the "L" is in the back-left corner (one edge at 12 o'clock, one at 9 o'clock) and perform the algorithm to get the Line.
- If you have the Line, hold it horizontally (not vertically) and perform the algorithm once to get the Cross.
Step 5: Orienting the Yellow Face (Sune Algorithm)
Once the yellow cross is formed, you want to make the entire top face yellow. This step is often called OLL (Orientation of the Last Layer) in advanced methods.
- Look at the top face and identify how many yellow corners are already facing up.
- Use the "Sune" algorithm: R U R' U R U2 R'.
The positioning of the cube before you start the algorithm is vital:
- If you have one corner solved (the "Fish" shape), hold the cube so the solved corner is in the bottom-left of the top face.
- If you have two corners solved, hold the cube so a yellow "sticker" is facing you on the front-left side.
- If no corners are solved, find a yellow sticker on the left side of the cube that is facing the left and hold the cube so that piece is in the back-left.
Continue applying the Sune algorithm until the entire top face is yellow.
Step 6: Permuting the Corners
Now the top face is yellow, but the side colors of the top layer likely don't match. We need to put the corners in their correct positions.
- Look for "headlights"—two corners on the same side that have the same color (e.g., two red corners).
- If you find headlights, rotate the top layer to match them with their side color and turn the cube so the headlights are at the back.
- If you have no headlights, it doesn't matter how you hold the cube.
- Perform the following algorithm: R' F R' B2 R F' R' B2 R2.
After this move, all four corners should be in their correct positions. You may need to rotate the top layer (U) to align them with the bottom two layers.
Step 7: Permuting the Edges (The Final Step)
The final step is to move the top edges to their correct spots. You will usually have one side completely solved and three edges that need to move, or four edges that need to move.
- If one side is solved, face that solved side away from you (back).
- If no sides are solved, perform the algorithm once from any angle to solve one side, then follow step 1.
- To move edges clockwise or counter-clockwise, use the "U-Perm" algorithm:
- R U' R U R U R U' R' U' R2
(Note: Some variations use different U-perms, but this sequence is highly effective for beginners). If the cube isn't solved after the first time, check the edge positions again and repeat the algorithm.
Comparative Analysis of Speedcubing Methods
As of 2026, the transition from beginner to professional involves moving from Layer-by-Layer to more complex systems. The following table compares the most popular methods currently used in competitive play.
| Method | Complexity | Average Move Count | Primary Use Case |
|---|---|---|---|
| Layer-by-Layer (LBL) | Low | 100+ | Beginners and casual solvers |
| CFOP (Fridrich) | High | 55–60 | Most world-record holders and professionals |
| Roux | High | 45–50 | Speedcubers preferring intuitive block-building |
| ZZ | Medium | 55–65 | Speedcubers focusing on ergonomic turns (EO) |
Hardware and Maintenance for 2026 Speedcubing
A "speed cube" is distinct from a standard puzzle due to its internal mechanism. Modern cubes feature adjustable magnetic strength, dual-adjustment tension systems, and MagLev technology (using opposing magnets instead of physical springs to reduce friction).
Tensioning and Lubrication
To solve faster, your cube must be "corner-cutting" capable—this means the cube can complete a turn even if the preceding turn wasn't perfectly aligned.
- Lubrication: Use silicone-based lubricants. Heavy lubes (high viscosity) slow a cube down and provide control, while light lubes (low viscosity) increase speed.
- Cleaning: Every few hundred solves, disassemble the cube and wipe away the "cube dust" (a mix of plastic wear and old lubricant) to maintain performance.
Finger Tricks
In speedcubing, you do not turn the faces with your whole hand. You use "finger tricks"—quick flicks of the index fingers for U moves and ring fingers for D moves. This is why modern speed cubes are designed to be effortless to turn; if you have to "grip and rip" the face, your cube is either too tight or not a true speed cube.
Common Mistakes and Troubleshooting
- The Impossible State: If you followed every step and the last layer refuses to solve (e.g., only one corner is rotated wrong or only two edges need to be swapped), your cube has likely suffered a "mechanical twist." This happens when a piece is physically turned during a fast solve. You must physically twist the corner back or pop the edge out to fix the internal state.
- Misinterpreting Notation: A common error is turning the B (Back) face or D (Down) face in the wrong direction. Always imagine you are looking directly at the face to determine which way is clockwise.
- Skipping the Cross Alignment: Beginners often solve the white cross without checking if the edge colors match the side centers. If this foundation is wrong, the entire middle layer will fail.
Frequently Asked Questions
What is the fastest way to solve a Rubik's cube in 2026?
The CFOP method (Cross, F2L, OLL, PLL) remains the most widely used system for world-class speeds. It requires memorizing approximately 78 algorithms but allows for solves consistently under 10 seconds. However, for a first-time solve, the Layer-by-Layer method described in this guide is the most reliable.
How long does it take to learn how to solve a 3x3?
Most people can learn to solve the cube using the Layer-by-Layer method in about 2 to 4 hours of focused practice. Reaching a "sub-1 minute" solve time typically requires several weeks of practicing finger tricks and memorizing the middle-layer and last-layer algorithms.
Why are magnets important in a speed cube?
Magnets help the cube "click" into place after a turn. This prevents "over-turning," where a face moves too far and causes the cube to lock up during the next move. In 2026, even budget cubes generally include magnets as a standard feature.
Can I solve the cube without memorizing algorithms?
While there are "intuitive" methods like the Roux method that rely more on logic than long sequences, every effective 3x3 method requires at least some memorization of algorithms for the final stages where pieces are highly constrained.
What should I do if my cube feels "crunchy" or slow?
This is usually a sign of dirt buildup or dry plastic. Clean the internal pieces with a microfiber cloth and apply 1-2 drops of a specialized speedcube lubricant. If the cube is still slow, try loosening the tension screws located under the center caps.
Path to Mastery
Once you have successfully solved the 3x3 speed cube using this step-by-step guide, the next logical step is to reduce your reliance on the "Daisy" and learn to build the white cross directly on the bottom. From there, you should explore F2L (First Two Layers), which combines Step 2 and Step 3 into a single fluid process. Speedcubing is a journey of muscle memory and pattern recognition; the more you solve, the more the cube becomes an extension of your hands.