The DS-160, Online Nonimmigrant Visa Application, is a digital form required for individuals applying for a temporary nonimmigrant visa to the United States, such as tourist (B1/B2), student (F-1), or exchange visitor (J-1) visas. It collects essential personal, biographical, and security information, which is submitted electronically to the U.S. Department of State to process and evaluate visa eligibility before an in-person interview.
Understanding the Purpose of the DS-160 Form
The DS-160 form serves as the primary data collection instrument for the United States government regarding nonimmigrant visa applicants. Every individual seeking to enter the United States temporarily for tourism, business, education, temporary work, or exchange programs must complete this electronic application. The information provided within the form forms the foundational record that consular officers use during the visa interview process.
Consular posts around the world rely on the data submitted via the Consular Electronic Application Center (CEAC) website to vet applicants. By centralizing this information digitally, the Department of State can efficiently screen applicants against various security databases, verify travel histories, and assess whether the applicant meets the legal requirements established under United States immigration law. A properly completed DS-160 ensures that the reviewing officer has a clear, accurate, and verifiable portrait of the applicant’s background, travel intentions, and ties to their home country.
Failing to complete this document accurately or thoroughly can lead to significant delays in visa processing or immediate administrative refusal. Because the form is processed electronically, every data field requires meticulous attention to detail. The information entered must match supporting documentation, such as passports, travel itineraries, employment records, and educational histories.
Eligibility and Prerequisites for Filing the DS-160
Before initiating the DS-160 application process, applicants must determine their appropriate visa category. Nonimmigrant visas are split into numerous classifications, ranging from B-1/B-2 visitor visas to specialized work visas like H-1B or student visas like F-1 and M-1. Each visa class carries specific eligibility criteria, financial prerequisites, and documentation requirements that must be understood before filling out the form.
Applicants should gather all necessary documents and information before accessing the online system. Having the correct materials on hand minimizes session timeouts and reduces the risk of data entry errors. Essential prerequisites include:
- Valid Passport: Must be valid for travel to the United States with a validity date at least six months beyond the intended period of stay.
- Travel Itinerary: Details of travel plans, if already finalized, or the intended dates of travel and addresses where the applicant will stay in the U.S.
- Dates of Past Travel: Records of previous visits to the United States, if applicable, along with international travel history for the past five years.
- Resume or Curriculum Vitae: Detailed information regarding current and previous employment, educational background, and professional qualifications.
- Digital Photograph: A compliant, recent passport-style photograph that meets specific U.S. Department of State dimensions and technical guidelines.
- Supporting Identification Numbers: Depending on the visa class, documents like the SEVIS ID (for students and exchange visitors) or petitioner receipt numbers (for petition-based work visas) are required.
Step-by-Step Guide to Completing the DS-160 Application
Navigating the CEAC portal to complete the DS-160 requires a structured approach. The platform is secure, but it times out after periods of inactivity, making it vital to save progress frequently.
1. Accessing the Portal and Starting a New Application
Applicants must navigate to the official Consular Electronic Application Center website. Upon arrival, the user selects the geographic location where they intend to submit their visa application and interview. Following location selection, the user clicks "Start an Application."
2. Recording the Application ID and Security Question
Once the application begins, a unique alphanumeric Application ID appears in the top right corner of the screen. Crucial Step: The applicant must write down this Application ID and select a security question with its corresponding answer. If the session times out or the applicant needs to complete the form across multiple sittings, this ID, security answer, and date of birth are required to retrieve the saved data.
3. Completing the Data Sections
The form is divided into multiple sequential categories, each requiring precise disclosure:
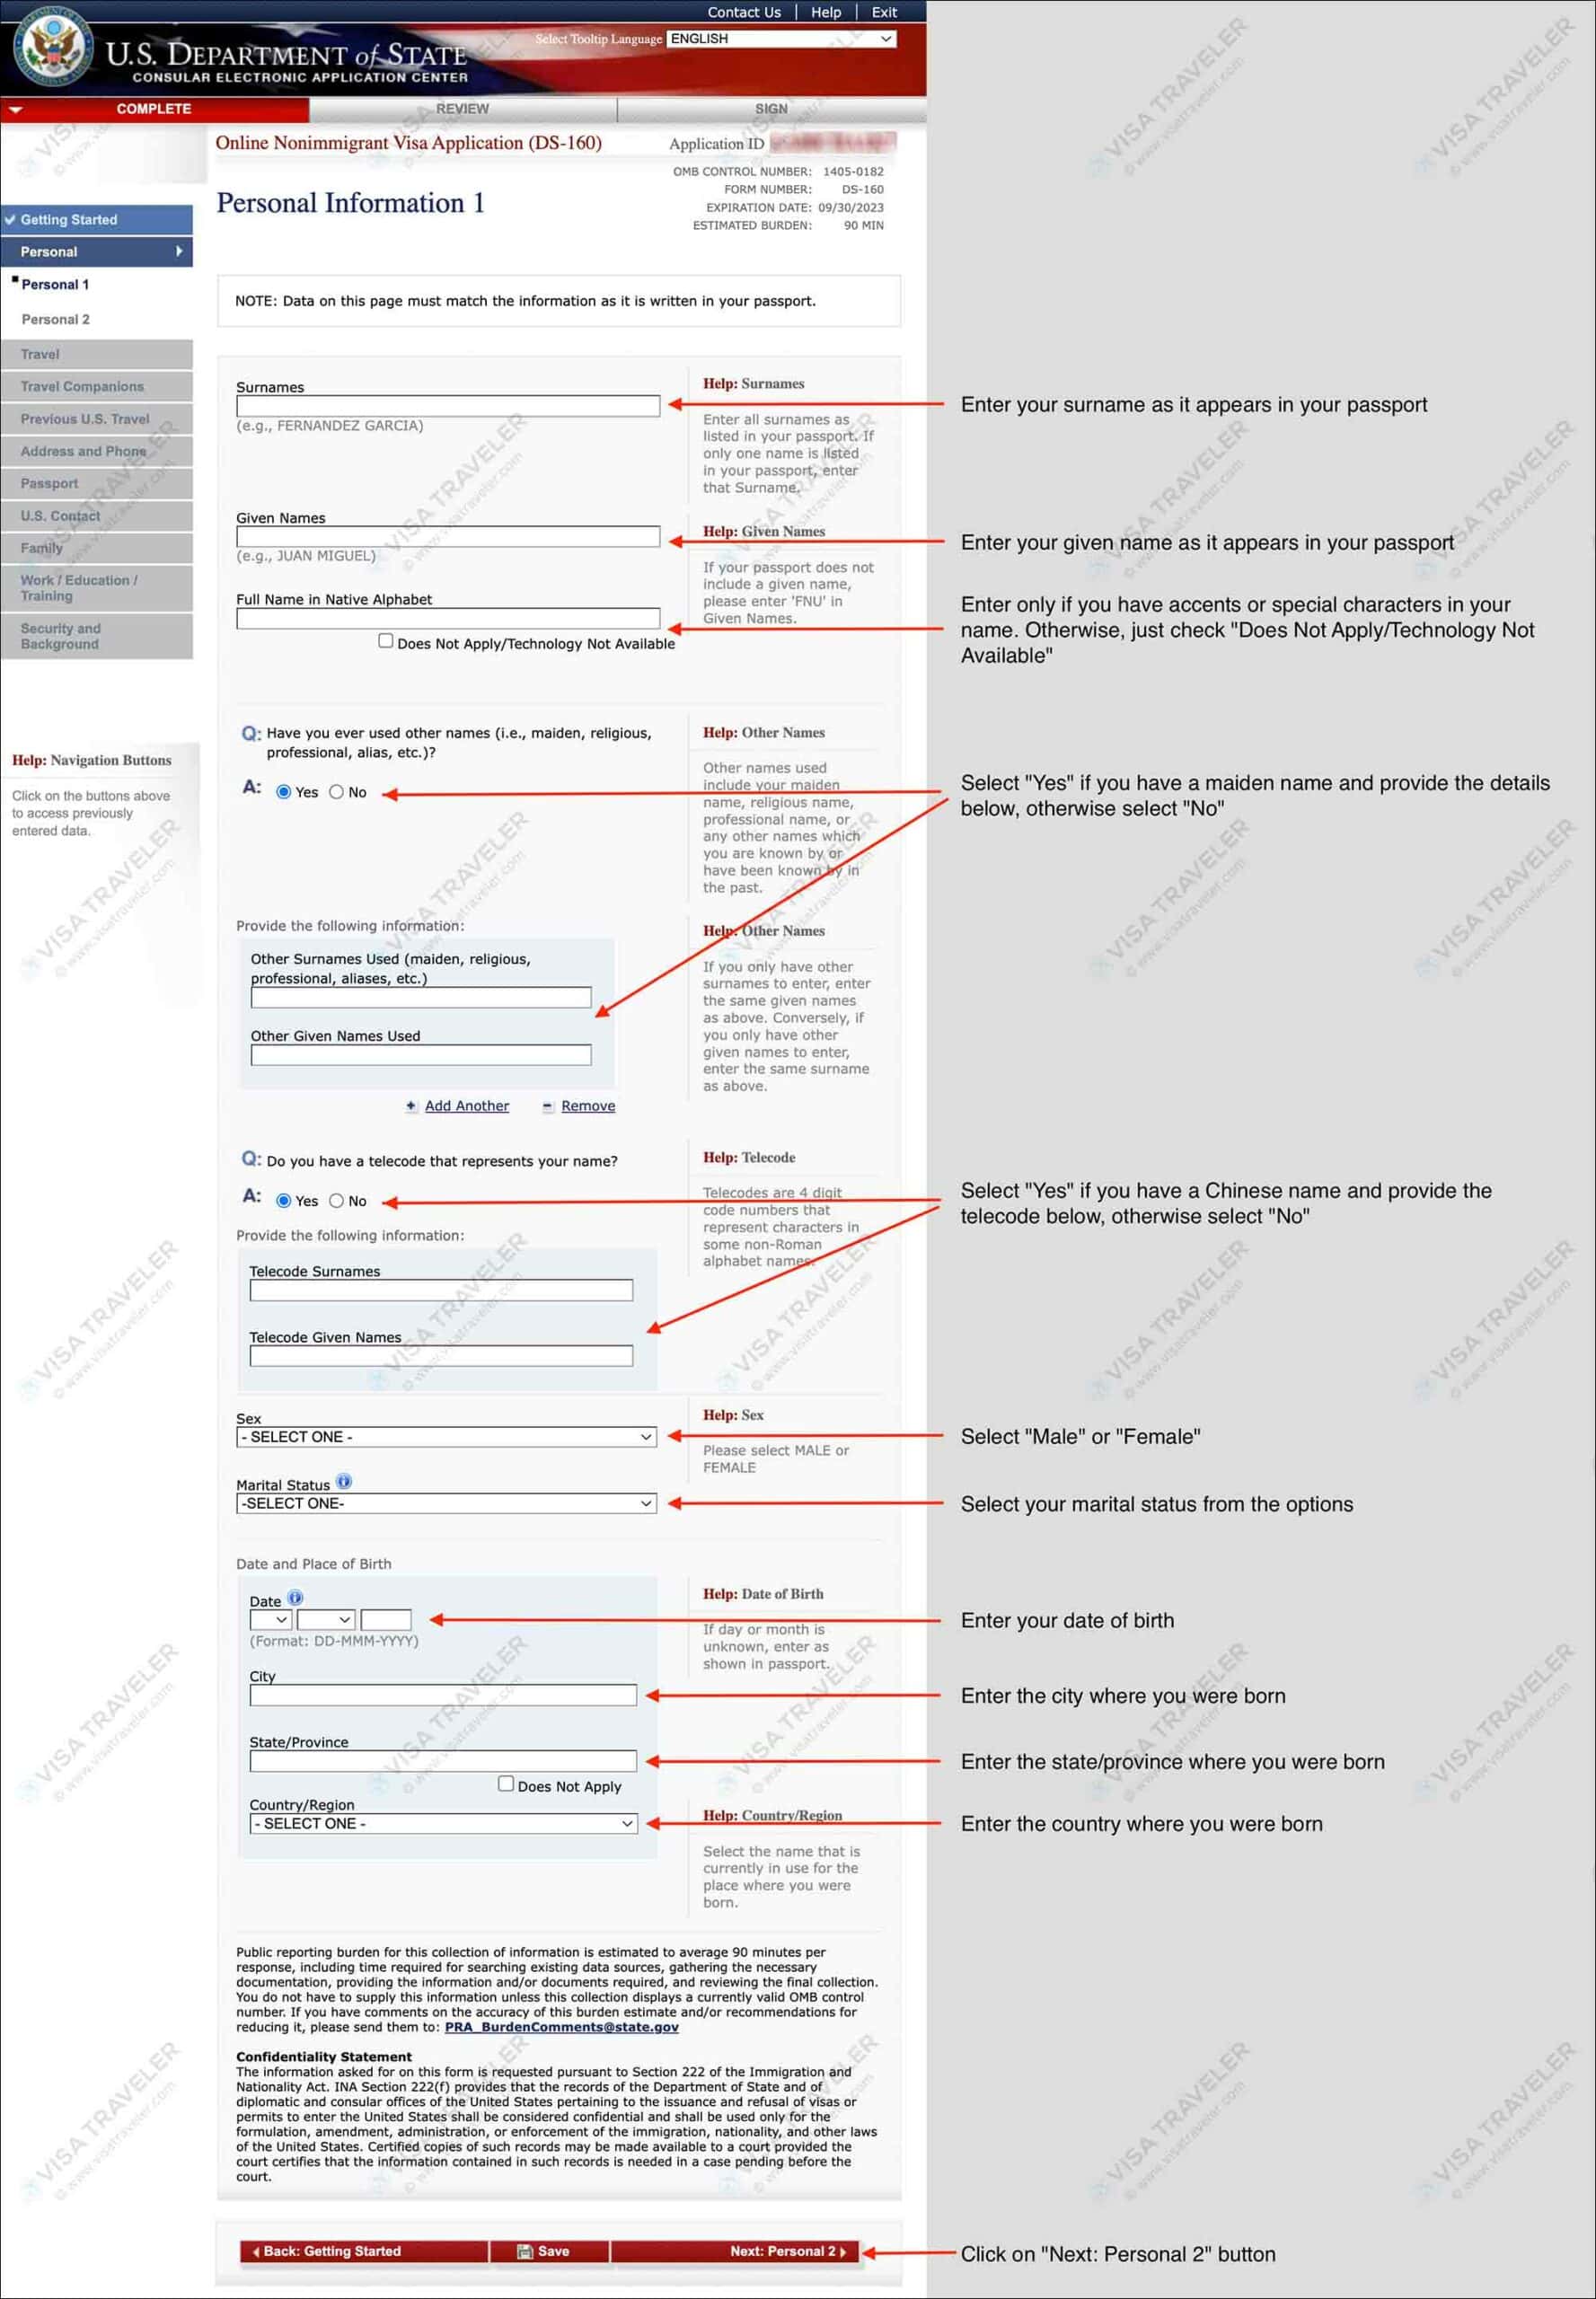
- Personal Information: Full name, date of birth, nationality, marital status, national identification numbers, and contact details.
- Travel Information: Purpose of the trip, intended arrival and departure dates, and financial provider for the trip.
- Travel Companions: Information regarding anyone traveling with the applicant.
- Previous U.S. Travel: History of prior U.S. visas, visa refusals, and immigration violations.
- Address and Phone Information: Current residential address, mailing address, phone numbers, and social media identifiers used over the past five years.
- Passport Information: Passport number, issuing country, issuance date, and expiration date.
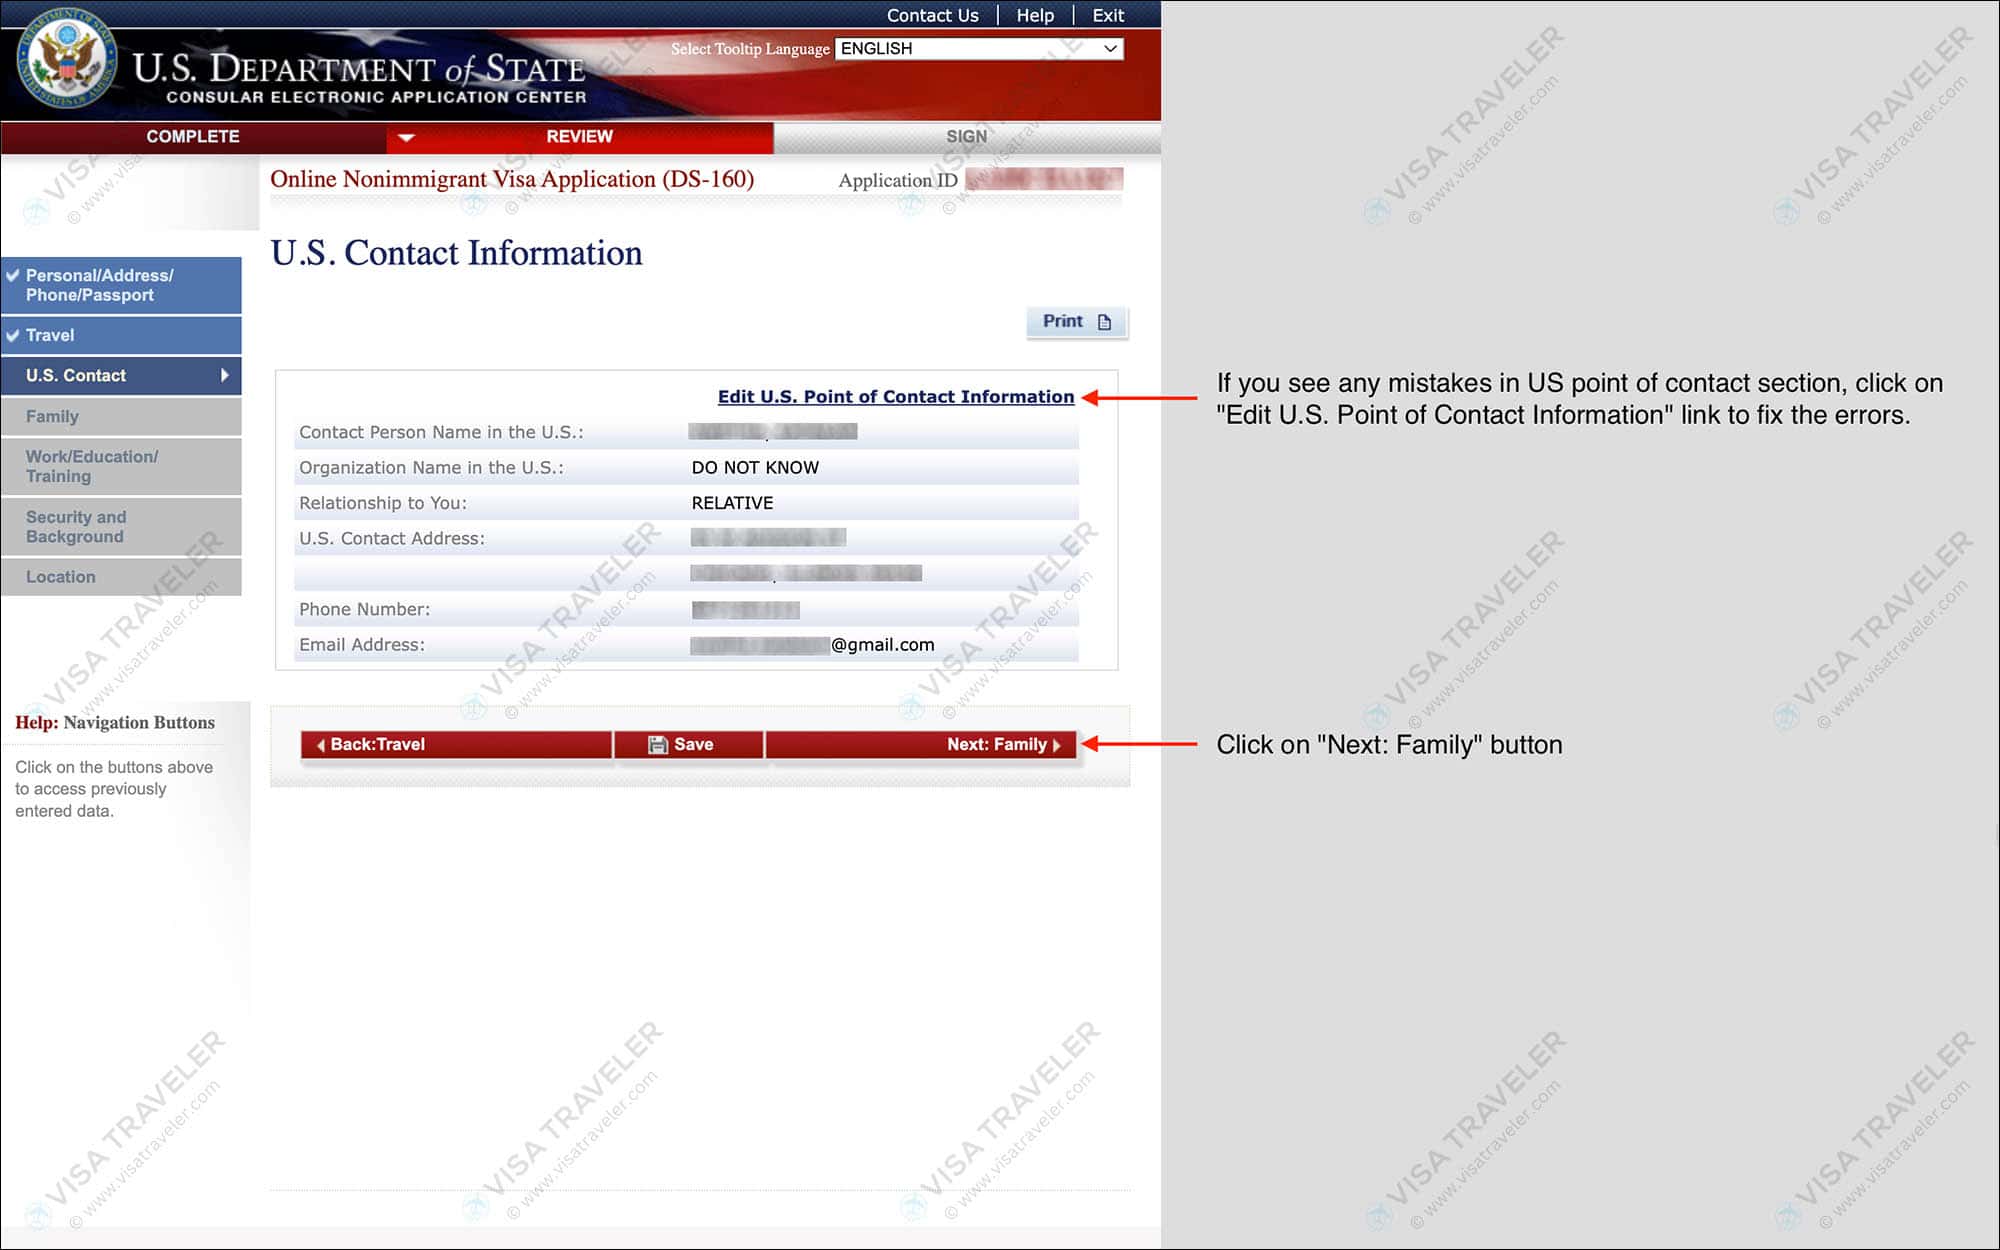
- U.S. Point of Contact: Information regarding an organization or individual in the United States who can verify the applicant's travel purpose.
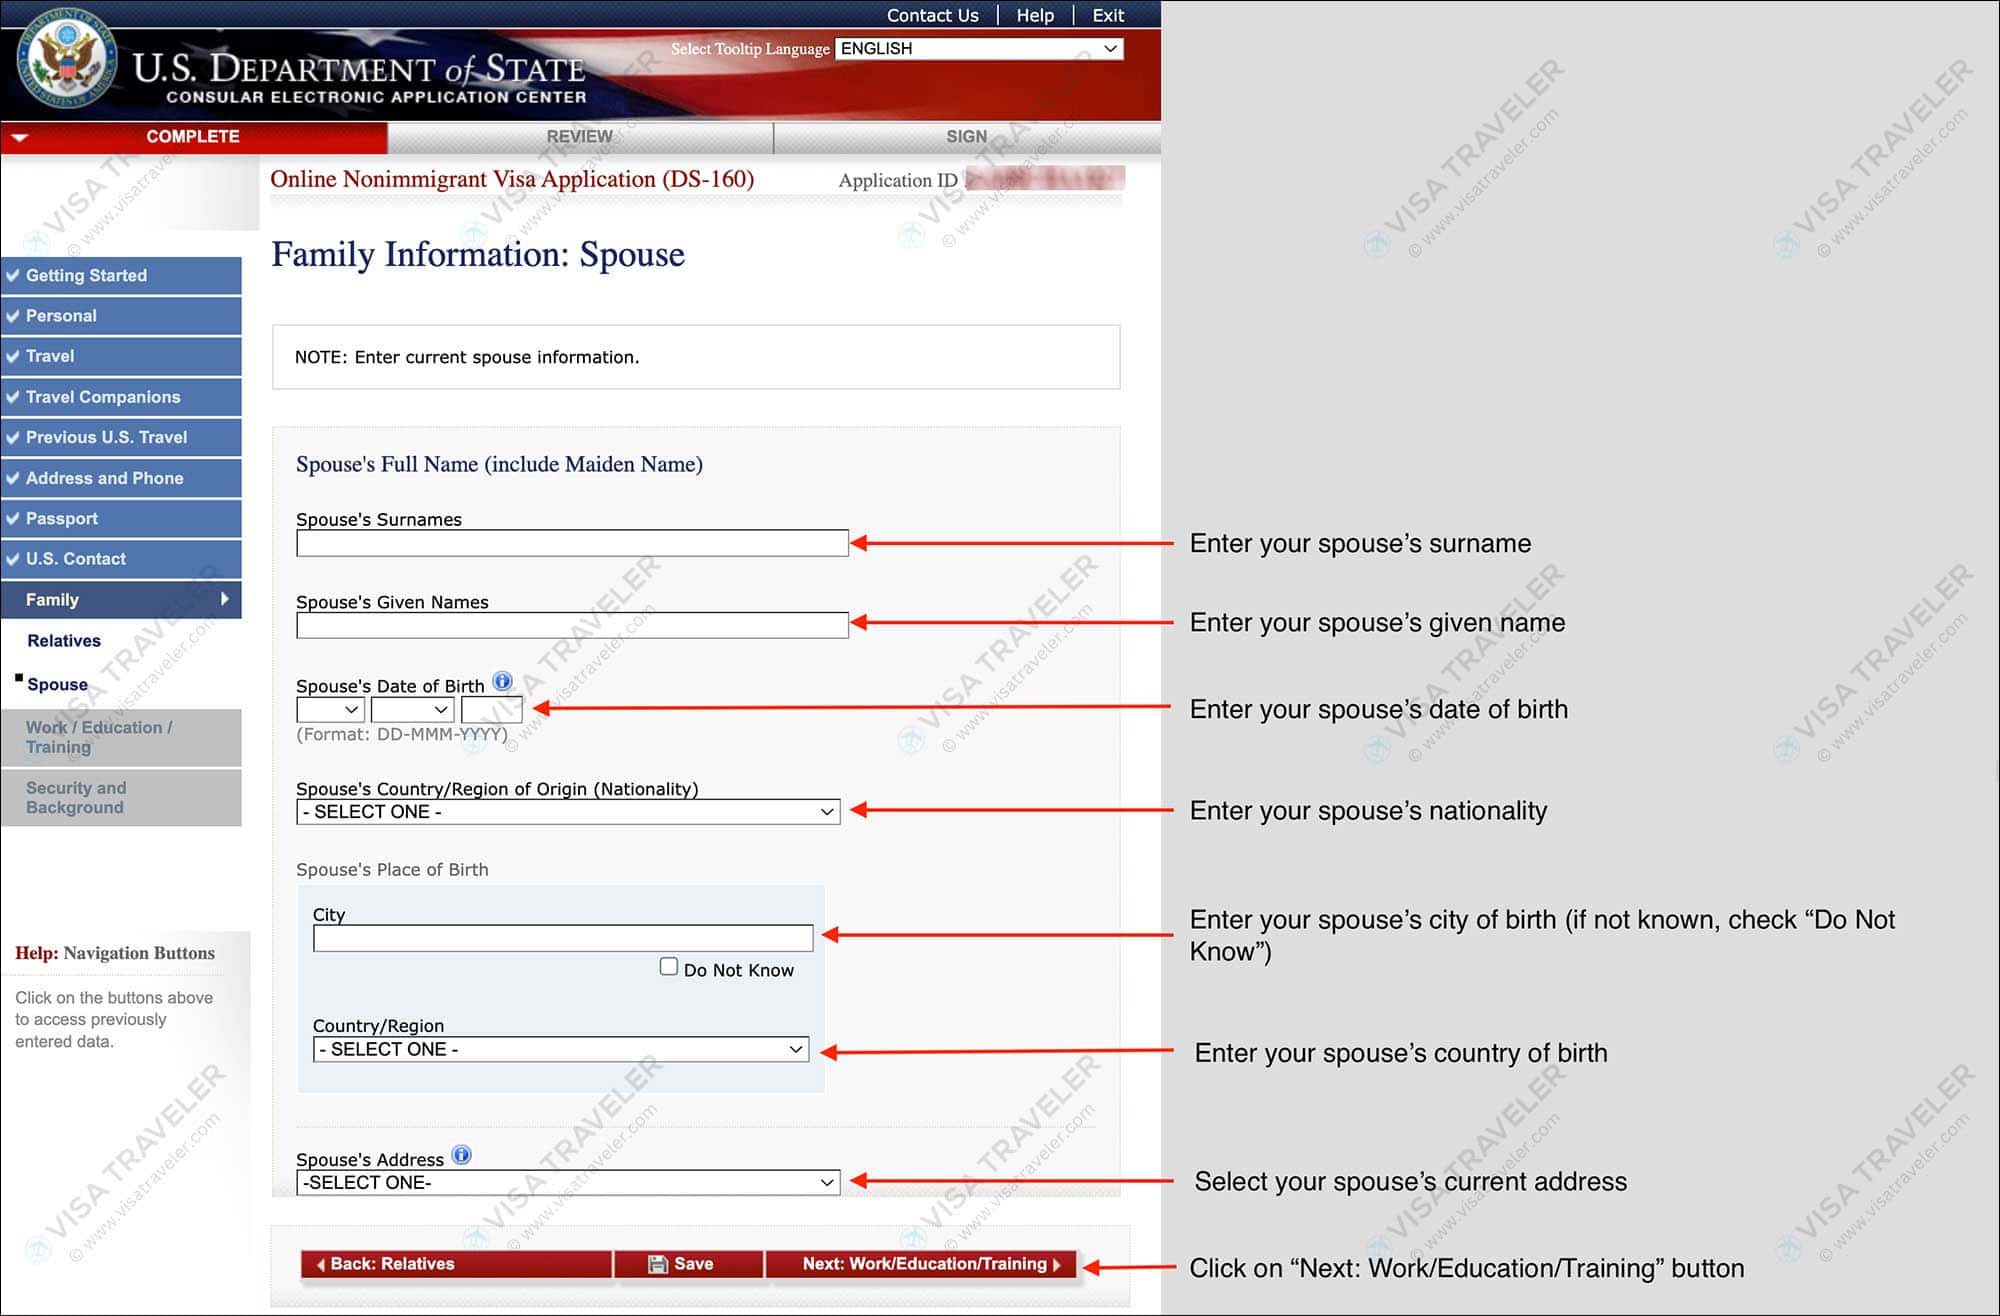
- Relative Information: Details about parents, spouses, and children, including whether any immediate relatives reside in the U.S.
- Work/Education/Training: Current occupation, employer details, past employment history, and educational background.
- Security and Background: A comprehensive series of security-related questions addressing criminal history, security violations, health conditions, and immigration law violations.
4. Uploading the Digital Photograph
Applicants must upload a digital photograph that adheres strictly to U.S. visa photo guidelines. The photo must be taken within the last six months, show a full-face view against a plain white or off-white background, and display no glasses, hats, or uniforms. If the online upload tool rejects the photo, applicants can proceed with the application and bring a physical, compliant photograph to the visa interview, though a successful digital upload is preferred.
5. Reviewing and Signing the Application
Before final submission, the system provides a complete preview of the entire application. Review every line item carefully, as errors discovered after submission cannot be directly edited on the original form. Once verified, the applicant signs the document electronically by entering their Passport Number and an on-screen character confirmation code, then clicking "Sign and Submit."
6. Printing the Confirmation Page
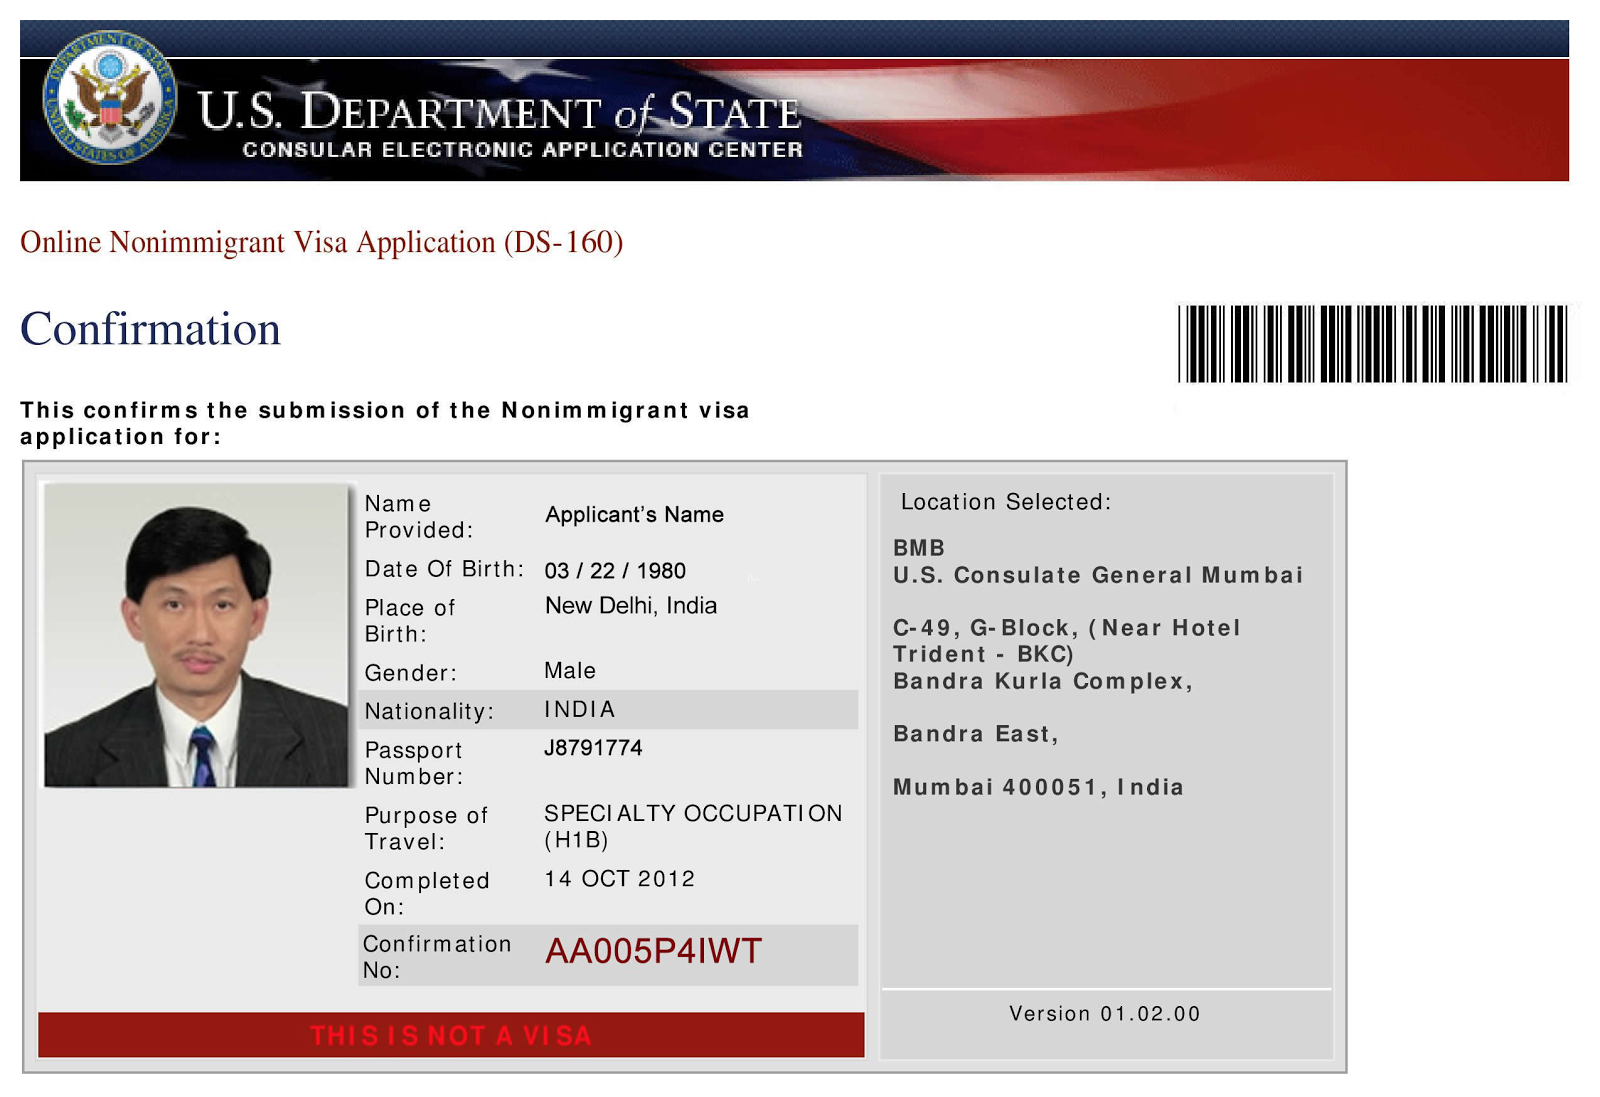
Following successful submission, a confirmation page featuring a unique barcode, the Application ID, and encrypted data fields appears. The applicant must print this confirmation page. Do not print the full application form. The physical confirmation page with the barcode is mandatory for scheduling the visa interview appointment and for entry into the U.S. Embassy or Consulate.
| Document / Step | Purpose | Critical Requirement |
|---|---|---|
| Application ID | Identifies and retrieves saved session data | Must be recorded immediately upon starting |
| Digital Photo | Visual identification for background checks | Must meet strict U.S. Department of State specifications |
| Confirmation Page | Proves successful submission of the DS-160 | Must be printed and brought to the visa interview |
| SEVIS ID (if applicable) | Links students/exchange visitors to school records | Must match Form I-20 or DS-2019 data precisely |
Common Mistakes and Troubleshooting During DS-160 Completion
Even minor mistakes on the DS-160 can lead to processing friction, consular delays, or the need to create an entirely new submission. Understanding common pitfalls helps safeguard the application process.
- Session Timeouts: The CEAC portal logs users out after approximately 20 minutes of inactivity. To prevent data loss, click the "Save" button at the bottom of the page frequently. Saved files can be temporarily stored on a computer hard drive or uploaded back to the CEAC server.
- Name Discrepancies: The name entered on the DS-160 must match the passport exactly. Variations in middle names, hyphenated surnames, or local script translations can cause administrative verification delays.
- Inaccurate Travel History: Omitting previous visa refusals or historical trips to the United States is a frequent cause of visa denial. Consular databases retain historical records; discrepancies between the application and government databases are viewed severely.
- Incorrect Social Media and Contact Disclosure: Applicants are required to list all social media platforms and handles used within the past five years. Providing incomplete or fabricated electronic footprint data violates the declaration signed at the end of the form.
If a mistake is discovered after the DS-160 has been submitted and signed, the applicant generally cannot unlock or edit that specific document. Instead, the applicant must return to the CEAC portal, select "Retrieve an Application," enter the old Application ID, and choose the option to "Create a New Application." This action populates a new form with the previous data, allowing the user to correct the error, generate a new Application ID, and receive a new confirmation barcode. The new barcode must then be updated in the visa scheduling portal.
Post-Submission Actions and Interview Preparation
Completing and submitting the DS-160 is a critical milestone, but it represents only the first phase of the overall nonimmigrant visa acquisition process. Once the confirmation page is in hand, applicants must transition to administrative and scheduling procedures.
First, the applicant must utilize the unique barcode number on the DS-160 confirmation page to pay the mandatory non-refundable Machine Readable Visa (MRV) application fee. Fee amounts vary depending on the specific visa classification (e.g., tourist vs. petition-based work visas). Payment receipts must be linked to the profile created on the official visa appointment service provider portal designated for the specific country or region.
After fee payment confirmation, the applicant can access the appointment calendar to schedule two mandatory appointments in most jurisdictions: a biometric data collection appointment (at an Applicant Service Center or Visa Application Center) and the formal consular interview appointment (at the U.S. Embassy or Consulate).
On the day of the interview, applicants must bring a comprehensive physical packet of documents. While requirements vary by visa class, standard items include a valid passport, the printed DS-160 confirmation page, the MRV fee payment receipt, passport photographs (if digital upload failed), and supporting evidence of ties to the home country—such as employment verification letters, property deeds, bank statements, or enrollment records. The consular officer evaluates these documents in tandem with the information already submitted via the electronic DS-160 to determine final visa issuance.
Frequently Asked Questions
Can I edit my DS-160 after I have signed and submitted it?
No. Once a DS-160 is electronically signed and submitted, it is locked in the Department of State database and cannot be modified. If you discover an error, you must complete a new DS-160 by retrieving your previous data, modifying the incorrect fields, and submitting a fresh application to receive a new confirmation barcode.
How much does it cost to file the DS-160 form?
The DS-160 form itself has no direct submission fee charged by the CEAC portal. However, every applicant must pay the non-refundable Machine Readable Visa (MRV) application fee, which varies based on the visa category you are applying for. This fee is paid separately through your local visa processing service provider.
Do children need their own DS-160 form?
Yes. Every individual seeking a U.S. nonimmigrant visa, regardless of age, must have a separate DS-160 submitted on their behalf. Parents or legal guardians can complete and sign the form for minor children, indicating on the application that a third party assisted with completion.
What should I do if my passport expires after I submit the DS-160?
If your passport expires or is replaced after you have already submitted your DS-160, you generally do not need to create a new form solely for that reason, provided you bring both your old passport (if available) and your new passport to the visa interview. However, consular policies can vary, and consulting the specific guidance of the U.S. Embassy or Consulate handling your case is recommended.
Can I save my DS-160 progress and complete it later?
Yes. The CEAC portal allows you to save your application to your computer's hard drive or a secure storage device. When you return to the portal, select "Retrieve an Application," enter your Application ID, answer your security question, and upload the saved file to resume where you left off. Saved files expire after 30 days of inactivity.
Conclusion
Successfully completing the DS-160 is a fundamental requirement for anyone seeking temporary entry into the United States. By understanding its underlying structure, gathering precise documentation in advance, and avoiding common data entry errors, applicants can streamline their application workflow. Treat the submission process with thoroughness and accuracy, ensure that your confirmation page is safely retained, and proceed promptly to fee payment and interview scheduling to keep your travel plans on track.