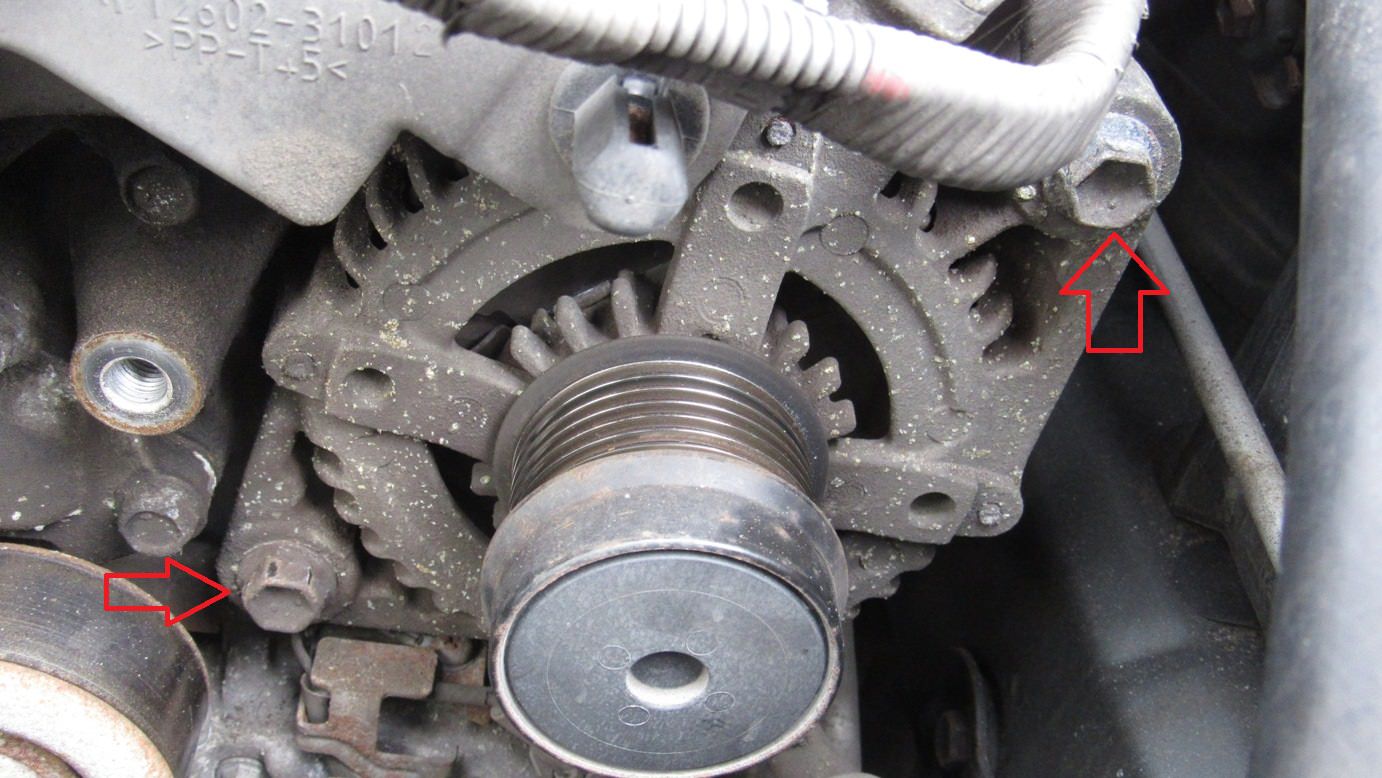
Replacing the alternator in a 2007 Lexus RX350 is a significant but manageable mechanical task for a DIY enthusiast with intermediate skills. This procedure requires specific tools to navigate the engine bay, remove the drive belt, and extract the component from the passenger-side engine block. Correct execution restores the vehicle’s electrical charging system and prevents battery failure.
Understanding the Role of the Alternator in the RX350
The alternator in the 2007 Lexus RX350 is a permanent-magnet generator responsible for converting mechanical energy from the engine into electrical energy. As the engine runs, the serpentine belt spins the alternator pulley, creating the AC current that is internally converted to DC to power the vehicle’s electronic control units (ECUs), infotainment systems, and climate control, while simultaneously recharging the 12-volt lead-acid battery.
When an alternator begins to fail, you may notice dimming headlights, erratic dashboard warning lights (specifically the Battery/Charging System light), or a whine originating from the front of the engine. Because the RX350 uses a 3.5L 2GR-FE V6 engine, the alternator is positioned in a location that requires careful component management, specifically regarding the tensioner and surrounding cooling system lines.
Safety Prerequisites and Tool Requirements
Before beginning, disconnect the negative terminal of your battery. This is non-negotiable; failing to do so can result in an electrical short, blown fuses, or damage to the vehicle's sensitive ECU if the power cable from the alternator contacts the chassis.
Required Tool Kit:
- Socket Set: 10mm, 12mm, 14mm, and 17mm sockets (shallow and deep).
- Wrench: 14mm serpentine belt tensioner tool or a long-handled 14mm box-end wrench.
- Pry Bar: A medium-sized pry bar to assist in shifting the alternator out of the mounting bracket.
- Safety Gear: Protective eyewear and mechanics gloves to avoid injury from sharp metal edges or hot engine components.
- Memory Saver: An OBDII memory saver (optional) to keep radio presets and ECU idle settings active during the battery disconnection.
Step-by-Step Removal and Installation Process
1. Preparation and Belt Removal
Ensure the engine is completely cool. Start by removing the plastic engine cover to gain better visibility. Locate the serpentine belt tensioner on the passenger side. Use your 14mm tool to rotate the tensioner clockwise—this relieves tension on the belt. While holding the tensioner, slide the belt off the alternator pulley. You do not need to remove the belt from the other pulleys; simply tuck it aside.
2. Electrical Disconnection
Once the belt is cleared, remove the rubber protective cap from the B+ terminal on the back of the alternator. Remove the 10mm nut and set the cable aside. Next, locate the electrical plug (the sensor connector). Gently depress the release tab and pull the connector away from the alternator housing. Do not pull by the wires, as the insulation may be brittle due to years of heat cycling.
3. Bolt Removal and Extraction
The alternator is held in place by two primary bolts. The upper bolt is typically the adjustment/mounting pivot point, and the lower bolt secures the base. Remove both using a 14mm socket. Once the bolts are removed, the alternator may remain seated due to tight manufacturing tolerances or corrosion. Use a pry bar gently against the mounting ear of the alternator to nudge it forward. Once free, carefully maneuver the unit out through the top of the engine bay.
4. Installing the New Unit
Place the new alternator into the mounting bracket. Reinstall the bottom bolt first to help support the weight of the unit, then thread the top bolt. Tighten both to manufacturer specifications—typically around 35–40 ft-lbs, though always check if you have access to a factory service manual. Reattach the B+ cable and the electrical harness, ensuring the connection clicks firmly into place. Re-route the serpentine belt, ensuring it is properly seated in the grooves of every pulley before releasing the tensioner.
Troubleshooting and Verification
Once reinstalled, reconnect the battery. Before starting the engine, use a multimeter to check the battery voltage. It should read approximately 12.6V with the engine off. Start the engine and measure the voltage again; it should jump to between 13.8V and 14.8V. If the voltage remains below 13V while running, the new alternator is either defective, or there is an issue with the wiring harness or the "ALT" fuse in the main fuse box.
| Component | Status Check | Expected Value |
|---|---|---|
| Battery (Engine Off) | Multimeter Test | 12.4V – 12.6V |
| Alternator (Idle) | Multimeter Test | 13.8V – 14.8V |
| Serpentine Belt | Visual Inspection | No cracks/fraying |
| Ground Wire | Physical Inspection | Secure and corrosion-free |
Common Mistakes to Avoid
One of the most frequent errors is failing to seat the serpentine belt properly. If the belt is off by one rib on any pulley, it will shred within minutes of operation, leaving you stranded. Always double-check the belt alignment by feeling the ribs on the underside of the pulleys.
Another common issue is cross-threading the mounting bolts. Because these bolts thread into aluminum engine components, they are prone to stripping. Always hand-thread the bolts for the first several turns before applying a ratchet. If you encounter resistance early, stop, remove the bolt, and verify that the alignment is perfect.
Related Frequently Asked Questions
How do I know for sure the alternator is the problem and not the battery? The best way to differentiate is to have both tested. A battery typically fails to hold a charge after the vehicle sits, while an alternator fails while the engine is running. If your car dies while driving or while the engine is running, the alternator is almost certainly the culprit.
Should I replace the serpentine belt at the same time? Yes. Since you are already removing the belt to access the alternator, it is standard practice to replace it if it shows any signs of wear, such as cracking or glazing. This saves you from having to perform the same labor-intensive removal process again in the near future.
Are remanufactured alternators reliable for the 2007 RX350? Remanufactured units vary in quality. Seek out reputable brands that offer a lifetime warranty. Avoid the cheapest "budget" units, as the internal voltage regulators are often prone to early failure.
Is it safe to drive with a failing alternator? No. Once the alternator stops providing power, the vehicle will run entirely off the battery. Once the battery voltage drops below a critical threshold—usually around 10 volts—the ECU will lose power, the transmission will stop shifting, and the engine will stall, creating a significant safety hazard in traffic.
Does the 2007 RX350 require a computer reset after an alternator change? Generally, no. The ECU will automatically adapt to the restored voltage levels. However, you may need to reset your power window pinch protection and the clock settings after disconnecting the battery.
Next Actions and Professional Guidance
If you complete the installation and the "Battery" or "Charging" light remains illuminated, double-check your connections. Corrosion on the main B+ cable can often mimic a failed alternator. If the cables are clean and the alternator is verified working, inspect the "ALT" fuse located in the engine compartment fuse block. If you are uncomfortable working with high-amperage electrical circuits, consult a certified Lexus technician or a local automotive electrical specialist to perform the final diagnostic steps.