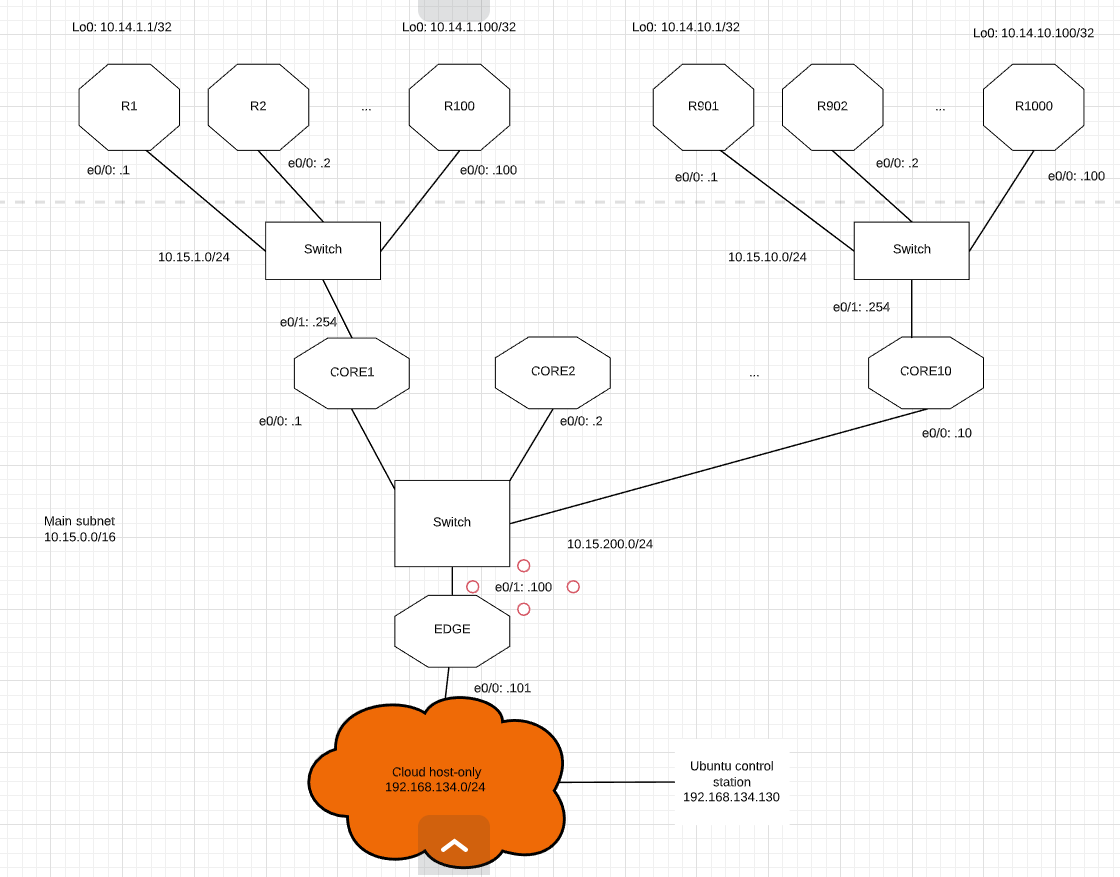
Mastering GNS3 (Graphical Network Simulator-3) in 2026 requires moving beyond simple drag-and-drop topologies to creating integrated, automated, and multi-vendor environments. To build a professional-grade network lab, you must master the GNS3 VM setup, appliance integration, external cloud bridging, network automation, and deep packet analysis. These five tutorials provide the foundational and advanced skills necessary to simulate complex production networks for certification or enterprise testing.
Tutorial 1: Establishing a High-Performance GNS3 VM Environment
The most critical step in modern network simulation is moving away from local execution to a server-based architecture. While GNS3 can run directly on Windows or macOS, the GNS3 VM (Virtual Machine) is the industry standard for 2026 because it leverages a Linux-based KVM (Kernel-based Virtual Machine) hypervisor. This allows for significantly better performance when running QEMU images, which are used for modern operating systems like Cisco IOS-XE, Arista vEOS, and Juniper vMX.
Why the GNS3 VM is Mandatory
In the past, engineers relied on Dynamips to emulate older MIPS-based Cisco hardware. Today, network vendors provide virtualized versions of their actual software. These images are resource-intensive. Running them natively on a non-Linux host often results in high CPU utilization and instability. The GNS3 VM provides a nested virtualization layer that allows these images to run with near-native speed.
Installation Steps
- Hypervisor Selection: Use VMware Workstation Pro or ESXi for the best compatibility. While Oracle VirtualBox is supported, VMware typically offers better nested virtualization support, which is vital for complex nodes.
- Resource Allocation: For a robust 2026 lab, allocate at least 4-8 vCPUs and 16GB of RAM to the VM. Ensure that "Virtualize Intel VT-x/EPT or AMD-V/RVI" is enabled in the processor settings of the hypervisor.
- Binding the Client: Open the GNS3 desktop application, navigate to Edit > Preferences > GNS3 VM, and enable the VM. Ensure the host binding matches the subnet assigned to the VM's host-only adapter.
Verification
Once the green "GNS3 VM" indicator appears in the Servers Summary pane, your environment is ready. This setup ensures that all heavy lifting is performed by the Linux backend, keeping your host OS responsive during large-scale simulations.
Tutorial 2: Adding and Configuring Multi-Vendor Appliances
A common mistake for beginners is manually configuring every node from scratch. GNS3 utilizes Appliance Files (.gns3a) to automate the import process. These templates define the correct symbols, default RAM, and network interface types for specific hardware images.
The Import Process
To add a new device, such as a Cisco ASAv or a Checkpoint Firewall:
- Download the
.gns3atemplate from the GNS3 Marketplace. - In GNS3, go to File > Import appliance.
- The wizard will identify the required binary files (e.g.,
.qcow2or.vmdk). You must provide these files legally via your vendor support contracts. - GNS3 will upload the file to the GNS3 VM and set up the QEMU parameters automatically.
Docker for Lightweight End-Hosts
In 2026, we no longer use full Windows VMs just to test ping or DNS. Instead, use Docker containers within GNS3. You can pull images like gns3/webterm or gns3/ipterm. These containers start instantly and use negligible RAM, allowing you to simulate hundreds of end-users or servers without crashing your host machine.
Optimizing Resource Usage
Always use the "Sparse" copy feature for disks when prompted. This ensures that the GNS3 VM only uses the physical disk space actually occupied by the virtual router's filesystem, rather than pre-allocating the entire virtual disk size.
Tutorial 3: Bridging the Lab to the Real World (Cloud Node)
A network lab is most effective when it can interact with the outside world. This allows you to update virtual router software, connect to real management platforms, or even let a virtual firewall protect your actual home network. This is achieved through the Cloud Node.
Cloud vs. NAT Node
GNS3 provides two primary ways to connect to the host:
- NAT Node: Uses a built-in DHCP server and provides outbound internet access. It is the easiest way to give your lab nodes internet connectivity for updates or NTP.
- Cloud Node: Maps a virtual interface in GNS3 directly to a physical or virtual NIC on your host. This allows "Inbound" access, meaning you can SSH from your real desktop's terminal (like PuTTY or iTerm2) directly into a virtual router.
Configuration Steps
- Drag a Cloud object into the workspace.
- Right-click and select Configure. Attach it to a "Host-Only" or "Bridge" adapter.
- Connect the Cloud node to your virtual router's Management interface.
- Assign an IP address to the router interface within the same subnet as your host's adapter.
Practical Use Case: SD-WAN Controllers
For engineers testing SD-WAN solutions, the Cloud node is essential. It allows the virtual controllers (vManage, vSmart) to be reachable via a web browser on your physical machine, simulating how a network administrator would manage a production environment.
Tutorial 4: Implementing Network Automation (NetDevOps)
By 2026, manual CLI configuration is becoming a secondary skill compared to Network Automation. GNS3 is the perfect sandbox for learning Python, Ansible, and Terraform without risking production hardware.
Setting up the Automation Node
The most efficient way to start is by adding the Network Automation Appliance (a specialized Docker container). This container comes pre-loaded with:
- Python 3.x
- Netmiko and NAPALM (Python libraries for network interaction)
- Ansible
- PyATS
Writing Your First Script
Instead of configuring five routers individually, you can write a Python script within the Automation container. The script can loop through an array of IP addresses, log in via SSH, and push a standardized OSPF or BGP configuration.
Benefits of GNS3 Automation
GNS3 supports API-driven topology changes. You can use the GNS3 Python API to programmatically create nodes, link them, and start them. This is vital for testing "Infrastructure as Code" (IaC) workflows where the network topology itself is defined in a configuration file.
Tutorial 5: Advanced Traffic Analysis with Wireshark
One of GNS3's greatest strengths is its native integration with Wireshark. In a physical lab, capturing traffic requires expensive TAPs or complex SPAN/RSPAN configurations. In GNS3, you can sniff traffic on any virtual link with two clicks.
How to Execute a Capture
- Right-click any active link (the line connecting two nodes).
- Select Start Capture.
- Check the box to "Start Wireshark."
- Wireshark will open on your host machine, streaming live traffic from the GNS3 VM.
Deep Dive Analysis
This is essential for troubleshooting protocol handshakes. For example, if a BGP peering is stuck in the "Active" state, you can look at the packet capture to see if TCP SYN packets are being ignored or if there is a TTL security mismatch.
| Feature | GNS3 | EVE-NG (Community) | Cisco Modeling Labs (CML) |
|---|---|---|---|
| Cost | Free / Open Source | Free / Open Source | Paid Subscription |
| Setup Complexity | Moderate | High | Low |
| Multi-Vendor | Excellent | Excellent | Limited (Native) |
| Interface | Desktop Client | Web Browser | Web Browser |
| Cloud Integration | Built-in | Requires Manual Config | Built-in |
| Resource Efficiency | Very High (via Docker) | High | Moderate |
Hardware Optimization for 2026 Lab Requirements
As of 2026, the complexity of virtual images (like Cisco Nexus 9000v) has increased. To run the five tutorials above effectively, your hardware should meet these modern specifications:
- CPU: At least 8 physical cores. Modern architectures like Zen 5 or 14th/15th Gen Intel processors are preferred for their high IPC (Instructions Per Clock), which speeds up boot times for virtual routers.
- RAM: 32GB is the "sweet spot." While 16GB works for CCNA-level labs, CCNP and CCIE-level topologies involving SD-WAN or ISE will easily consume 24GB+.
- Storage: NVMe SSDs are non-negotiable. Booting 10 virtual routers on a traditional HDD can take 20 minutes; on an NVMe Gen4/Gen5 drive, it takes less than 60 seconds.
Troubleshooting Common GNS3 Issues
- uBridge Errors: This usually occurs if the GNS3 application doesn't have administrative permissions to create virtual bridges. On Windows, ensure you run GNS3 as Administrator.
- KVM Acceleration Missing: If your nodes are extremely slow, check the GNS3 VM console. If it says "KVM acceleration: No," you must enable virtualization in your computer's BIOS/UEFI.
- Connection Refused: This typically happens when the GNS3 Client version does not match the GNS3 VM version. Always keep both updated to the same point release.
Frequently Asked Questions
Is GNS3 better than Packet Tracer for 2026 certifications?
GNS3 is superior for advanced certifications (CCNP, CCIE) and real-world testing because it runs actual network operating systems. Packet Tracer is a simulator that mimics command output, whereas GNS3 is an emulator that runs the real software. For basic CCNA concepts, Packet Tracer is sufficient, but GNS3 is required for anything involving complex features or third-party vendors.
Where do I get Cisco IOS images for GNS3?
Legally, you must obtain images from the Cisco Software Download portal. This requires a valid service contract (SmartNet). Many engineers purchase a Cisco Modeling Labs (CML) subscription, which provides legal access to the latest IOSv, IOS-XE, and NX-OS images that can then be exported and used in GNS3.
Can GNS3 simulate Wireless or Fiber Optics?
GNS3 simulates the logic and data plane of these technologies. While it doesn't simulate the physical properties of light or radio waves, you can configure virtual Wireless LAN Controllers (vWLC) and Access Points to test SSID management, roaming logic, and authentication.
How much does it cost to run a full GNS3 lab?
The GNS3 software itself is free. The primary costs come from hardware (RAM/CPU) and vendor software licenses. If you use open-source appliances like VyOS, FRRouting, or Arista's free-tier images, you can build a comprehensive lab for the cost of your electricity.
Does GNS3 support SD-WAN and SASE?
Yes. By using the QEMU/KVM support in the GNS3 VM, you can run SD-WAN controllers and edge devices. This makes GNS3 a primary tool for engineers learning Software-Defined Networking and SASE (Secure Access Service Edge) architectures in 2026.
Final Recommendation
To get the most out of GNS3, start by perfecting your GNS3 VM installation. Once you have a stable backend, focus on automation via Python and Docker. The ability to treat your lab as "code" rather than just a collection of static icons will prepare you for the current demands of the networking industry. For your next step, attempt to build a small topology that connects a virtual Cisco router to a virtual Juniper switch and use a Python script to verify OSPF adjacency between them.