Apple AssistiveTouch is an accessibility feature built into iOS, iPadOS, watchOS, and macOS that overlays a customizable screen menu or enables gesture control for device navigation. Designed primarily for users with motor or dexterity challenges, it allows complete control of an Apple device without pressing physical hardware buttons or executing complex multi-finger gestures.
What Is Apple AssistiveTouch?
AssistiveTouch serves as an adaptive bridge between users and Apple operating systems. Originally introduced in iOS 5 to assist individuals with physical disabilities, the tool has evolved into a comprehensive control interface used across the entire Apple ecosystem.
At its core, AssistiveTouch places an adjustable, floating soft key on the display screen. Tapping this virtual button opens an expandable menu that replicates hardware button presses, system controls, and touch gestures. For users who cannot comfortably press the physical Lock, Volume, or Home buttons, or for those who find pinching and multi-finger swiping difficult, AssistiveTouch translates simple single-finger taps into complex system commands.
Beyond assisting users with permanent or temporary mobility limitations, AssistiveTouch is widely utilized when physical buttons break or become non-responsive. It also serves power users seeking rapid access to custom system shortcuts—such as taking screenshots, triggering Control Center, or activating voice controls—without changing their hand position on larger devices.
Core Capabilities and Functional Scope
AssistiveTouch goes far beyond simulating simple button clicks. Its functionality spans system control, gesture automation, external device integration, and hardware-level replacements.
Physical Button Replacement
AssistiveTouch can execute every operation typically assigned to external hardware switches and keys. Through the digital interface, users can:
- Lock or wake the screen.
- Adjust device volume up or down, or mute hardware ringers.
- Trigger hardware restarts without holding down side buttons.
- Rotate the display orientation regardless of auto-rotate lock states.
- Access Control Center, Notification Center, and the App Switcher with a single tap.
Custom Gesture Creation
Many applications rely on complex touch patterns, such as two-finger pinching to zoom into maps or three-finger swipes to undo text inputs. For individuals unable to execute simultaneous touch points, AssistiveTouch allows the creation and recording of custom gestures. Once saved, a multi-finger swipe or pinch can be performed by selecting the custom gesture from the AssistiveTouch menu using a single finger or stylus.
Pointer Device Support
AssistiveTouch includes robust support for secondary pointing devices. Users can pair USB or Bluetooth mice, trackpads, joysticks, and specialized switch hardware. When connected, AssistiveTouch displays an on-screen pointer, allowing complete control of the touchscreen interface via external control devices. Parameters such as pointer speed, color, size, and button mapping can be adapted to individual user requirements.
Enabling AssistiveTouch Across Devices
Setting up AssistiveTouch varies slightly depending on the operating system, but the feature is natively embedded within the core system settings of supported Apple hardware.
Enabling on iPhone and iPad (iOS & iPadOS)
- Open the Settings app.
- Navigate to Accessibility.
- Under the Physical and Motor section, select Touch.
- Tap AssistiveTouch at the top of the menu.
- Toggle the AssistiveTouch switch to the On position.
Once enabled, a translucent floating button appears on the screen. Users can drag this icon to any position along the left, right, top, or bottom edges of the display.
Settings ➔ Accessibility ➔ Touch ➔ AssistiveTouch ➔ Toggle ON
Alternative quick-activation methods include:
- Siri: Activate Siri and say, "Turn on AssistiveTouch."
- Accessibility Shortcut: Configure the triple-click function (on the Side or Home button) under Settings > Accessibility > Accessibility Shortcut to toggle AssistiveTouch instantly.
- Control Center: Add the Accessibility Shortcuts module via Settings > Control Center to toggle the feature from the drop-down shade.
Enabling on Apple Watch (watchOS)
AssistiveTouch on watchOS allows users with upper-limb differences to navigate Apple Watch interfaces without touching the screen, utilizing wrist movements and muscle contractions detected by internal sensors.
- Open the Settings app on the Apple Watch (or open the Watch app on the paired iPhone).
- Tap Accessibility.
- Select AssistiveTouch.
- Toggle AssistiveTouch to On.
Enabling on Mac (macOS)
On macOS, AssistiveTouch provides an on-screen menu interface that mirrors system commands, replacing complex keyboard shortcuts or hardware clicks.
- Open the Apple menu () in the top-left corner and select System Settings.
- Select Accessibility from the sidebar.
- Click on Pointer Control or Touch (depending on hardware and macOS build).
- Enable AssistiveTouch to display the floating control menu on desktop displays.
Customizing the AssistiveTouch Experience
AssistiveTouch is highly customizable, permitting users to strip away unused features, reorganize menus, or reassign default tap behaviors to align with individual physical needs.
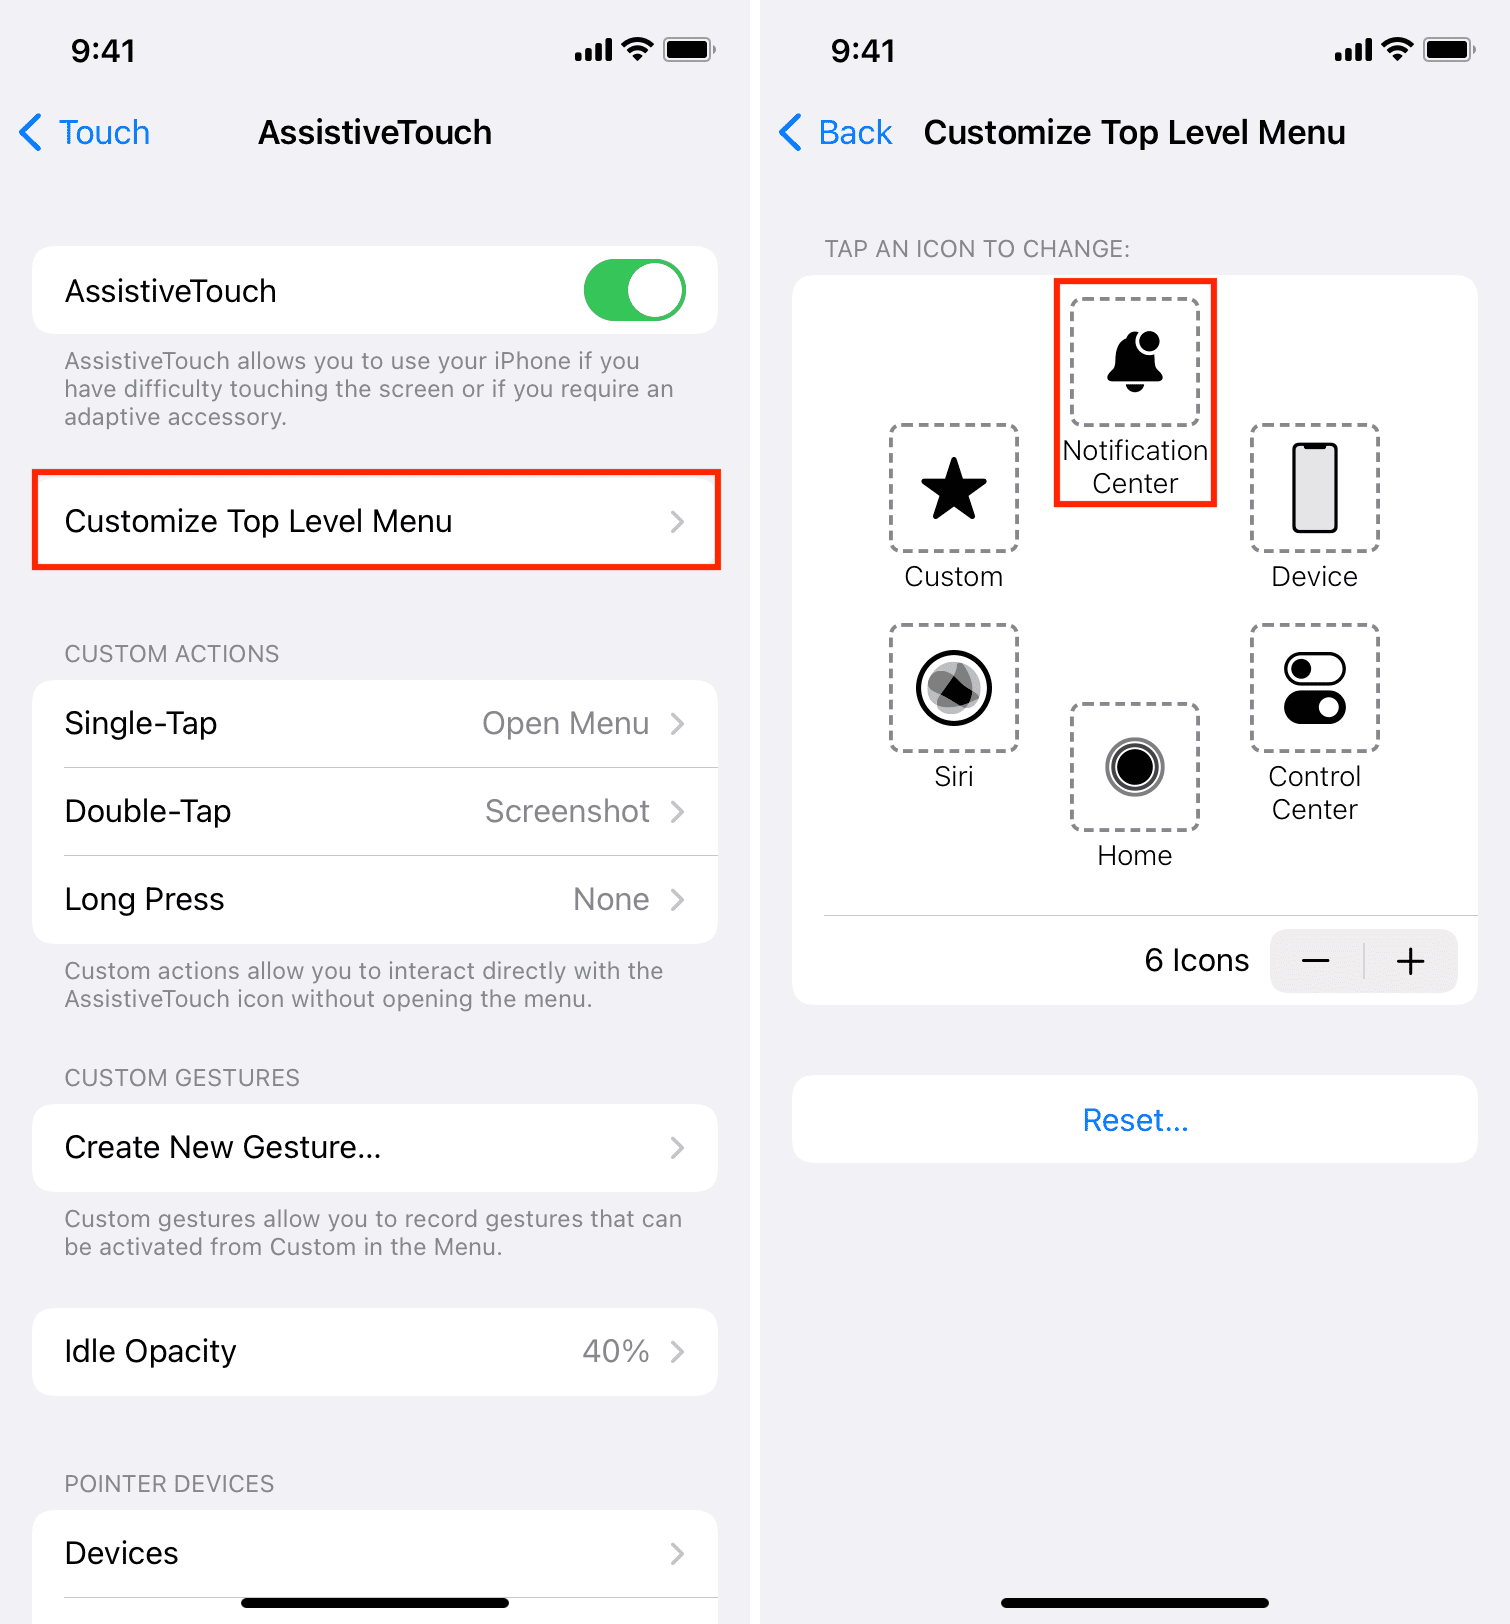
Customizing the Top Level Menu
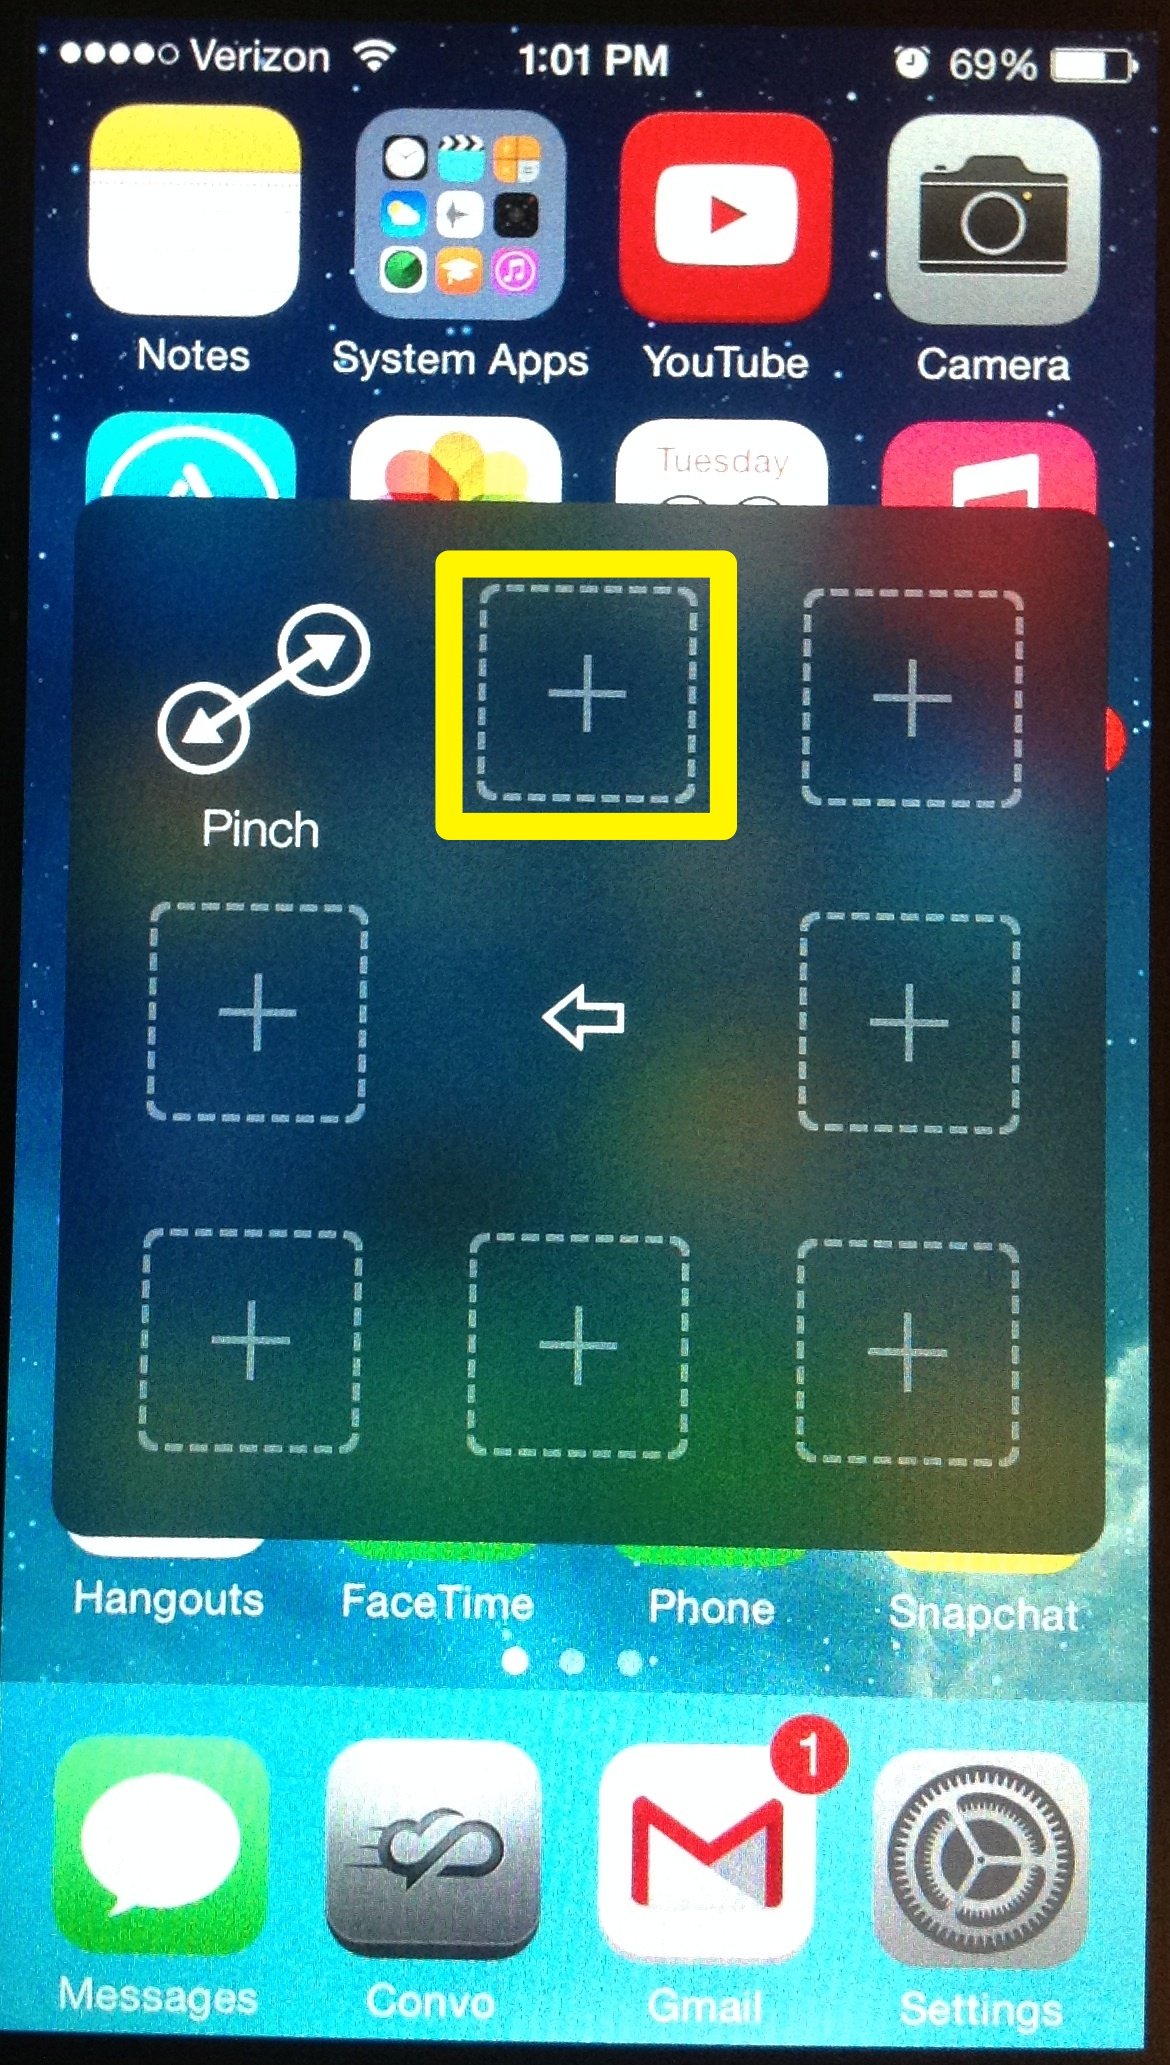
The primary menu opens when tapping the floating AssistiveTouch icon. Users can modify both the number of icons and the specific commands assigned to them.
- Go to Settings > Accessibility > Touch > AssistiveTouch.
- Tap Customize Top Level Menu.
- Use the + and - icons to change the number of available slots (from 1 up to 8 icons).
- Tap any icon location to assign a specific action, such as Screenshot, Siri, Reachability, Mute, or Volume Down.
- Select Reset at any point to restore the default Apple layout.
Configuring Custom Actions
Custom Actions allow users to interact directly with the floating AssistiveTouch icon without opening the full pop-up menu. Three primary interaction states can be configured:
- Single-Tap: By default, this opens the main AssistiveTouch menu. However, it can be reconfigured to directly open Control Center, execute a Pass-Through Gesture, or take a Screenshot.
- Double-Tap: Triggers a designated second-tier action when the floating icon is tapped twice in rapid succession.
- Long Press: Triggers an action when holding down the icon for a designated duration (configurable from 0.2 to 8.0 seconds).
For instance, a user who frequently captures screenshots can map Double-Tap to Screenshot, eliminating the need to press hardware volume and side buttons simultaneously.
Idle Opacity Adjustment
To prevent the floating button from obstructing content while reading or watching media, users can adjust its transparency when not in active use.
- Go to Settings > Accessibility > Touch > AssistiveTouch.
- Tap Idle Opacity.
- Drag the slider between 15% (nearly invisible) and 100% (fully opaque).
- The icon automatically fades to the selected opacity level after a few seconds of inactivity.
Advanced Capabilities: External Hardware and Wrist Controls
AssistiveTouch includes sophisticated input mappings designed for specialized hardware setups and advanced gesture recognition.
Mouse and Pointer Control Integration
When connecting a physical Bluetooth or USB pointing device (such as a standard trackball, ergonomic mouse, or head-tracker), AssistiveTouch manages device performance:
- Button Rebinding: Users can assign secondary and tertiary mouse buttons to execute custom commands, such as returning to the Home screen, locking the display, or opening the App Switcher.
- Dwell Control: Dwell Control enables users to perform actions without physically clicking a mouse button. By holding the pointer motionless over a screen element for a set duration (dwell time), AssistiveTouch automatically triggers a left-click, tap, or selected menu option.
- Pointer Style: Users can enlarge the on-screen circle pointer, alter its color, or set it to automatically hide after a specified period of inactivity.
Hand Gestures on Apple Watch
On supported Apple Watch models, AssistiveTouch relies on optical heart-rate sensors, accelerometers, and gyroscopes to detect precise hand and finger movements. Users can perform distinct hand gestures to move a high-contrast focus ring across the watch screen:
- Pinch (Index finger taps thumb once): Moves forward to the next screen element.
- Double Pinch (Index finger taps thumb twice quickly): Moves backward to the previous element.
- Clench (Fist closed once): Performs a selection or tap on the highlighted element.
- Double Clench (Fist closed twice quickly): Brings up the AssistiveTouch action menu for accessing hardware controls, scrolling, or Crown presses.
Additionally, Apple Watch users can activate a Motion Pointer, which turns the watch face into a tilt-based cursor controller guided by hand orientation.
Platform Comparison: AssistiveTouch Across the Apple Ecosystem
The table below outlines how AssistiveTouch functionality varies across Apple platforms, hardware requirements, and primary input mechanisms.
| Platform | Primary Inputs Supported | Hardware Requirements | Signature Feature |
|---|---|---|---|
| iOS (iPhone) | Touch, Voice (Siri), Bluetooth/USB Mouse, Switches | Compatible with all active iOS devices | Custom Top-Level Menu & Idle Opacity controls |
| iPadOS (iPad) | Touch, Apple Pencil, Bluetooth Mouse, Trackpad | Compatible with all active iPadOS devices | Full Dwell Control & external pointer button remapping |
| watchOS (Apple Watch) | Hand gestures (Pinch, Clench), Wrist movement | Apple Watch Series 4 or later, Apple Watch SE | Sensor-based muscle movement tracking without screen touch |
| macOS (Mac) | Trackpad, Mouse, Switch Access, Head Tracking | Intel or Apple Silicon Macs running modern macOS | Desktop overlay for system-wide shortcuts and menu navigation |
Practical Troubleshooting and Common Issues
While AssistiveTouch operates reliably at the operating system level, users occasionally encounter operational issues. The following steps resolve common functional errors.
The AssistiveTouch Icon Disappears
If the floating button vanishes from the screen:
- Verify the feature remains enabled in Settings > Accessibility > Touch > AssistiveTouch.
- Check if Idle Opacity is set too low (e.g., 15%), making the button difficult to see against bright backgrounds.
- Triple-click the Side or Home button if the Accessibility Shortcut is configured, as it may have been accidentally disabled.
- Issue a voice command to Siri: "Turn on AssistiveTouch."
Screen Gestures Blocked by Full-Screen Apps or Games
Certain full-screen applications or video games may hide system overlays. If the floating button obstructs gameplay or essential app controls, drag the icon to an unused corner of the screen. Alternatively, configure a double-tap shortcut on the back of the iPhone (Settings > Accessibility > Touch > Back Tap) to toggle AssistiveTouch on and off as needed.
Mouse Pointer Moving Slowly or Drifting
If an external Bluetooth mouse or trackpad exhibits pointer lag or unexpected drift:
- Navigate to Settings > Accessibility > Touch > AssistiveTouch > Tracking Speed.
- Drag the slider toward the turtle (slower) or rabbit (faster) to re-calibrate cursor sensitivity.
- Ensure Dwell Control is not executing unwanted clicks while adjusting your pointing hardware.
Recommended Setup Strategy
To get the most utility from Apple AssistiveTouch, follow this step-by-step setup strategy tailored to your primary usage goal:
- Identify Primary Usage: Determine whether AssistiveTouch is serving as an essential mobility solution, a hardware button backup, or a efficiency shortcut menu.
- Configure Custom Actions First: Assign your most frequently used command (e.g., Screenshot or Lock Screen) to Double-Tap or Long Press. This saves time by reducing the need to open the full pop-up menu for routine tasks.
- Streamline the Top Level Menu: Reduce the top-level menu count from six or eight icons down to four or five high-frequency items. Minimizing choices speeds up visual searching during single-handed use.
- Set Up Accessibility Shortcuts: Always bind AssistiveTouch to the hardware side-button triple-click (Settings > Accessibility > Accessibility Shortcut). This gives you an immediate physical fallback to toggle the overlay on or off whenever necessary.
Frequently Asked Questions
Does using AssistiveTouch drain the device battery faster?
AssistiveTouch has a negligible impact on battery performance on iOS, iPadOS, and macOS. On watchOS, active continuous sensor monitoring for hand gestures (Pinch/Clench) uses slightly more battery power than standard standby modes, but the overall operational impact remains minimal.
Can I move the AssistiveTouch button anywhere on the screen?
The AssistiveTouch button can be dragged to any location along the perimeter edges of the display screen. When released, it automatically snaps to the nearest side edge to keep the main viewing area unobstructed.
How do I take a screenshot using AssistiveTouch?
Open Settings > Accessibility > Touch > AssistiveTouch > Customize Top Level Menu. Select an unused icon position (or tap + to add one) and choose Screenshot from the action list. Alternatively, assign Screenshot directly to the Double-Tap or Long Press custom action.
Will AssistiveTouch work if my iPhone screen is cracked or non-responsive?
AssistiveTouch works as long as at least part of the display digitizer responds to input, allowing you to move the button to a functional screen region. If touch input is completely unresponsive, you can connect a standard USB or Bluetooth mouse using an adapter to control the screen cursor via AssistiveTouch.