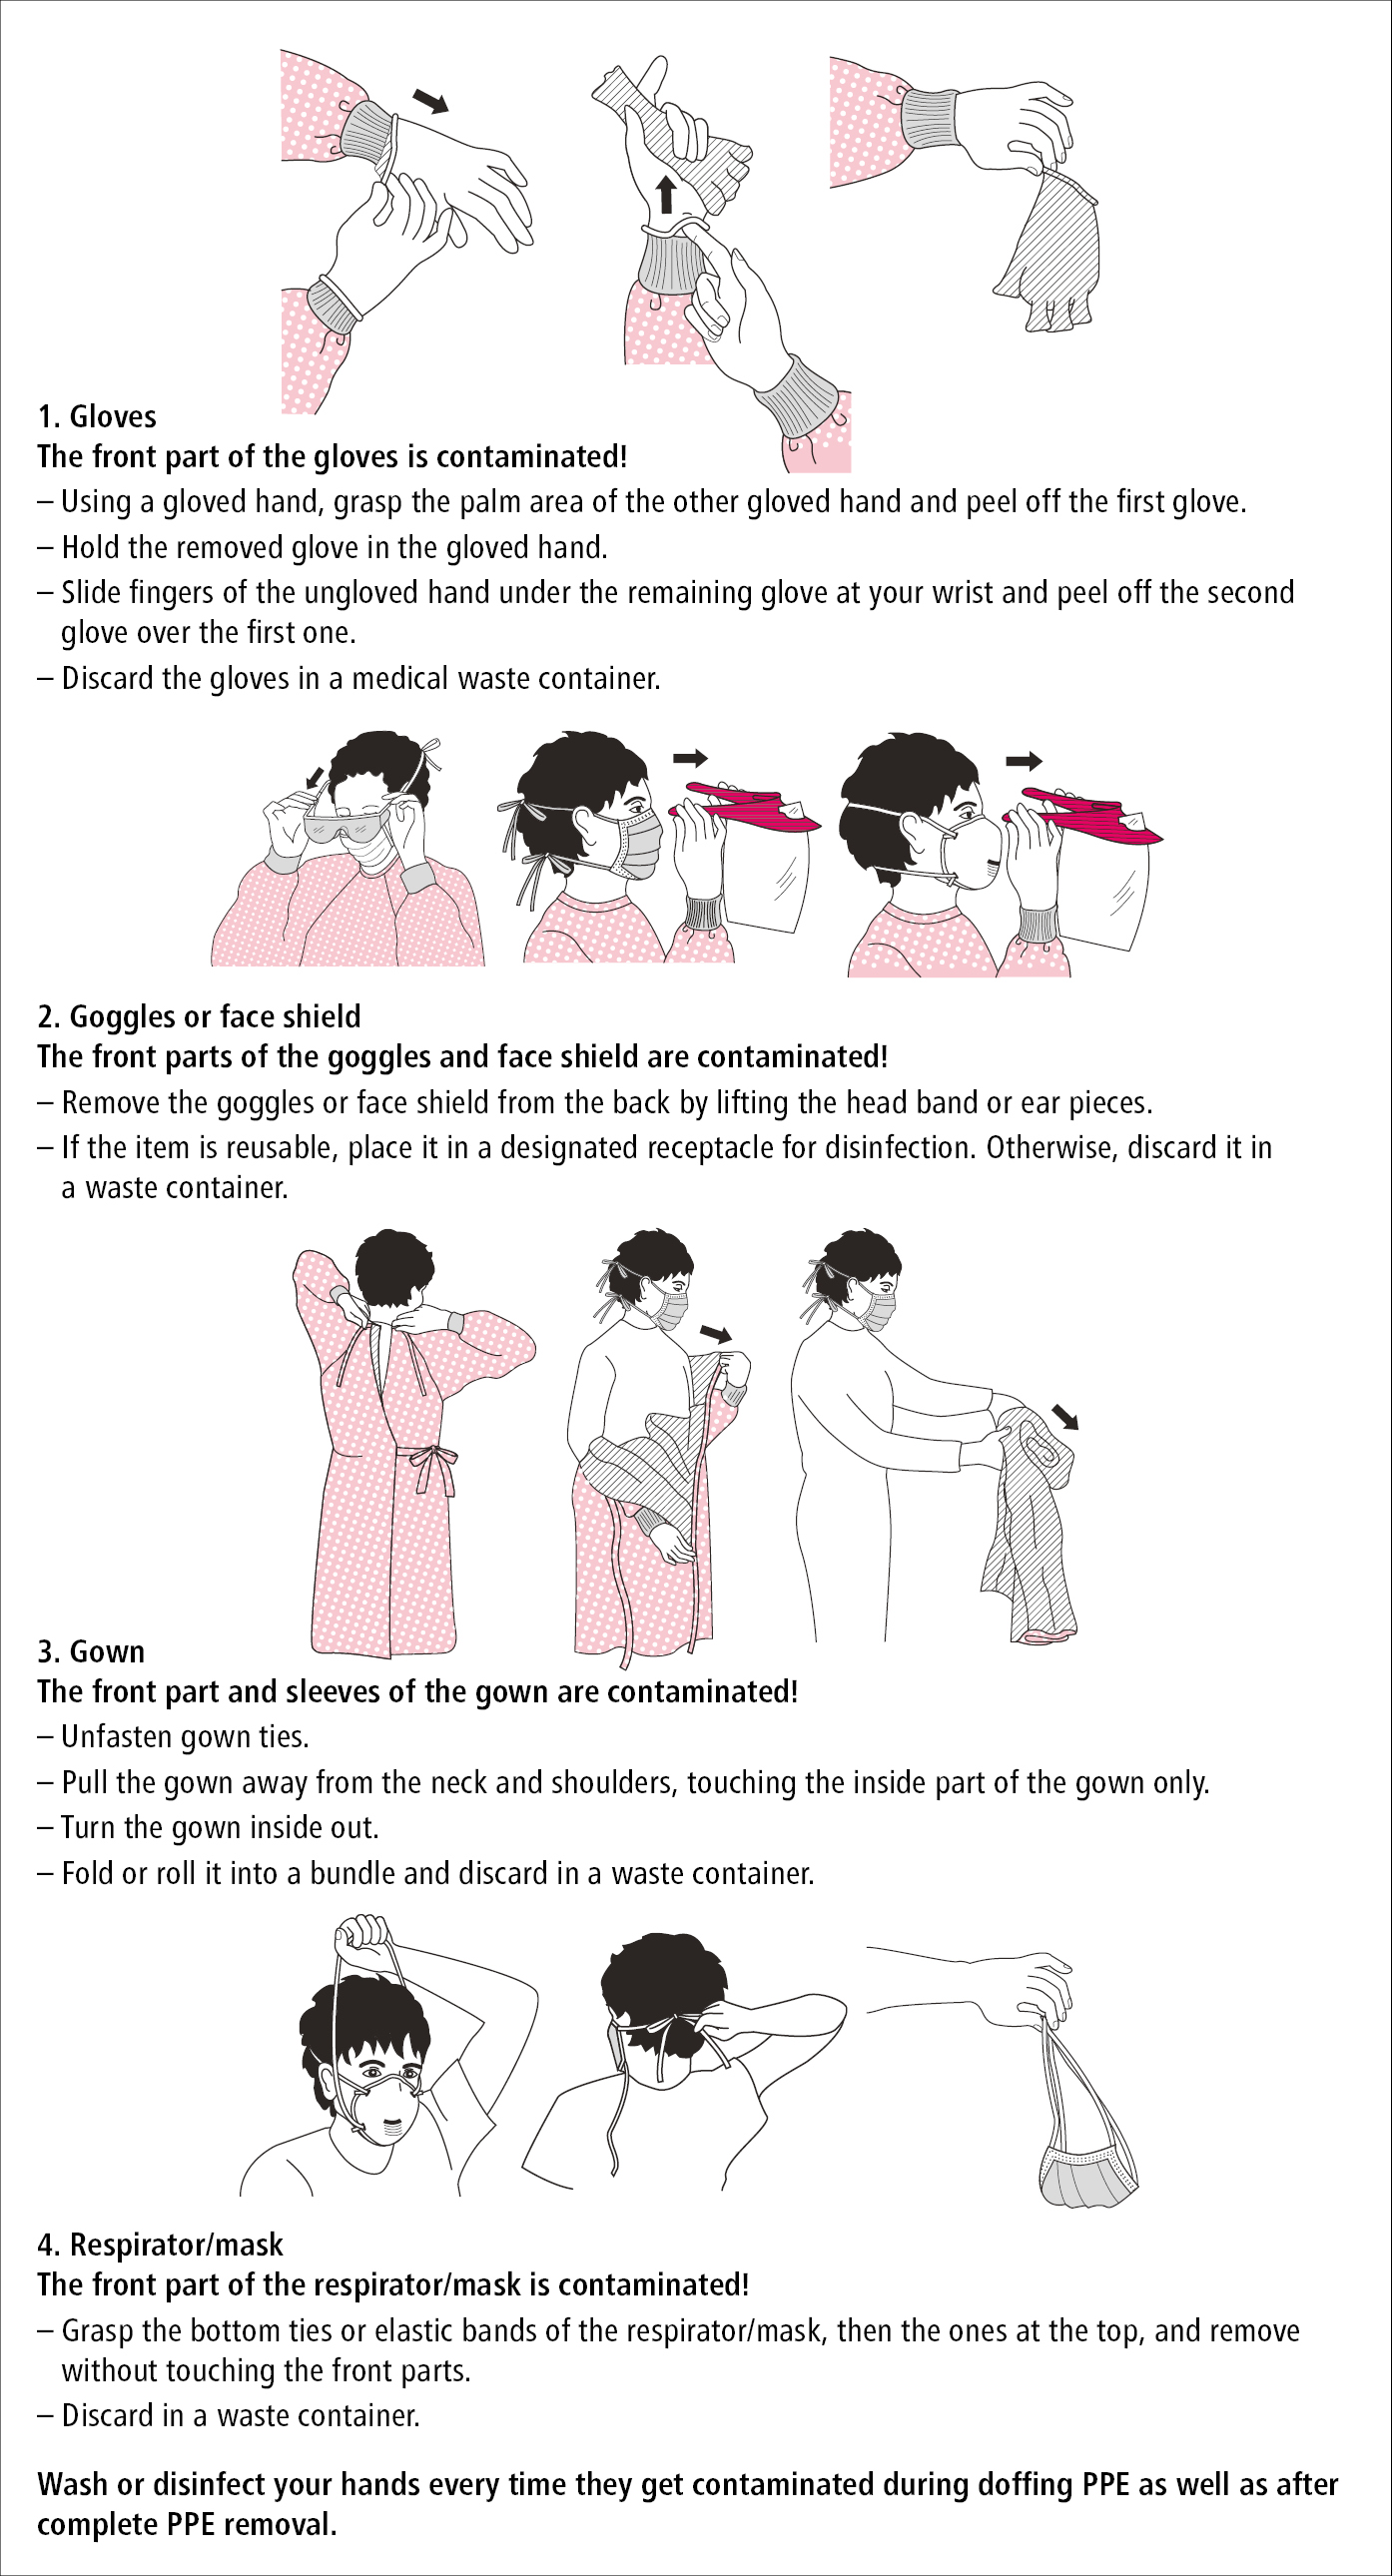
The four primary steps of doffing Personal Protective Equipment (PPE) involve removing gloves, followed by goggles or a face shield, then the gown, and finally the mask or respirator. Hand hygiene is a critical component that must be performed immediately after removing gloves and again after the entire sequence is completed to prevent cross-contamination.
Doffing—the process of removing personal protective equipment—is arguably the most dangerous part of working with infectious agents or hazardous materials. While donning (putting on) PPE ensures you are protected before entering a contaminated environment, doffing is the moment when the "barrier" is removed, exposing the wearer to the very pathogens or chemicals the equipment was meant to exclude. In 2026, healthcare and industrial safety standards continue to emphasize that more healthcare worker infections occur during the doffing process than during patient care itself, primarily due to self-contamination.
The 4-step sequence is designed to move from the most contaminated items to the least contaminated items, ensuring that the wearer’s face and respiratory system remain protected for as long as possible. This guide provides a comprehensive breakdown of the protocol, the mechanics of each movement, and the safety rationale behind the order.
Prerequisites for a Safe Doffing Procedure
Before initiating the 4-step doffing process, several environmental and procedural prerequisites must be met. You cannot simply begin removing gear anywhere; the location and preparation are as vital as the steps themselves.
The Designated Doffing Area
Doffing should occur in a designated area, typically a "buffer zone" or "ante-room" located just outside the contaminated environment. This area must be clearly marked and equipped with:
- Waste Receptacles: Properly labeled biohazard bins (usually red or yellow bags) that are hands-free (foot-pedal operated).
- Hand Hygiene Supplies: Alcohol-based hand rub (ABHR) containing at least 60-70% alcohol or a sink with soap and water.
- Mirrors: Large, wall-mounted mirrors help the wearer see their own movements, which is crucial for avoiding accidental contact with the "dirty" exterior of the PPE.
The Role of the Trained Observer (The Buddy System)
In high-risk scenarios, such as those involving Viral Hemorrhagic Fevers or highly resistant 2026 respiratory strains, a "trained observer" is mandatory. This person uses a checklist to read each step aloud, monitoring the wearer for any breaches in technique. If the wearer accidentally touches the outside of their gown with their bare skin, the observer stops the process immediately to ensure hand hygiene is performed before continuing.
Step 1: Removing Gloves (The Most Contaminated Item)
Gloves are considered the most contaminated piece of PPE because they have had direct contact with the patient, surfaces, or hazardous materials. Therefore, they must be removed first to prevent the transfer of pathogens to the rest of the equipment during the removal process.
The "Glove-to-Glove, Skin-to-Skin" Technique
- Glove-to-Glove: Using one gloved hand, pinch the outside of the opposite glove near the wrist. Be careful not to touch your bare skin. Peel the glove downwards, away from the wrist, turning the glove inside out as you pull it off. Hold the removed glove in your remaining gloved hand.
- Skin-to-Skin: Slide a finger from your un-gloved hand under the remaining glove at the wrist. Do not touch the outside of the glove. Peel the second glove off from the inside, creating a "bag" that contains the first glove inside the second.
- Disposal: Immediately drop the bundled gloves into the biohazard waste container.
Why Precision Matters
The most common mistake in Step 1 is "snapping" the gloves. In 2026, research into aerosolization confirms that the rapid snapping of latex or nitrile can release microscopic droplets into the immediate air zone. The removal must be a slow, controlled "peeling" motion. If your hands become visibly contaminated during this step, you must stop and perform hand hygiene before moving to Step 2.
Step 2: Removing Goggles or Face Shield
Once the gloves are removed, your hands are (relatively) cleaner, but the front of your face protection is likely contaminated with droplets or splashes. The goal of Step 2 is to remove the eye protection without touching the front "shield" area.
Handling the "Clean" Zones
The front of the goggles or face shield is considered "dirty," while the earpieces or the headband are considered "clean."
- Reach toward the back of your head or the sides of your face.
- Grasp the headband or earpieces of the goggles/shield.
- Lift them away from your face and pull them forward. Do not let the front of the equipment touch your forehead or hair.
- If the item is disposable, discard it immediately. If it is reusable (common in many 2026 sustainability-focused hospital protocols), place it in a designated reprocessing bin for sterilization.
Avoiding Mucosal Exposure
The eyes are a primary entry point for pathogens. In Step 2, the primary risk is "flicking" the equipment, which can cause droplets on the shield to land in the eyes. Always pull the equipment straight out and then away.
Step 3: Removing the Gown
The gown protects the torso and arms, and its front and sleeves are considered contaminated. Step 3 requires a specific "rolling" motion to ensure the "dirty" side is trapped on the inside of the bundle.
The Mechanics of Gown Removal
- Unfasten Ties: Carefully unfasten the gown ties. If the gown is a "break-away" style, you may tug the neck and waist ties gently until they snap. Ensure your hands do not touch the front of the gown during this process.
- The Peel: Reach up toward the shoulders and pull the gown down and away from your body.
- The Roll: As the gown comes off the arms, turn it inside out. Roll it into a tight bundle, ensuring that the contaminated exterior is now on the inside of the roll.
- Disposal: Drop the bundle into the waste container.
Complexity of Gown Styles
In 2026, many gowns feature thumb-loops to prevent sleeves from riding up. If your gown has thumb-loops, you must be extra cautious during the "peel" phase to ensure that as the sleeve exits the thumb, it doesn't snap back and spray contaminants.
Step 4: Removing the Mask or Respirator
The mask or respirator is the final barrier. It is removed last to ensure the wearer has respiratory protection throughout the entire doffing process, particularly during the removal of the gown, which can stir up dust or fibers.
The "Strap-Only" Protocol
Just like goggles, the front of the mask is highly contaminated.
- Bottom Strap First: If wearing a respirator (like an N95), grasp the bottom strap and pull it over your head.
- Top Strap Second: Grasp the top strap and pull it over your head while leaning slightly forward.
- Controlled Release: Do not let the mask "snap" against your face. Use the straps to guide the mask away from your face and into the waste bin.
- Surgical Masks: If using a mask with ear loops, hook your fingers into the loops and pull them forward, discarding the mask without touching the front filter.
Final Hand Hygiene
The 4-step process is not complete until a final, thorough hand hygiene session is performed. Even with perfect technique, the act of doffing can result in microscopic transfer. Scrub your hands for at least 20 seconds, ensuring you cover the backs of the hands, between fingers, and under the nails.
Summary of PPE Doffing Sequences
While the 4-step method is standard, different organizations (such as the CDC or WHO) may suggest slight variations depending on the type of gown used. The following table compares the most common sequences used in 2026 clinical environments.
| Step | Standard 4-Step Method | Alternative (Gown/Gloves Together) | Critical Safety Rationale |
|---|---|---|---|
| 1 | Gloves | Gown and Gloves | Removing gloves first reduces the "viral load" on hands before touching other items. |
| 2 | Goggles/Shield | Goggles/Shield | Eye protection is removed by the clean straps to prevent mucosal contact. |
| 3 | Gown | Mask/Respirator | The gown is rolled inside-out to contain pathogens within the fabric. |
| 4 | Mask/Respirator | Hand Hygiene | The mask stays on longest to protect the airway during the doffing of other gear. |
Common Doffing Mistakes and How to Avoid Them
Even experienced professionals can make errors during doffing, especially at the end of a long shift when fatigue sets in. In 2026, safety audits continue to highlight these three common pitfalls:
1. Touching the Front of the Mask
It is a natural reflex to grab the front of the mask to pull it off. However, the front of the mask acts as a filter that has been concentrating pathogens for hours. Touching it effectively "loads" your fingertips with a high concentration of the infectious agent. Always use the straps.
2. Moving Too Quickly
Doffing should be a slow, deliberate "dance." Rushing through the steps increases the likelihood of "flicking" or "snapping" the equipment, which can aerosolize contaminants. Occupational health guidelines in 2026 recommend taking at least 2 to 3 minutes to complete the doffing sequence.
3. Improper Disposal
If the waste bin is overfilled, the PPE may "spring back" or touch the rim of the bin, potentially contaminating the doffing area. Ensure bins are emptied regularly and that the PPE is placed deep into the container.
Frequently Asked Questions
Why is the mask removed last?
The mask is removed last because the process of removing the gown and goggles can cause a "cloud" of microscopic particles to be disturbed from the surface of the PPE. Keeping the mask on until the very end ensures that the wearer does not inhale these particles during the movement of other equipment.
When should I wash my hands with soap instead of using hand sanitizer?
In 2026, the standard remains: use soap and water if your hands are visibly soiled with blood, body fluids, or chemicals. Additionally, if you have been exposed to spore-forming organisms (like Clostridioides difficile), soap and water are mandatory because alcohol-based sanitizers do not kill spores.
Can I reuse any part of the PPE?
Generally, PPE used in infectious disease environments is single-use. However, some 2026 protocols allow for the sterilization and reuse of high-quality goggles, face shields, and elastomeric respirators. These items must be placed in a specialized "decontamination bin" rather than the standard waste bin.
What should I do if I realize I made a mistake during doffing?
If you realize you touched a contaminated surface with your bare skin, stop immediately. Perform hand hygiene with alcohol-based rub, wait for it to dry, and then continue with the next step of the sequence. If the breach was significant (e.g., a needle stick or splash to the eye), follow your facility’s post-exposure protocol immediately after finishing doffing.
Is the 4-step sequence the same for N95 and surgical masks?
The order of the steps is the same (mask is always last), but the technique differs slightly. N95 respirators usually have two head straps that must be pulled over the head, while surgical masks usually have ear loops. The core principle remains: only touch the straps/loops, never the filter.
Practical Recommendation for Safety Managers
To maintain high standards of safety in 2026, organizations should implement "Doffing Drills." Simply watching a video is insufficient for mastering the muscle memory required for safe PPE removal. Periodic, unannounced observations of the doffing process, followed by immediate constructive feedback, can significantly reduce the rate of self-contamination. Furthermore, ensure that the doffing area is ergonomically designed, with bins and sanitizer dispensers placed at the exact height where they are needed to prevent the wearer from having to overreach or bend awkwardly, which can lead to balance issues and accidental contact with contaminated gear.