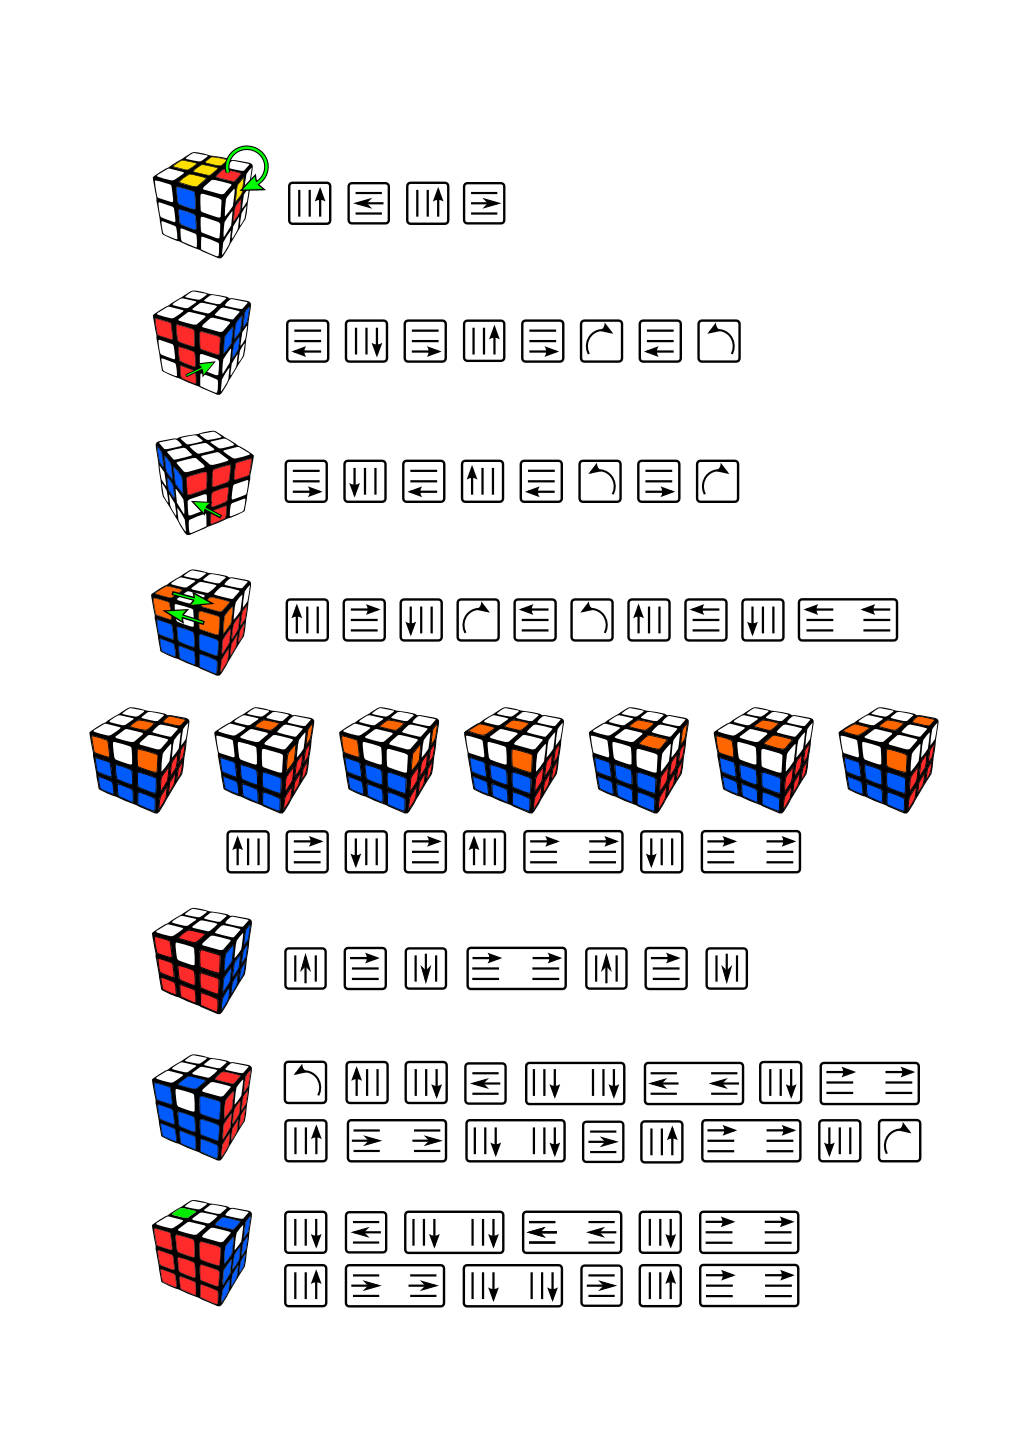
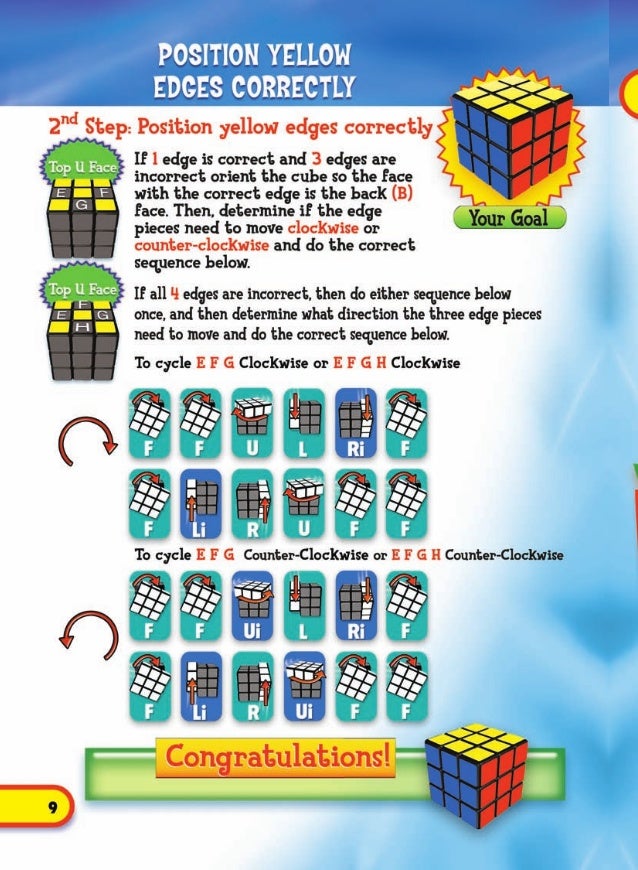
Solving a Rubik’s Cube is achievable for anyone by following the Layer-by-Layer (LBL) method. This approach breaks the complex 3D puzzle into a sequence of manageable stages: forming a cross, completing the first layer, positioning the middle edges, orienting the top layer, and finally permuting the remaining pieces to finish the cube.
Understanding the Geometry of the Cube
Before attempting a solution, it is essential to understand the mechanics of a standard 3x3x3 Rubik’s Cube. The puzzle consists of 26 individual pieces, known as "cubies," which rotate around a central core. The core features six fixed center pieces that define the color of each face. Because these center pieces never move relative to one another, they serve as the anchor for your solution.
There are three types of pieces:
- Center Pieces: These are fixed in place and represent the color of the entire face.
- Edge Pieces: These pieces have two colors and sit between the corners. There are 12 edge pieces in total.
- Corner Pieces: These pieces have three colors and sit at the vertices of the cube. There are 8 corner pieces in total.
The fundamental rule to remember is that you are not moving individual stickers; you are moving pieces. When you turn a face, you are cycling four edge pieces and four corner pieces around the static center.
Notation: The Language of Movements
To follow any solution, you must understand the standard notation used to describe rotations. Each letter represents a 90-degree clockwise turn of a specific face when looking directly at it:
- R (Right): Rotate the right face clockwise.
- L (Left): Rotate the left face clockwise.
- U (Up): Rotate the top face clockwise.
- D (Down): Rotate the bottom face clockwise.
- F (Front): Rotate the front face clockwise.
- B (Back): Rotate the back face clockwise.
An apostrophe after a letter (e.g., R') indicates a counter-clockwise turn. A number 2 after a letter (e.g., U2) indicates a 180-degree turn. Mastering these turns is the prerequisite for executing the algorithms required to solve the cube.
Step 1: The White Cross
The most intuitive starting point is the "White Cross." You must position the four white edge pieces around the white center piece. Crucially, the side colors of these white edges must match the color of the adjacent center pieces (e.g., the white-red edge must be aligned with the red center).
This step does not require complex algorithms; it relies on basic spatial reasoning. If you find a white edge on the bottom layer, simply rotate the side face until it aligns with its corresponding center, then rotate that face 180 degrees to bring it to the top.
Step 2: The First Layer (Corners)
Once the cross is complete, you must place the four white corner pieces. A white corner belongs in the position where the white, side-color-one, and side-color-two faces meet.
To insert a corner, place it directly underneath its target slot. Perform the "Right Trigger" algorithm: R U R' U'. This moves the corner piece into the top layer. You may need to repeat this sequence several times until the white sticker on the corner is facing upward or the corner is correctly oriented within the slot.
Step 3: The Second Layer (Middle Edges)
With the white layer complete (held on the bottom), you now focus on the four edge pieces of the middle layer. Your goal is to move edges from the top layer into the middle slots.
To move an edge from the top to the middle-right:
- Align the edge so it forms an inverted "T" with the matching center color.
- Execute: U R U' R' U' F' U F.
To move an edge from the top to the middle-left:
- Align the edge as before.
- Execute: U' L' U L U F U' F'.
Step 4: The Yellow Cross
Now, focus on the top face (yellow). You are likely to see one of three patterns on the top: a single yellow center, an "L" shape, or a horizontal line.
Use the algorithm F (R U R' U') F' to transform these states. If you have the "L" shape, position it in the back-left corner of the top face before performing the move. If you have a horizontal line, position it horizontally. Repeat until you have a yellow cross on top.
Step 5: Positioning the Yellow Cross Edges
The yellow cross edges must now be aligned with their respective side centers. Rotate the top layer until two edges match their side colors. If they are adjacent, hold the cube so one correct edge is at the back and one is on the right.
Use the "Sune" algorithm: R U R' U R U2 R'. This will swap the positions of the edges until all four align with the side centers.
Step 6: Positioning the Corners
At this stage, you must move the corner pieces to their correct locations, even if they are rotated incorrectly. Find a corner that is already in the right place. Hold the cube so this corner is in the front-right-top position.
Use the algorithm: U R U' L' U R' U' L. This rotates the other three corners clockwise. Repeat until all four corners are in the correct spot.
Step 7: Orienting the Corners
The final step is to orient the corners so the yellow stickers face upward. This is where many beginners struggle.
- Hold the cube so an unsolved corner is in the front-right-top position.
- Repeat R' D' R D until the yellow sticker of that corner is facing up.
- Crucial: Once the corner is oriented, only rotate the top layer (U) to bring the next unsolved corner into the front-right-top position.
- Repeat the R' D' R D sequence.
Do not worry if the rest of the cube appears scrambled during this process; it will resolve itself once the final corner is oriented.
Comparison of Solution Methods
| Method | Complexity | Move Count | Learning Curve |
|---|---|---|---|
| Layer-by-Layer | Low | High | Very Short |
| CFOP (Fridrich) | High | Low | Long |
| Roux | Very High | Medium | Very Long |
Troubleshooting Common Mistakes
If your cube does not appear solved after following these steps, check the following:
- Misaligned Center Pieces: Ensure you did not inadvertently turn a face you were not supposed to turn.
- Incorrect Notation: Verify that you are turning the faces clockwise (standard notation) and not counter-clockwise.
- The "D" Move: In the final step, beginners often forget the final D move in the R' D' R D sequence. This final turn is required to restore the bottom two layers.
Frequently Asked Questions
How long does it take to learn the basic solution? Most people can learn the Layer-by-Layer method in one to two hours of dedicated practice. Retaining the muscle memory takes several days of repetition.
Do I need an expensive cube? No. While professional speedcubes provide smoother rotation and better corner-cutting, a standard, functional Rubik’s Cube is sufficient for learning the LBL method. Ensure the pieces move freely and are not jammed.
What should I do if my cube seems unsolvable? If you have disassembled your cube and put it back together, it may be in an "unsolvable" state where pieces are swapped. Ensure your cube is assembled correctly, or reset it to a solved state first.
Are there shorter ways to solve the cube? Yes. Advanced solvers use the CFOP method, which combines techniques to reduce the move count. However, these require memorizing significantly more algorithms (over 70 for full proficiency).
Is the Rubik's Cube solvable by logic alone? While you can solve the first layer logically, the subsequent layers require specific sequences of moves (algorithms) to manipulate pieces without disrupting the progress made on previous layers.
Next Steps for Aspiring Solvers
Once you have successfully completed your first solve, focus on fluidity. Avoid looking at the cube while performing the algorithms; instead, focus on the rhythm of the turns. As your speed increases, you will naturally begin to recognize the patterns in the top layer more quickly. For those interested in competitive cubing, 2026 guidelines from the World Cube Association (WCA) provide the standard rules for official timed events, which can serve as a benchmark for your progress.