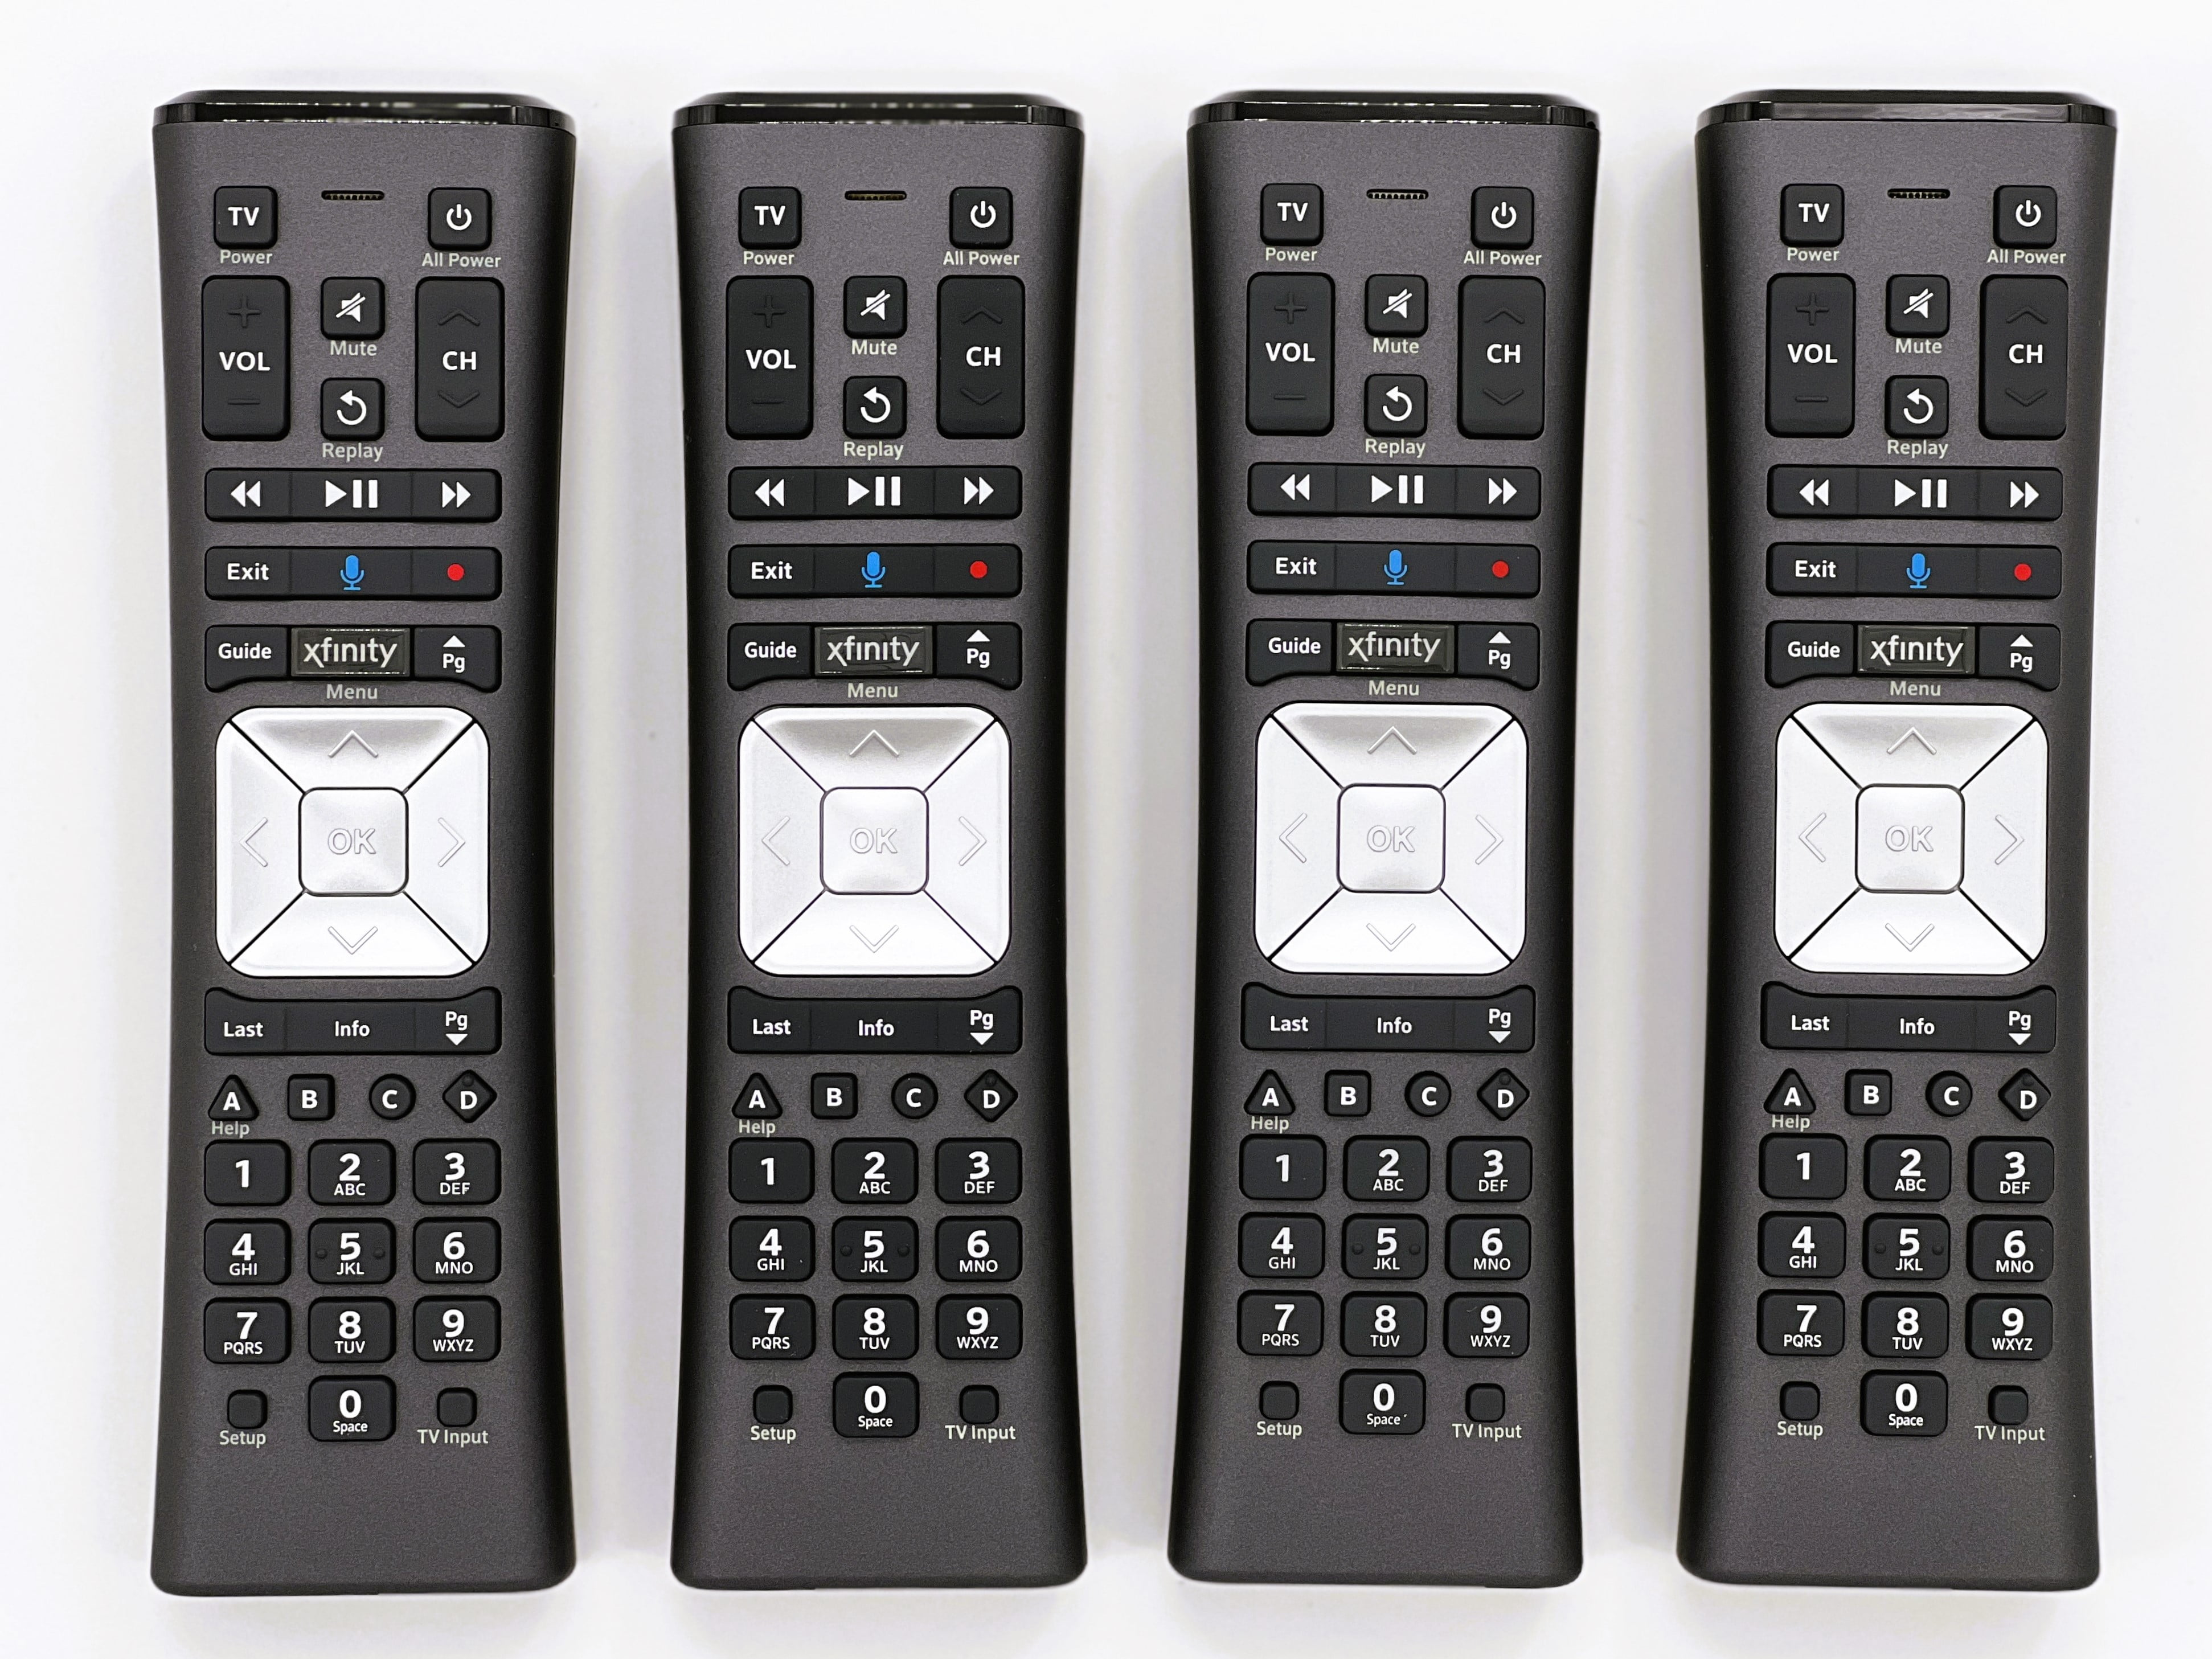
Setting up an Xfinity XR11 remote involves installing fresh batteries, turning on your television and Xfinity set-top box, holding the "Setup" button until the indicator light changes, entering a matching device brand code or using the remote's automatic code search feature, and finally testing the power and volume functions to verify successful pairing.
For millions of cable television subscribers, the remote control is the primary interface for navigating endless entertainment options, adjusting audio levels, and managing home media ecosystems. Among the various controllers issued by Comcast over the years, the Xfinity XR11 remote stands out as one of the most widely deployed voice-enabled controllers. Featuring an ergonomic layout, dedicated buttons for popular streaming commands, and a built-in microphone for voice search, the XR11 remains a reliable staple in living rooms nationwide.
However, whether you have just unboxed a replacement controller, migrated your equipment to a new television set, or inadvertently reset your current device, getting the remote to communicate seamlessly with both your Xfinity TV box and your television can occasionally present a challenge. Without proper pairing and code programming, you may find yourself juggling multiple remotes just to change channels or alter the volume. This guide provides a comprehensive, step-by-step walkthrough to help you successfully configure your Xfinity XR11 remote, ensuring complete control over your home entertainment hardware.
Understanding the Xfinity XR11 Remote Control
Before diving into the setup procedure, it helps to understand what the XR11 remote is designed to achieve and how it interacts with your entertainment system. The XR11 is a radio frequency (RF) and infrared (IR) hybrid remote control. This dual-technology approach is crucial to its operation. The RF capability allows you to control your Xfinity set-top box (such as an X1 DVR or streaming box) without needing a direct line of sight. You can point the remote anywhere in the room, and the cable box will receive the command.
Conversely, the IR capability is typically used to control your television and audio receiver (such as a soundbar or surround sound system). Because televisions and audio equipment require specific infrared line-of-sight signals to adjust power states and volume levels, the XR11 must be programmed with the correct manufacturer code corresponding to your specific hardware brand. Recognizing this distinction helps clarify why your remote might change Xfinity channels immediately out of the box, yet fail to adjust your television's volume until you complete the programming sequence.
Key Features and Capabilities
The XR11 was engineered to streamline the television-watching experience through several distinct hardware integrations:
- Voice Control: The prominent microphone button enables voice-activated commands, allowing you to search for programs, launch apps, or tune to specific channels simply by speaking into the device.
- Backlit Buttons: Motion-activated backlighting illuminates the keypad when the remote is picked up in a dark room, making nighttime viewing much more convenient.
- Point-Anywhere RF Technology: Eliminates the need to point the remote directly at the cable box, reducing frustrating input lag or missed commands.
- Universal TV and Audio Control: Capable of operating the power, volume, and mute functions of thousands of television and sound system models.
Prerequisites and Preparation
To ensure a smooth setup process without unnecessary interruptions, take a few moments to prepare your workspace and gather the necessary components. Attempting to program a remote with failing batteries or obstructed hardware sensors is one of the most common reasons setup attempts fail.
Hardware and Environmental Checklist
- Fresh Batteries: The XR11 requires two AA batteries. If your remote has been sitting in a drawer or running on low power, unstable voltage can interfere with the infrared programming sequence or prevent the LED indicator light from flashing correctly. Always insert fresh alkaline batteries, paying careful attention to the positive (+) and negative (-) alignment markers inside the battery compartment.
- Clear Line of Sight to the TV: While the Xfinity box can communicate via RF, programming the TV codes requires a direct infrared line of sight between the tip of the XR11 remote and the IR receiver window on your television or audio receiver. Clear any physical obstructions, such as decorative items, soundbars, or loose cables blocking the front of your TV.
- Power Status: Ensure that both your television and your Xfinity set-top box are powered on and actively displaying an image on the screen before you begin the programming steps.
Step-by-Step Guide: How to Set Up an Xfinity XR11 Remote
The following five sequential steps outline the standard manual method for pairing your Xfinity XR11 remote with your television and cable box. Follow these instructions carefully.
Step 1: Power On Your Equipment and Check Batteries
Before executing any button combinations, verify that your Xfinity TV box and your television are fully powered on. Slide open the battery cover on the back of your XR11 remote, insert two fresh AA batteries, and secure the cover. Press any button on the remote, such as the Xfinity button, and verify that the status indicator light at the top of the remote flashes. If the light does not flash, check your battery orientation or replace the batteries with a brand-new set.
Step 2: Press and Hold the "Setup" Button
Locate the Setup button on your XR11 remote. Depending on the exact manufacturing revision of your remote, this button is usually found near the upper left portion of the keypad. Press and hold the Setup button down continuously. Watch the small LED indicator light at the very top of the remote. Keep holding the button until that indicator light changes from a steady red glow to a solid green light. Once the light turns green, release the Setup button.
Step 3: Enter the 5-Digit Manufacturer Code
With the indicator light remaining a solid green, you must now enter a specific 5-digit code that corresponds to the brand of your television.
To find the correct code for your TV brand, consult the manufacturer code list provided in your Xfinity setup manual or look up the verified code online via the official Xfinity support portal. Common television brands utilize specific code ranges, though many major manufacturers have multiple valid codes.
Using the number pad on the remote, carefully enter the 5-digit code. As you press each number, the green indicator light should blink. If you enter a valid code, the green light will flash green twice in rapid succession. If you enter an incorrect or invalid code, the indicator light will flash red three times, indicating that you must repeat the sequence with a different code.
Step 4: Test the Volume and Power Functions
Once the remote accepts the 5-digit code, you must test whether the programming was successful. Point the XR11 directly at your television and press the Volume Up or Volume Down buttons. If your television's volume indicator changes, your remote has successfully communicated with your TV. Next, press the Power button on the XR11 to see if your television turns off.
If the volume and power functions operate correctly, your setup is complete. If the television does not respond, return to Step 2, select an alternate 5-digit code listed for your specific television brand, and test again.
Step 5: Complete the On-Screen Pairing for Xfinity Box Control
While programming the TV code handles your television's hardware, you may also need to pair the remote directly to your Xfinity X1 TV box to enable voice commands and RF point-anywhere functionality.
To do this, press the Xfinity button on your remote. Navigate to the on-screen Settings menu (represented by the gear icon). Select Remote Settings, and then choose Pair Remote. Follow the straightforward prompts displayed on your television screen, which typically involve pointing the remote at the cable box and pressing a specific sequence of numbers or letters displayed visually. Once completed, your XR11 is fully synchronized for both box and television control.
Alternative Setup Method: Automatic Code Search
If you cannot find your television brand in the printed documentation or online code lists, the XR11 features an automatic code search utility that scans the remote's internal memory bank for a matching frequency.
| Setup Method | Best Used For | Primary Advantage | Potential Drawback |
|---|---|---|---|
| Manual 5-Digit Code Entry | Known television and audio receiver brands. | Fast, precise, and immediately targets your exact hardware. | Requires looking up specific manufacturer codes. |
| Automatic Code Search | Unknown, generic, or off-brand televisions. | Eliminates the need to search for external code lists. | Can take several minutes to cycle through code libraries. |
To utilize the automatic code search, execute the following procedure:
- Turn on your television and Xfinity box.
- Press and hold the Setup button on the XR11 until the indicator light changes from red to green.
- Enter the code 9-9-1 on the remote's keypad. The green indicator light will blink twice.
- Press the Channel Up (CH +) button repeatedly. Every time you press the button, the remote transmits a different power command from its database. Continue pressing Channel Up slowly until your television turns off.
- As soon as your television powers off, press the Select (or OK) button in the center of the directional pad to lock in the working code. The green indicator light will blink twice to confirm that the code has been saved.
Troubleshooting Common Setup Issues
Even when following instructions meticulously, minor technical hurdles can arise during remote configuration. Review these common scenarios and resolutions to overcome setup roadblocks.
The Indicator Light Flashes Red Instead of Green
If holding the Setup button results in a blinking red light rather than a solid green light, your remote's firmware is signaling low battery voltage. The internal microprocessor requires stable electrical current to enter programming mode. Replace both AA batteries with fresh units and restart the setup process from Step 1.
The Remote Controls the TV Power, But Not the Volume
This scenario occurs when the 5-digit code you entered successfully paired the power control command set for your TV brand, but missed the specific audio control protocol. To fix this, you can decouple the volume control so it operates your audio receiver or soundbar instead of the TV, or you can cycle through alternative codes for your television brand until you find one that controls both power and volume simultaneously.
The Voice Control Button Does Not Work
If all buttons control your TV and cable box normally, but pressing the microphone button yields no response on-screen, your remote has not completed RF pairing with the Xfinity set-top box. Return to Step 5 and execute the on-screen pairing sequence through the Xfinity settings menu to re-establish the radio frequency data link.
Frequently Asked Questions
Can I program an Xfinity XR11 remote to control a soundbar?
Yes, the XR11 can be programmed to control volume and mute functions on major soundbar and audio receiver brands. During the setup process, you can look up specific audio equipment codes in the manufacturer directory or use the automatic code search while your soundbar is powered on, ensuring that audio commands target your external speaker system rather than the television's internal speakers.
What should I do if my XR11 remote stops working completely?
If your remote stops responding entirely, start by replacing the batteries with fresh ones. If fresh batteries do not restore function, perform a factory reset on the remote by holding the Setup button until the light turns green, then pressing 9-8-1. The light will blink to indicate a successful reset, clearing all previous programming so you can start the setup process fresh.
Why won't my TV respond to the 5-digit codes?
Some television manufacturers, particularly newer off-brand or budget displays, utilize proprietary infrared protocols that may not match standard legacy code libraries. If standard codes fail, utilize the automatic code search method detailed in this guide to cycle through the remote's entire internal database until a compatible signal is located.
Does the XR11 require a direct line of sight to the Xfinity box?
No. Because the XR11 uses radio frequency (RF) technology to communicate with Xfinity X1 set-top boxes, you do not need to point the remote directly at the cable box. You can operate the box from inside a cabinet or with your back turned. However, a direct line of sight remains necessary when programming the remote to control your television via infrared (IR) signals.
Conclusion and Next Actions
Successfully configuring your Xfinity XR11 remote transforms your living room entertainment experience, consolidating multiple controllers into a single, intuitive device. By ensuring your hardware is prepared, following the 5-step programming sequence carefully, and verifying both infrared TV functions and radio frequency box pairing, you can eliminate operational friction. If you encounter persistent hardware failures or unresponsive buttons after exhausting all troubleshooting steps, visit the official Xfinity Support website to explore hardware replacement options or chat with a technical support representative.