The 7 step Rubik cube formula for the 3x3 cube is a systematic approach known as the Layer-by-Layer (LBL) method. It involves solving the first layer (cross and corners), the middle layer (edges), and the final layer (cross, edge orientation, corner positioning, and corner orientation). By following specific algorithms for each phase, anyone can successfully solve the cube regardless of its initial scrambled state.
Understanding the Foundation of the 3x3 Rubik’s Cube
Before attempting the 7 step rubik cube formula 3x3, it is vital to understand the mechanical constraints and anatomy of the puzzle. As of 2026, the Rubik’s Cube remains the world’s most popular puzzle, and while speedcubing methods like CFOP (Cross, F2L, OLL, PLL) have become mainstream, the 7-step beginner method remains the essential starting point for every cuber.
The cube consists of three distinct types of pieces that never change their fundamental nature:
- Center Pieces: There are six centers, each with one color. These are fixed to the internal core and do not move relative to each other. The white center is always opposite the yellow center, blue is opposite green, and red is opposite orange.
- Edge Pieces: There are 12 edges, each with two colors. These sit between the corners.
- Corner Pieces: There are 8 corners, each with three colors.
The Language of the Cube: Notation
To follow any formula or algorithm, you must learn Cube Notation. Each letter represents a 90-degree turn of a specific face in a clockwise direction. If the letter is followed by an apostrophe ('), it indicates a counter-clockwise turn (often called a "Prime" move, such as R-Prime).
- R (Right): Turn the right-side layer clockwise.
- L (Left): Turn the left-side layer clockwise.
- U (Up): Turn the top layer clockwise.
- D (Down): Turn the bottom layer clockwise.
- F (Front): Turn the front layer clockwise.
- B (Back): Turn the back layer clockwise.
A "2" after a letter (e.g., U2) means you turn that face 180 degrees. Understanding this notation is the prerequisite for the 7-step process.
Step 1: The White Cross (The Daisy Method)
The first step in the 7 step rubik cube formula 3x3 is creating a cross on the white face. For beginners, the most reliable way to achieve this is the "Daisy" method.
The Goal: Position four white edge pieces around the yellow center. This creates a "daisy" look.
The Process: Find the white edges on the cube. Move them to the top layer so they surround the yellow center piece. You do not need an algorithm for this; it is intuitive. Once you have the daisy:
- Look at the side color of one white edge (e.g., the white-red edge).
- Rotate the top layer (U) until that side color matches its center piece (the red center).
- Rotate that face 180 degrees (F2) so the white edge moves to the bottom, surrounding the white center.
- Repeat for all four edges.
By the end of this step, you will have a white cross on the bottom of the cube, with the side colors of the edges matching the centers of the four side faces.
Step 2: Solving the White Corners
With the cross complete, the next objective is to finish the first layer by placing the four white corners.
The Goal: Move the white corners into their correct positions between the matching center pieces.
The Formula: The "Righty Trigger" (R U R' U').
The Process: Hold the cube so the white cross is on the bottom. Look for a corner piece in the top layer that has white on it.
- Identify the other two colors on that corner (e.g., Green and Red).
- Rotate the top layer (U) until that corner is directly above the spot where it belongs (between the Green and Red centers).
- Perform the Righty Trigger (R U R' U') repeatedly until the corner is in its correct place with the white side facing down.
Repeat this for all four corners. If a white corner is already in the bottom layer but in the wrong spot or oriented incorrectly, perform the Righty Trigger once to move it to the top layer, then proceed as usual.
Step 3: Solving the Middle Layer (The Edges)
At this stage, the bottom layer is complete. Now, we focus on the four edge pieces of the middle layer.
The Goal: Insert the edges into the middle layer without disturbing the solved white layer.
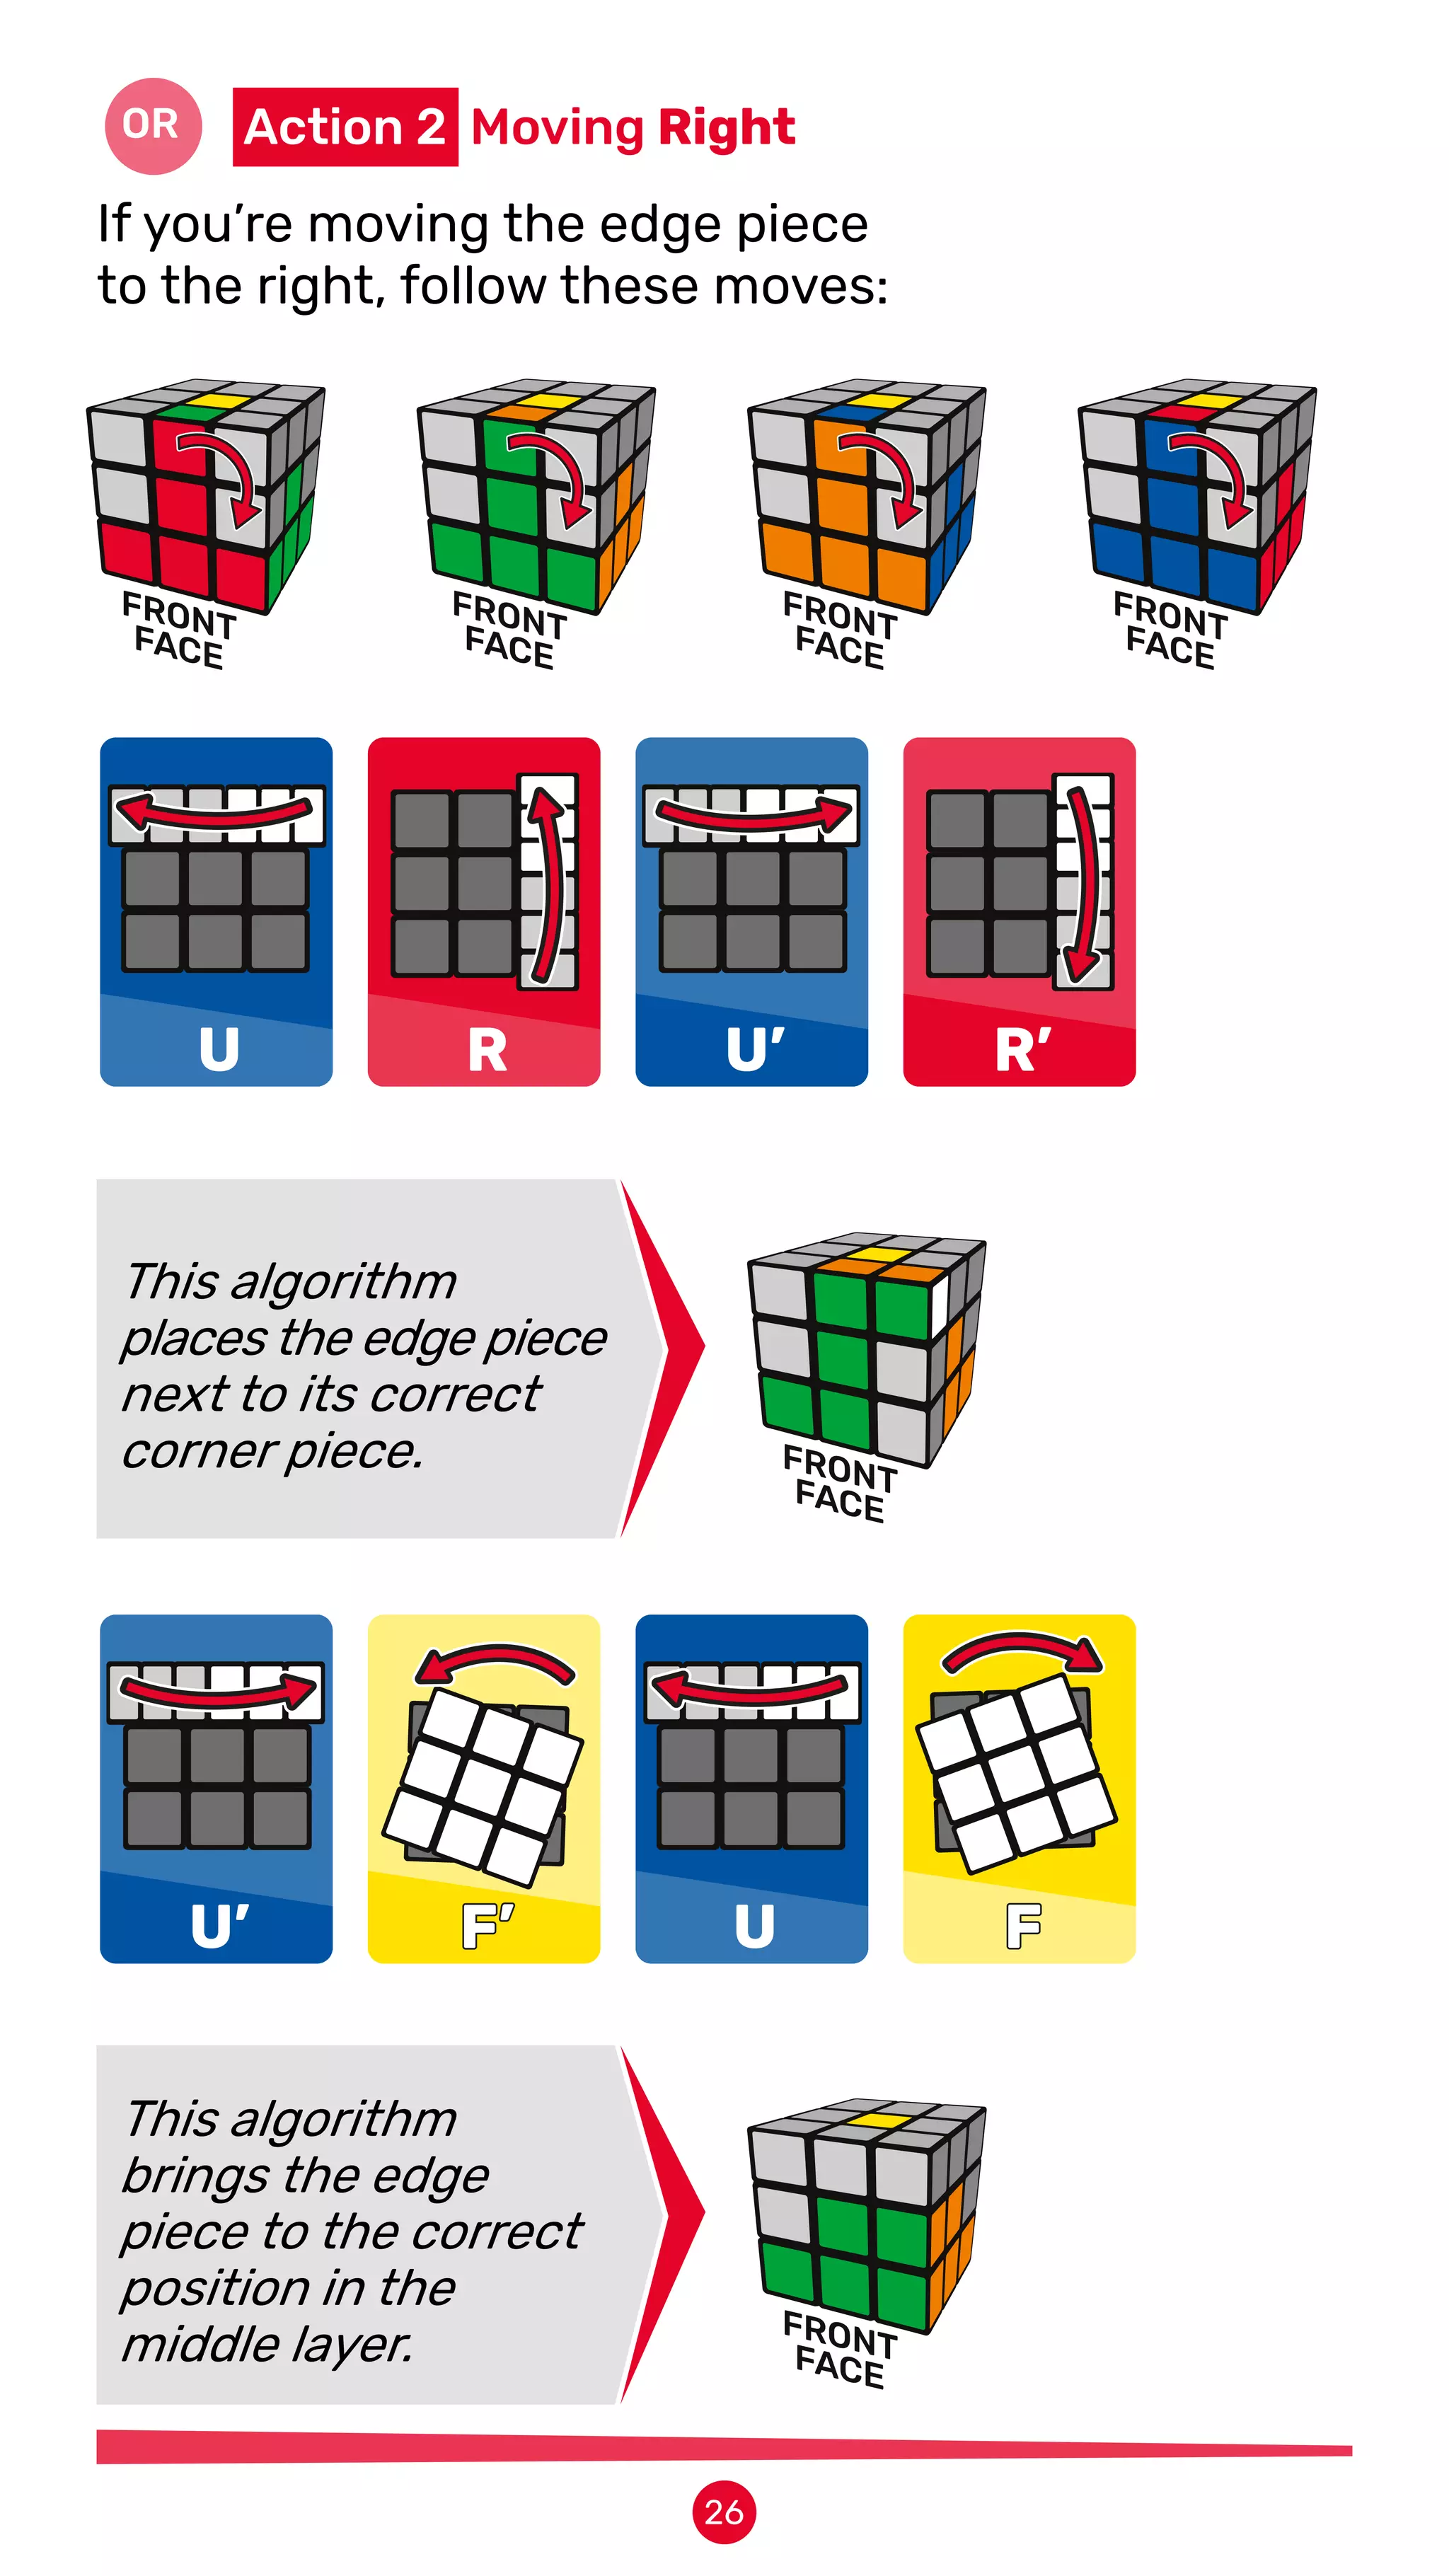
The Formula:
- To move an edge to the Right: U R U' R' U' F' U F
- To move an edge to the Left: U' L' U L U F U' F'
The Process: Find an edge piece in the top layer that does not have yellow on it.
- Look at the color of the edge facing you. Rotate the top layer until that color matches its center (forming a vertical 'T').
- Identify which side the edge needs to go to (left or right).
- Apply the corresponding formula.
This step requires precision. If an edge piece is stuck in the middle layer but is in the wrong spot or flipped, use either formula to "knock" it out into the top layer by inserting a random yellow edge in its place. Once it is in the top layer, you can solve it properly.
Step 4: The Yellow Cross
Now we move to the top layer. The goal is no longer to solve specific colors one by one but to manipulate the top face while keeping the bottom two layers intact.
The Goal: Create a yellow cross on the top face.
The Formula: F R U R' U' F'
The Process: When you look at the top (yellow) face, ignore the corners. You will see one of three patterns:
- The Dot: Only the center is yellow.
- The Hook (L-Shape): The center and two adjacent edges are yellow.
- The Bar: The center and two opposite edges are yellow.
How to execute:
- If you have a Dot: Perform F R U R' U' F' to get the Hook.
- If you have a Hook: Hold the cube so the hook points "back and left" (like an upside-down 'L') and perform the formula to get the Bar.
- If you have a Bar: Hold the bar horizontally (pointing left and right) and perform the formula once more to get the Cross.
Step 5: Aligning the Yellow Edges
Even if you have a yellow cross, the side colors of those edges might not match the side centers.
The Goal: Align all four yellow edges with their corresponding side centers.
The Formula: R U R' U R U2 R'
The Process: Rotate the top layer (U) and see how many edges you can match with their centers.
- If two adjacent edges match: Hold the cube so one matching edge is at the Back and the other is on the Right. Perform the formula.
- If two opposite edges match: Hold the cube so the matching edges are at the Front and Back. Perform the formula. This will lead to the "adjacent" scenario, allowing you to solve it in the next step.
- After the formula, you may need one final U turn to align all edges.
Step 6: Positioning the Yellow Corners
In this step, we are not worried about whether the yellow side is facing up. We only care if the corner is in the correct "home" between its three center colors.
The Goal: Move the four corners to their correct geometric positions.
The Formula: U R U' L' U R' U' L
The Process: Check the corners. Is any corner in the correct spot? (For example, a corner with Yellow, Blue, and Red colors sitting between the Yellow, Blue, and Red centers).
- If one corner is correct: Hold the cube so that corner is in the Front-Right-Top position. Perform the formula. You may need to do it twice.
- If no corners are correct: Perform the formula once from any position. This will result in at least one corner being in the correct spot.
Once all corners are in their correct positions (even if they are twisted), you are ready for the final step.
Step 7: Orienting the Yellow Corners
This is the most critical stage of the 7 step rubik cube formula 3x3. It is where most beginners make a mistake because the cube will appear to be completely "messed up" during the process.
The Goal: Twist the corners so the yellow side faces up, completing the cube.
The Formula: R' D' R D (Repeat)
The Process:
- Hold the cube so a corner that needs twisting is in the Front-Right-Top position.
- Perform R' D' R D repeatedly until the yellow side of that corner is facing up.
- Crucial: Once the corner is oriented, only move the top layer (U) to bring the next unsolved corner to the Front-Right-Top position.
- Repeat the R' D' R D cycle for the next corner.
Important Warning: Do not rotate the entire cube during this step. Only rotate the U layer. If you finish orienting all corners, the bottom layers will automatically resolve themselves.
Algorithm Summary Table
| Step | Objective | Primary Algorithm | Result |
|---|---|---|---|
| 1 | White Cross | Intuitive (Daisy Method) | White edges match side centers |
| 2 | White Corners | R U R' U' | Complete first layer |
| 3 | Middle Layer | U R U' R' U' F' U F (Right) | Complete middle layer |
| 4 | Yellow Cross | F R U R' U' F' | Yellow cross on top face |
| 5 | Align Edges | R U R' U R U2 R' | Cross matches side colors |
| 6 | Position Corners | U R U' L' U R' U' L | Corners in correct locations |
| 7 | Orient Corners | R' D' R D | Fully solved 3x3 cube |
Common Challenges and Troubleshooting
The transition from a scrambled cube to a solved one is rarely perfectly linear for a beginner. Here are the most frequent issues encountered when using the 7 step rubik cube formula 3x3:
The "Flipped Edge" in Step 3
Sometimes you will find the correct edge piece in the correct spot, but its colors are swapped. To fix this, you must "eject" the piece. Use the Step 3 algorithm (Right or Left) to insert a junk yellow edge into that spot. The flipped edge will move to the top layer, where you can then re-insert it correctly.
The "D" Move Confusion in Step 7
In the final step, the "D" move (bottom layer clockwise) is often forgotten. Users often perform R' D' R and then stop. You must complete the full R' D' R D cycle every time. Even if the corner looks correct after the "R" move, you must finish with the "D" move to keep the rest of the cube's logic intact for the subsequent corners.
Recognizing a "Parity" or Impossible Cube
If you have been following the 7-step method perfectly and find that only one corner is twisted at the end, or only two edges are swapped, your cube might be physically "insoluble." This happens if a piece was popped out and put back in the wrong way, or if the stickers were moved. In such cases, you must manually twist the corner or disassemble the cube to its solved state.
Advanced Progression: Moving Beyond 7 Steps
Once you have mastered the 7 step rubik cube formula 3x3 and can solve the puzzle in under two minutes, you may want to look toward more advanced methods. The most common progression is the CFOP Method, which reduces the number of steps but increases the number of algorithms you must memorize (over 70).
- Cross: Similar to Step 1 but performed directly on the bottom without the Daisy.
- F2L (First Two Layers): Combines Step 2 and Step 3 into one efficient phase where you insert corners and edges simultaneously.
- OLL (Orientation of the Last Layer): Solves the entire yellow face in one algorithm (replaces Steps 4, 5, and 7).
- PLL (Permutation of the Last Layer): Moves all pieces of the top layer to their final positions in one algorithm (replaces Step 6).
As of 2026, many digital apps and "smart cubes" are available to help track your turns and suggest more efficient paths, but the logic of the 7-step method remains the universal foundation of cubing.
Frequently Asked Questions
Which step is the hardest to learn for a beginner?
Step 3 (the middle layer) and Step 7 (orienting corners) are generally considered the most difficult. Step 3 involves the longest algorithms for a beginner, and Step 7 is psychologically challenging because it looks like you are destroying your progress while you are actually finishing the cube.
Do I need to memorize all the algorithms at once?
No. It is better to practice one step until you can do it without looking at a guide before moving to the next. Start with the White Cross and Corners. Once you can do those by heart, add the Middle Layer algorithm. Muscle memory is more effective than rote memorization for cubing.
How long does it take to learn the 7 step rubik cube formula 3x3?
Most people can learn to solve the cube using this method in about 2 to 4 hours of focused practice. Reaching a point where you can solve it from memory usually takes a few days of repeated practice.
Is the 7-step method the same as the "Beginner Method"?
Yes. While there are slight variations (some use different algorithms for the final steps), the 7-step Layer-by-Layer method is the standard definition of the Beginner Method.
Why does my cube get messed up in the final step?
This usually happens because the user forgets the "D" at the end of the R' D' R D sequence or because they rotate the whole cube instead of just the top layer when moving between corners. If you follow the sequence strictly, the cube will always resolve.
Next Steps for New Cubers
To truly master the 3x3, consistency is key. Now that you have the 7 step rubik cube formula 3x3, your next action should be to perform 10 "slow solves." During these solves, don't worry about speed; focus on watching how the pieces move. Understanding the mechanics of how a corner moves into place will make you a much better solver than just memorizing letters. Once you are comfortable, consider timing yourself or exploring different lubricants to make your cube turn more smoothly.