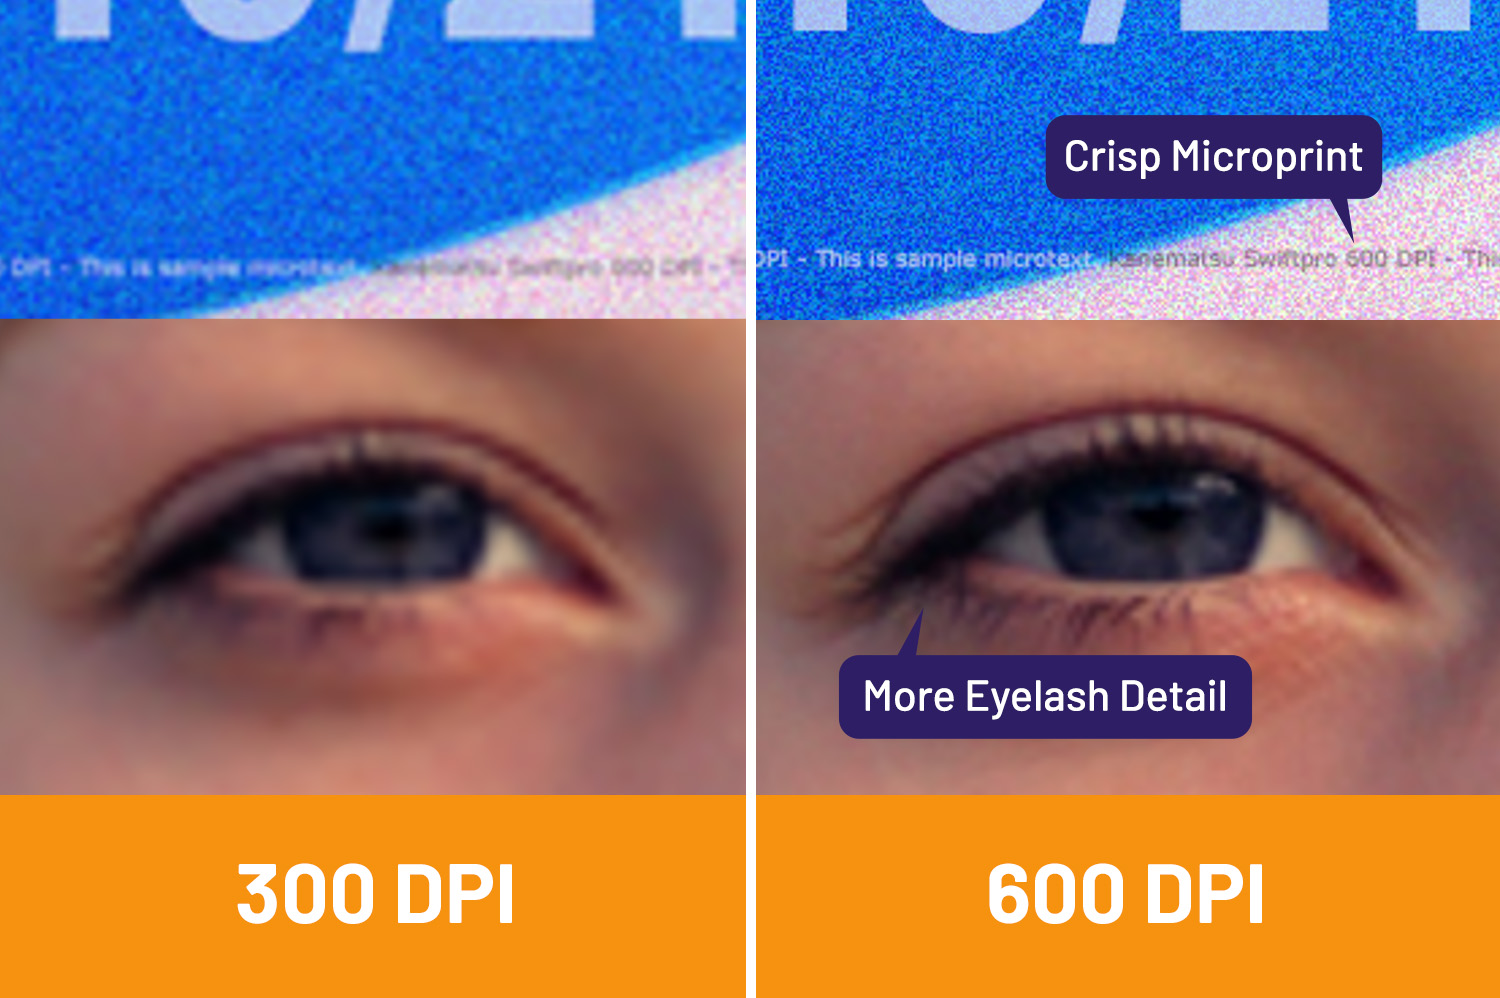
Achieving a professional 300 DPI print quality in Adobe Photoshop requires balancing physical dimensions, pixel density, resampling methods, and color spaces to ensure your digital artwork translates cleanly from screen to paper without pixelation or muddying.
When designers and photographers first step into the world of physical output, they frequently encounter a wall of technical confusion surrounding image resolution. The term "300 DPI" is often thrown around as a magical golden rule for all printed materials, yet misunderstanding how digital pixels map to physical inks can ruin an expensive print run. To master print production inside Adobe Photoshop, you must look past arbitrary numbers and understand the relationship between pixels, physical dimensions, resampling math, and color profiles. This comprehensive guide strips away the technical jargon to give you a clear, actionable blueprint for preparing flawless print-ready files.
The Core Concept: Pixels, Dots, and Inches Explained
To demystify 300 DPI, we must first clear up a widespread naming convention confusion. DPI stands for Dots Per Inch, a metric used almost exclusively by printing hardware (such as inkjet or offset lithography presses) to describe how many microscopic ink droplets a machine sprays onto a physical sheet of paper.
Conversely, digital images inside Adobe Photoshop are measured in PPI, which stands for Pixels Per Inch. A pixel is a single square of color data in your digital grid, while a dot is a physical dot of ink. While hardware manufacturers and graphic designers often use the terms interchangeably, Photoshop fundamentally deals with pixels. When you set an image to 300 PPI, you are instructing the software to cram 300 individual pixels into every linear inch of physical space when the file is outputted at a 1:1 scale.
| Term | Full Name | Primary Domain | Function in Print Production |
|---|---|---|---|
| PPI | Pixels Per Inch | Software (Photoshop) | Defines digital resolution and pixel density mapped to physical dimensions. |
| DPI | Dots Per Inch | Hardware (Printers) | Describes the physical ink droplets or halftone dots printed per linear inch. |
| LPI | Lines Per Inch | Offset Printing | Measures the frequency of the halftone screen used in commercial printing presses. |
Understanding this distinction prevents costly mistakes. If your file lacks sufficient pixel data, your printer cannot magically invent high-resolution details; it will simply stretch existing pixels or rely on printer-driver interpolation, leading to a blurry, artifact-laden output.
The Myth of 300 DPI: When Is It Actually Necessary?
The blanket rule of "everything must be 300 DPI" is one of the most persistent misconceptions in graphic design. While 300 PPI is the gold standard for high-end, close-up viewing materials like art prints, business cards, and glossy magazines, it is not a rigid law for every single medium.
The required pixel density of a print is directly tied to viewing distance. The human eye can resolve a certain amount of detail at a specific distance. As viewing distance increases, the required PPI decreases dramatically because the eye can no longer distinguish individual pixels or dots from afar.
- Close Viewing (0 to 2 feet): Business cards, flyers, photo books, and fine art prints require 300 PPI (or higher) to maintain crisp typography and sharp photographic details.
- Medium Viewing (3 to 6 feet): Posters, standard indoor banners, and counter displays can often look perfectly sharp at 150 to 200 PPI, as viewers stand further back.
- Far Viewing (10+ feet): Large billboard displays, trade show backdrops, and vehicle wraps are frequently printed at 30 to 72 PPI. Up close, they look pixelated, but from 20 feet away, the human eye blends the pixels seamlessly.
Blindly upsampling a low-resolution web image to 300 DPI does not add detail; it merely inflates the file size by manufacturing fake pixels through interpolation, which often results in a softer image than if you had left it alone.
Setting Up Your Document Correctly in Photoshop
The absolute best way to ensure 300 DPI print quality is to establish your canvas dimensions correctly before you paint a single stroke or place a single asset.
To create a new print document in Photoshop, navigate to File > New and select the Print preset tab. Here, you will see standard paper sizes like Letter, Legal, Tabloid, and A4. Pay close attention to the configuration panel on the right side of the dialog box:
- Dimensions: Set your units to inches, centimeters, or millimeters based on your production requirements. Input your final trim size (the actual physical size of the cut piece).
- Resolution: Enter
300and ensure the dropdown menu is set to Pixels/Inch (PPI). - Color Mode: Change this from the default web setting of RGB to CMYK Color if you are sending files to a traditional offset or digital press. If your print provider specifically requests RGB (common for many modern inkjet photo labs and digital storefronts), keep it in RGB, but be mindful of the wider color gamut.
- Bit Depth: Choose 8-bit for standard print jobs. 16-bit is typically reserved for heavy photographic retouching where maximum tonal data is required, though it doubles your file size.
Bleed, Slug, and Safety Margins
Setting up your document isn't just about width, height, and resolution; it is also about accounting for mechanical tolerances in the printing and cutting process. Commercial cutting blades are remarkably accurate, but they can shift by a fraction of a millimeter during high-speed runs.
- Bleed: Extend your background colors and artwork past the trim edge by an extra 0.125 inches (3mm) on all sides. This ensures that if the guillotine blade cuts slightly off-mark, you won't end up with an unsightly white sliver on the edge of your paper.
- Safety Margin (Safe Zone): Keep all critical text, logos, and important design elements at least 0.25 inches inside the trim line. If text sits too close to the edge, it risks getting clipped during trimming.
Managing Image Size and Resampling in Existing Files
If you are handed an existing digital asset or a low-resolution photograph that needs to be adapted for a high-end print product, you must navigate Photoshop's Image Size dialog box (Image > Image Size). This tool dictates how pixel data is interpreted when scaling.
When the Resample checkbox is ticked, Photoshop actively adds or removes pixels to hit your target physical dimensions and PPI. Understanding the resampling algorithms available in the dropdown menu is crucial:
- Nearest Neighbor: Preserves hard edges with no anti-aliasing. Ideal for pixel art or digital illustrations with flat colors, but terrible for photographs.
- Bilinear: Adds pixels by averaging the color values of surrounding pixels. Results in a softer image.
- Bicubic Smoother / Sharper: Older preset interpolations optimized for enlarging or reducing photographic data.
- Bicubic Automatic: Lets Photoshop decide the best method based on whether you are scaling up or down.
- Preserve Details (Enlargement): Powered by Adobe's advanced interpolation engine, this slider allows you to increase image dimensions while retaining edge clarity, paired with a noise-reduction slider to clean up artifacts.
The Math of Scaling
To check if an existing image can hit true 300 DPI without aggressive resampling, use this simple formula:
$$\text{Physical Width in Inches} \times 300 = \text{Required Pixel Width}$$
For example, if you want to print a sharp 8x10 inch photograph, multiply 8 by 300 (2,400 pixels) and 10 by 300 (3,000 pixels). If your source image dimensions are at least 2400 x 3000 pixels, it will print natively at 300 DPI at an 8x10 size without any upsampling required.
Color Spaces and Gamut Management for Print
Resolution is only half the battle; color fidelity determines whether your print matches what you envisioned on your monitor. Monitors emit light using the RGB (Red, Green, Blue) color space, which boasts a massive spectrum of vibrant colors. Printers, however, use physical inks—typically CMYK (Cyan, Magenta, Yellow, Key/Black)—which absorb light and operate within a narrower color gamut.
Choosing the Right Color Profile
- sRGB: The standard web color space. It has a narrower gamut, making it safer for general printing if your lab requests RGB, but it limits vibrant greens and cyans.
- Adobe RGB (1998): A wider color gamut frequently used by photographers. It captures richer cyan and green tones, making it ideal for high-end inkjet printing.
- CMYK (SWOP or GRACoL): Standard industry profiles for commercial offset printing presses in North America.
Soft Proofing Your Files
To prevent nasty surprises when your prints arrive, use Photoshop’s Soft Proofing feature (View > Proof Setup > Custom). This simulates how your digital RGB file will translate onto a specific printer and paper profile using CMYK ink mixing.
- Navigate to View > Proof Setup > Custom.
- Select your target printing press profile (e.g., US Web Coated SWOP v2).
- Check Simulate Black Ink and Simulate Paper Color to see how the contrast drops when printing on real paper stock.
- Toggle soft proofing on and off using
Ctrl+Y(Windows) orCmd+Y(Mac). - Use View > Gamut Warning to highlight any hyper-vibrant RGB colors that fall outside the printable CMYK range so you can manually desaturate or shift them.
Common Mistakes and Troubleshooting Print Issues
Even seasoned designers occasionally run into production issues due to overlooked settings or hidden file data. Review these common pitfalls to safeguard your next project.
- Mistake 1: Relying on PPI Up-Resing for Web Images. Grabbing a 72 PPI thumbnail from the internet, typing "300" into the resolution box, and hitting OK does not create detail. It merely creates a massive file filled with interpolated, blurry pixels. Always source high-resolution raw assets.
- Mistake 2: Forgetting to Convert Type to Smart Objects or Shapes. Rasterizing text too early locks it into a low resolution. Keep text editable or convert type layers into Smart Objects so they maintain vector sharpness regardless of how many times you scale the document.
- Mistake 3: Ignoring Embedded Transparency and Layer Effects. Drop shadows, outer glows, and complex layer masks can sometimes flatten incorrectly during PDF export, resulting in unwanted white boxes around transparent elements. Always flatten or merge unnecessary layers before exporting final production proofs, or use modern PDF standards that support native transparency.
- Mistake 4: Missing Bleeds. Submitting a file at exact trim dimensions without a 0.125-inch bleed often leads print shops to reject the file or print it with thin white borders where the paper shifted.
Step-by-Step Checklist for Exporting Print-Ready Files
When your design is complete, follow this verified workflow to package and export your file for maximum print fidelity.
- Perform a Final Visual Inspection: Zoom in to 100% view (
Ctrl+1orCmd+1) across the entire canvas to check for pixelation, stray brush marks, or spelling errors. - Verify Image Dimensions and Resolution: Go to Image > Image Size to confirm the final physical dimensions match your order specs and the resolution sits firmly at 300 PPI (unless specified otherwise for large formats).
- Check Color Mode: Ensure your document is in the correct color space (CMYK or calibrated RGB) requested by your specific print provider. Run a Soft Proof pass.
- Flatten or Preserve Layers: Consult your printer's submission guidelines. Most modern digital printers prefer Photoshop PDF files with layers intact or flattened based on preflight requirements, while traditional offset printers often require flattened TIFFs or high-compatibility PDFs.
- Export via Save As or Export As: Choose Photoshop PDF, select a preset like High Quality Print or PDF/X-1a:2001, and make sure to check the box for Use Document Bleeds under the Marks and Bleeds section if your template requires crop marks.
By combining proper canvas setup, accurate mathematical scaling, and mindful color management, you eliminate the guesswork from print production. Your digital assets will transition smoothly from monitor glow to physical ink, yielding crisp, professional results every time.