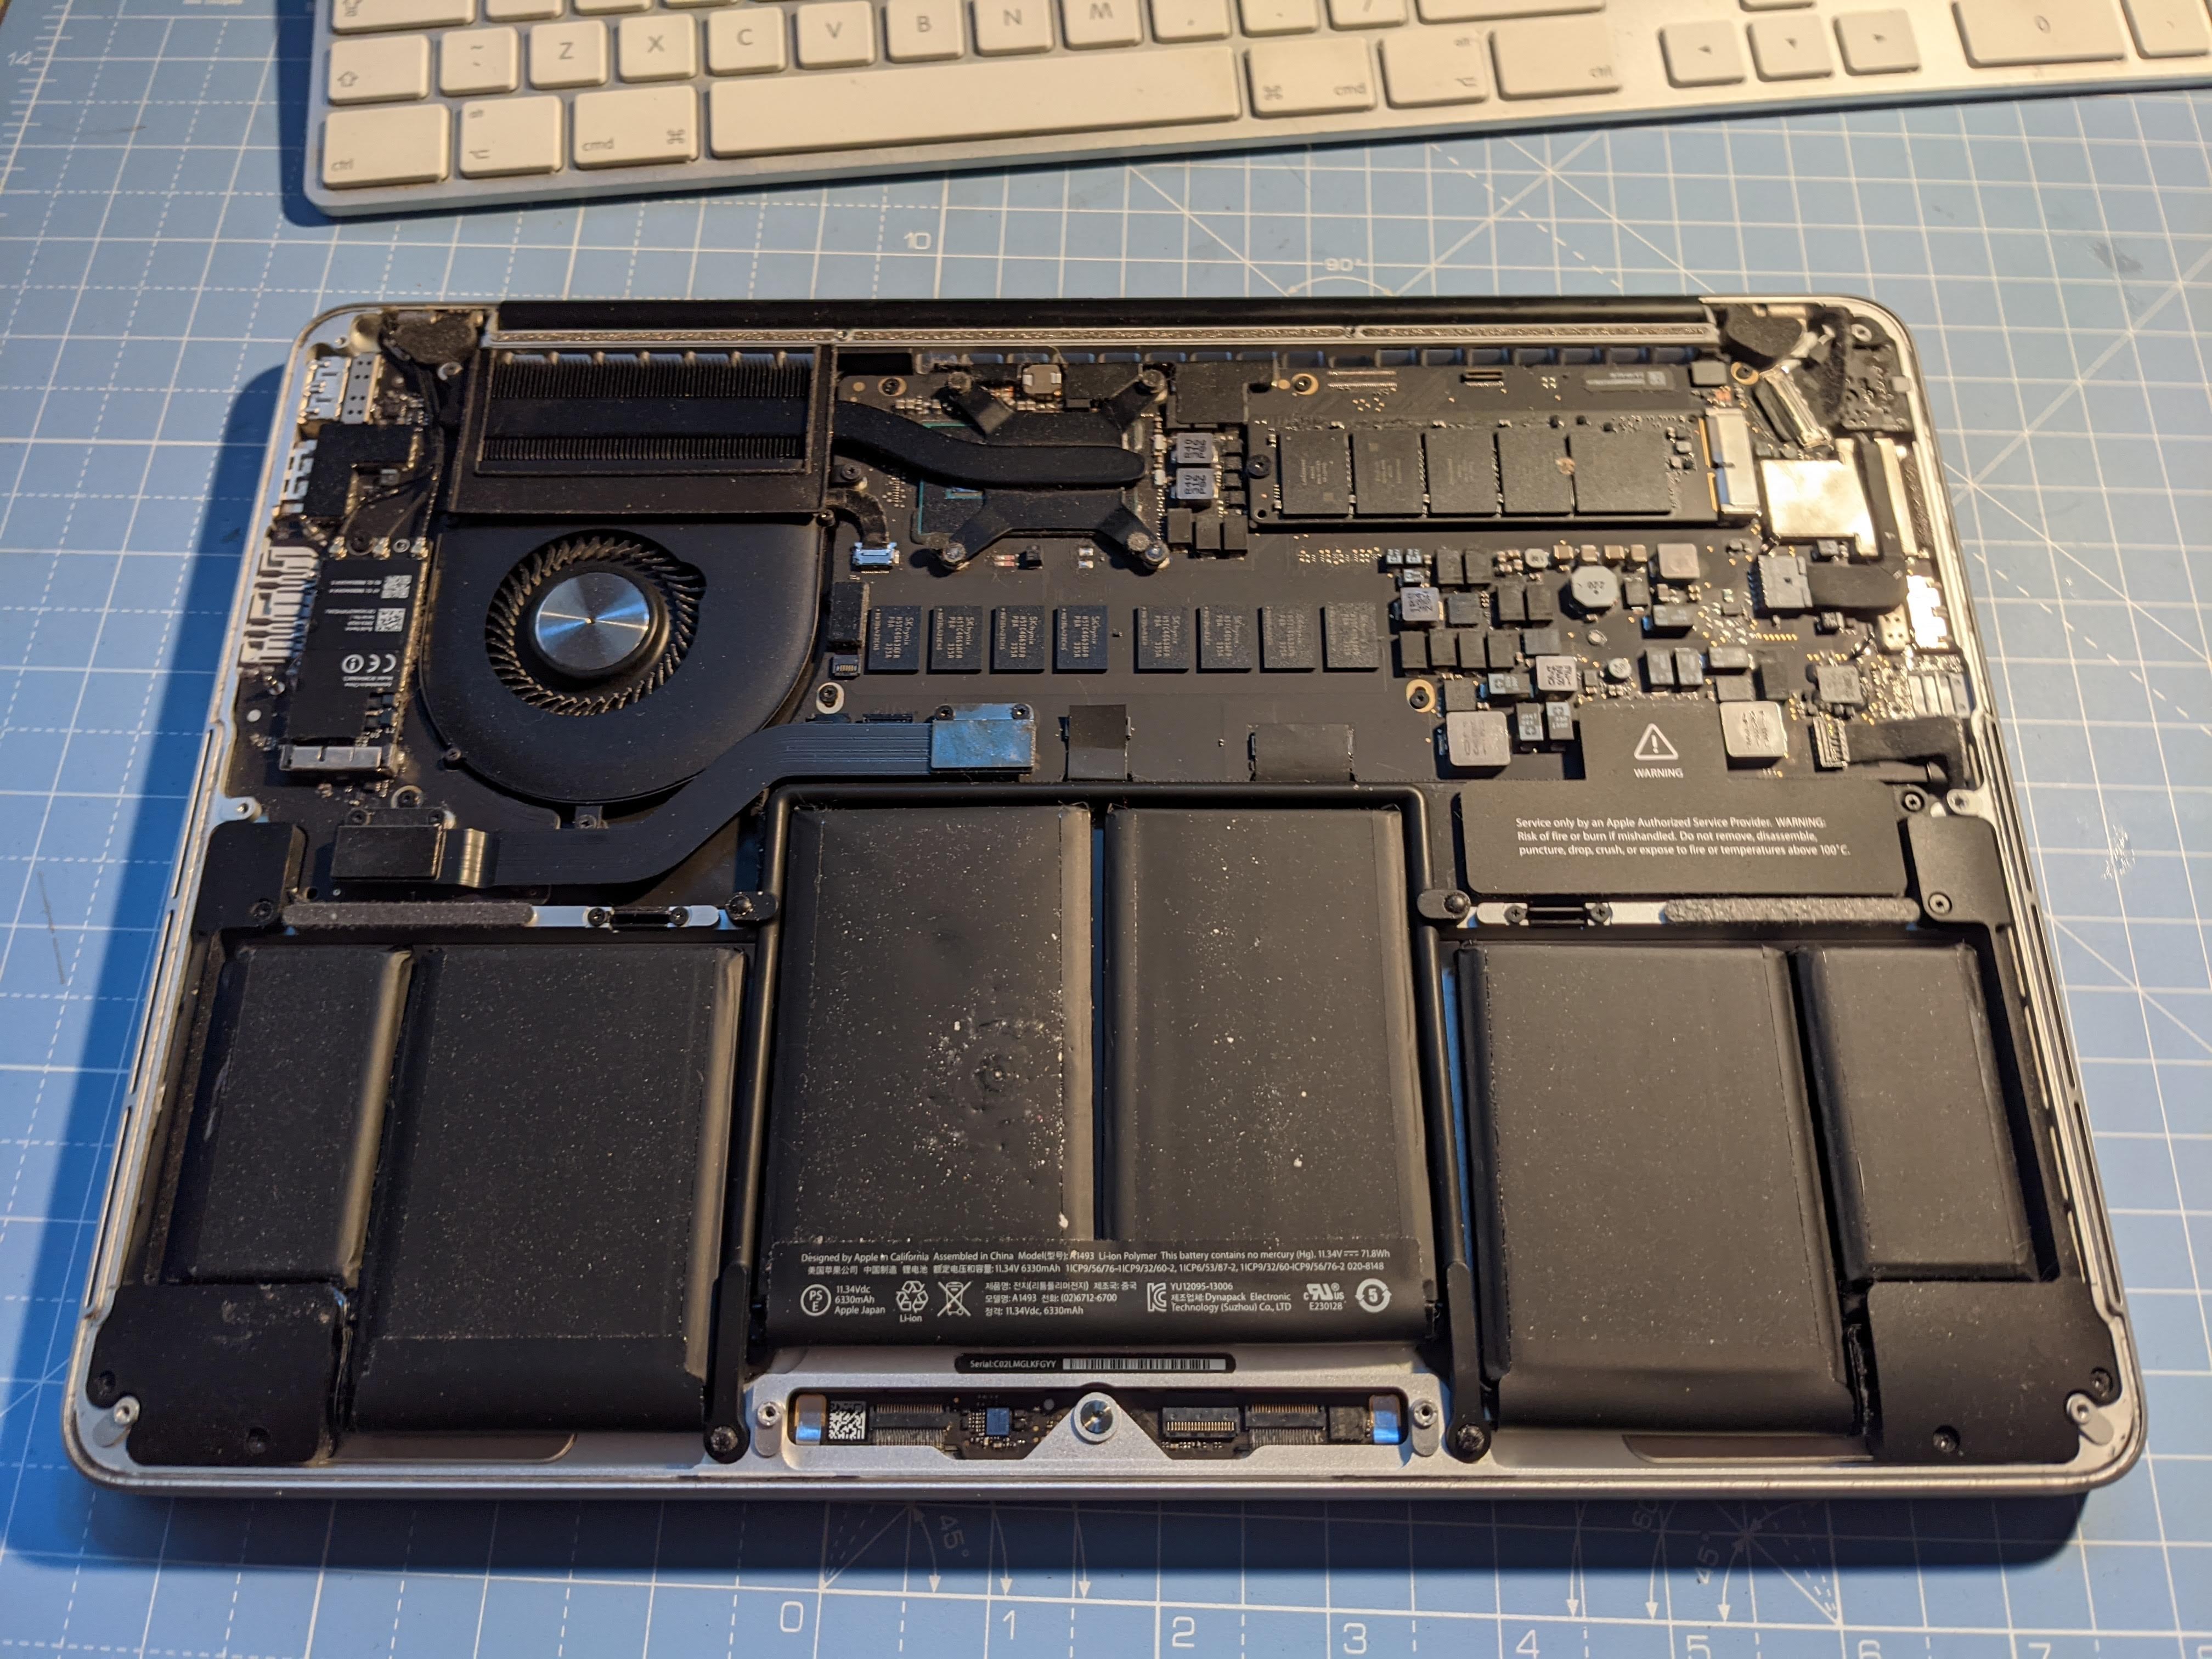
Replacing the battery in a 2014 MacBook Pro involves removing the lower case, disconnecting the old power cell, safely separating the lithium-ion polymer units adhered tightly to the aluminum chassis, installing a replacement battery, and reassembling the machine. Because Apple glued these batteries directly into the upper case housing, the process requires patience, specialized tools, and careful solvent application to avoid puncturing the sensitive chemical pouches.
Understanding the 2014 MacBook Pro Battery Ecosystem
The Late 2013 and Mid 2014 Retina MacBook Pro models represent a transitional era in Apple laptop engineering. During this period, manufacturers shifted away from user-swappable batteries secured by simple latches or screws, moving instead toward ultra-thin designs where components are bonded to the chassis to save precious millimeters of vertical space. For owners of a 14-inch or 15-inch Retina MacBook Pro from 2014, finding a reliable path forward when the battery degrades is a common challenge.
A degrading battery manifests in several predictable ways. You might notice the macOS battery status menu displaying a "Service Recommended" or "Replace Now" warning. Physical symptoms are also common; as lithium-ion cells age, internal chemical reactions can produce gas, causing the battery pack to swell. A swollen battery pushes upward against the trackpad, making it difficult or impossible to click physically, and can eventually warp the aluminum unibody enclosure. Furthermore, degraded maximum capacity leads to severe runtime drops, unexpected sudden shutdowns when executing resource-intensive tasks, and sluggish performance if the operating system dynamically throttles the CPU to prevent power brownouts.
Assessing Official Apple Support vs. Independent Repair
Before opening your workspace and gathering tools, you must evaluate whether to pursue an official repair through Apple or an authorized service provider, or to perform the replacement yourself.
Historically, Apple classified the 2014 MacBook Pro as vintage or obsolete depending on the exact regional threshold, meaning official battery replacements directly through Apple stores or Apple Authorized Service Providers are often unavailable or subject to strict parts availability limitations. When Apple did service these units, they typically replaced the entire top case assembly—including the keyboard, trackpad, aluminum enclosure, and the glued-in battery—rather than swapping the battery alone. While this yielded a like-new chassis, it came with a steep price tag reflecting the extensive parts involved.
Independent repair, by contrast, focuses strictly on the battery component itself. High-quality aftermarket batteries can be sourced from reputable third-party vendors who provide complete toolkits. This approach preserves your original unibody enclosure and costs a fraction of historical official service fees. However, it places the labor burden entirely on you. If you lack fine motor skills or the patience required to work with chemical adhesives and delicate ribbon cables, independent repair carries a risk of permanent hardware damage.
| Repair Option | Estimated Cost | Pros | Cons |
|---|---|---|---|
| Official Apple Service | Variable / Often Unavailable | Genuine components, comprehensive top-case swap | Subject to vintage/obsolete status, high cost |
| DIY Replacement Kit | Low to Moderate | Cost-effective, retains original housing, educational | Requires specialized tools, patience, and careful solvent use |
| Third-Party Repair Shop | Moderate | Professional labor, warranty on service | Varying technician skill levels, potential third-party part quality inconsistencies |
Required Tools, Materials, and Safety Precautions
Attempting a MacBook Pro battery replacement without the proper equipment is a recipe for stripped screws, damaged connectors, or punctured lithium cells. Because lithium-ion polymer batteries store significant amounts of chemical energy, puncturing them can trigger a thermal runaway event, resulting in smoke, fire, or chemical burns.
To execute this project safely, prepare a clean, brightly lit, and static-free workspace. Magnetic parts trays are essential because the internal screws holding a 2014 MacBook Pro together vary significantly in length and thread pitch. Mixing them up during reassembly can cause punctures to the logic board or outer casing.
Essential Tool Checklist
- P5 Pentalobe Screwdriver: Required to remove the exterior lower case screws on Retina MacBook Pro models.
- T5 Torx Screwdriver: Needed for removing internal fasteners, such as the battery connector and SSD brackets on certain configurations.
- Phillips #00 Screwdriver: Used for various internal fastening duties depending on the specific sub-model layout.
- Nylon Spudger (Non-conductive pry tool): Crucial for disconnecting ribbon cables and lifting components without shorting out sensitive circuitry.
- Curved Fine Tweezers: Useful for managing tiny screws, tape, and adhesive backing liners.
- High-Concentration Isopropyl Alcohol (90% or higher) or Adhesive Remover: Used to dissolve the industrial adhesive securing the battery cells to the aluminum upper case.
- Plastic Playing Cards or Flexible Plastic Prying Cards: Safer than metal tools for sliding underneath battery cells to slice through adhesive strips.
- Safety Glasses and Nitrile Gloves: Protective gear to shield your eyes and skin from chemical solvents and potential battery residue.
Step-by-Step Replacement Procedure
Before touching any internal components, shut down your MacBook Pro completely, disconnect the MagSafe power adapter, and ensure external displays or peripherals are unplugged. Ground yourself by touching a bare metal surface to discharge static electricity, which can instantly fry sensitive solid-state logic boards.
Step 1: Removing the Lower Case
Turn your MacBook Pro upside down on a soft, non-abrasive surface to protect the display lid from scratches. Locate the ten screws securing the aluminum lower case. Note that these screws are not uniform: some near the hinge are longer than the ones near the front edge. Map their exact locations as you remove them using your P5 Pentalobe screwdriver. Once all screws are extracted, gently lift the lower case near the display hinge where a slight gap exists, and pull it away from the chassis clips.
Step 2: Disconnecting the Battery Immediately
Safety dictates that you must disconnect the battery from the logic board before performing any other internal work. Locate the large rectangular battery connector where the multi-wire ribbon cable plugs into the logic board. Carefully slide the plastic spudger underneath the connector lip and lift straight up to unseat it. If your model features a secondary locking flap or plastic pull tab, release it gently. Once disconnected, bend the connector slightly away from the socket to ensure it cannot accidentally re-engage while you work.
Step 3: Preparing the Workspace and Removing Obstructions
Depending on whether you have a 13-inch or 15-inch Late 2013 / Mid 2014 MacBook Pro, internal components such as the I/O board bracket, speaker cables, or the solid-state drive may partially obstruct access to the battery cells. Remove any obstructing brackets or cables, keeping careful note of their screw placements. Never force a component out of alignment; every bracket is engineered for a precise, friction-free fit.
Step 4: Dissolving and Lifting the Glued Battery Cells
The core challenge of this repair lies in breaking the bond of the high-strength adhesive strips anchoring each of the battery's individual cells to the aluminum unibody.
- Apply a few drops of high-concentration isopropyl alcohol or specialized electronic adhesive remover along the edges of the battery cells. Allow the solvent to seep underneath the cells for two to three minutes. This softens the acrylic adhesive tape.
- Carefully insert the edge of a plastic playing card or a flexible plastic prying tool underneath a corner of the outer battery cell.
- Use a gentle sawing motion, combined with continuous, light downward pressure against the aluminum case (not upward against the battery), to slice through the remaining adhesive tape.
- Repeat this process for each individual cell block. Never use sharp metal screwdrivers or knives to pry up the cells; a single slip can puncture the casing, releasing toxic fumes or causing a fire.
- Once all cells are freed, lift the old battery assembly out of the chassis and dispose of it according to local hazardous waste and electronics recycling regulations.
Step 5: Cleaning the Chassis and Installing the New Battery
Before dropping the replacement battery into position, use a lint-free cloth and isopropyl alcohol to thoroughly clean all residual adhesive, dust, and oils from the aluminum unibody floor. Any remaining debris will prevent the new adhesive backing from making full contact, potentially causing the battery to shift or rattle.
Peel away the protective plastic liners from the adhesive strips on your new replacement battery. Align the battery precisely within the unibody housing, ensuring that the alignment aligns cleanly with the logic board connector socket without putting tension on the cable. Press down firmly across the surface of each cell block for thirty seconds to ensure a secure bond. Reconnect the battery plug to the logic board socket, ensuring it clicks fully into place.
Reassembly and Initial Power Verification
Reassembly is essentially the reverse of the removal sequence, but requires disciplined attention to detail.
- Reinstall any internal brackets, covers, or speaker cables that were removed to access the battery compartment.
- Tighten all internal T5 and Phillips screws to a snug fit, taking care not to overtighten and strip the threaded mounts embedded in the aluminum frame.
- Place the lower case back onto the unibody, pressing down gently around the edges until the internal metal clips snap securely into position.
- Reinstall the ten exterior P5 Pentalobe screws into their exact original holes, referencing the map you created during disassembly.
Do not power the machine on immediately with battery power alone. Plug the original MagSafe power adapter into the MacBook Pro. You should see the LED indicator light shift from amber (charging) to green, or vice versa, confirming that power is flowing. Open the display and boot the machine. Once macOS loads, navigate to the Apple menu () > About This Mac > System Report > Power to verify that the operating system recognizes the new battery health metrics, serial number, and initial charge percentage.
Troubleshooting Common Post-Replacement Issues
Even with careful execution, minor anomalies can occasionally arise after a battery swap. Understanding how to diagnose and resolve them saves time and prevents unnecessary teardowns.
- MacBook Pro Won't Turn On After Installation: If the machine fails to respond to the power button or MagSafe connection, the battery connector may not be fully seated in the logic board socket. Unplug the MagSafe charger, reopen the lower case, disconnect and inspect the battery connector for bent pins or debris, and reconnect it firmly. Additionally, perform a System Management Controller (SMC) reset by holding down
Shift + Control + Optionon the left side of the built-in keyboard and the power button for 10 seconds while connected to power. - Battery Not Charging Past 0% or 1%: Sometimes a new replacement battery sits in a deep discharge state during warehouse storage. Leave the machine connected to a verified working MagSafe charger uninterrupted for at least three to four hours. If the percentage remains frozen, calibrate the battery by letting it charge to 100%, leaving it plugged in for two hours, unplugging it, running it down until the computer sleeps due to low power, and then recharging it fully without interruption.
- Trackpad Clicking Issues or Uneven Resistance: If the trackpad feels stiff or fails to register physical clicks after reassembly, the battery cells may not be pressed completely flat against the aluminum case floor, or the lower case screws near the trackpad are overtightened. Check that the lower case is flush and that screws are tightened evenly without excessive torque.
Frequently Asked Questions
Can I use a higher-capacity battery in my 2014 MacBook Pro than the original specification?
Third-party manufacturers sometimes advertise "extended capacity" batteries for older MacBooks by packing higher milliamp-hour (mAh) ratings into the same physical dimensions using denser chemical formulations. While minor capacity variations are common, be cautious of exaggerated claims. Always purchase replacement cells from reputable vendors with documented safety certifications (such as CE, RoHS, and FCC) to ensure proper thermal management and circuit protection.
Is it safe to store a spare lithium-ion battery for future use?
Storing loose lithium-ion batteries is generally discouraged because these cells naturally degrade over time even when sitting idle. If you must store a replacement battery, keep it in a cool, dry environment at approximately 50% charge level, enclosed in a fireproof lipo storage bag. Never store batteries in extreme heat or direct sunlight.
What should I do with my old, swollen MacBook Pro battery?
Swollen batteries are hazardous waste and pose a severe fire risk if punctured or crushed. Never throw them into household trash or standard municipal recycling bins. Take the removed battery immediately to a certified electronics recycling facility, hazardous waste collection site, or a local repair shop equipped to handle lithium-ion battery recycling safely.
Why does macOS still show "Service Recommended" after installing a brand-new battery?
If you installed a high-quality third-party battery, the macOS System Information utility reads the new hardware's chip data. Occasionally, inexpensive aftermarket circuit boards do not communicate precise manufacturer health metrics to macOS, triggering persistent warning flags despite the battery performing normally. As long as runtime meets expectations and the battery charges reliably, this message can often be disregarded, though sourcing a battery with a fully compatible Texas Instruments gas gauge chip prevents this issue.
How long should a replacement 2014 MacBook Pro battery last?
A well-manufactured replacement lithium-ion polymer battery typically retains optimal health for approximately 300 to 500 complete charge cycles, translating to roughly two to three years of typical daily usage before maximum capacity drops below 80 percent. Maintaining good charging habits—such as avoiding frequent complete zero-percent discharges and keeping the laptop in well-ventilated environments—maximizes this lifespan.