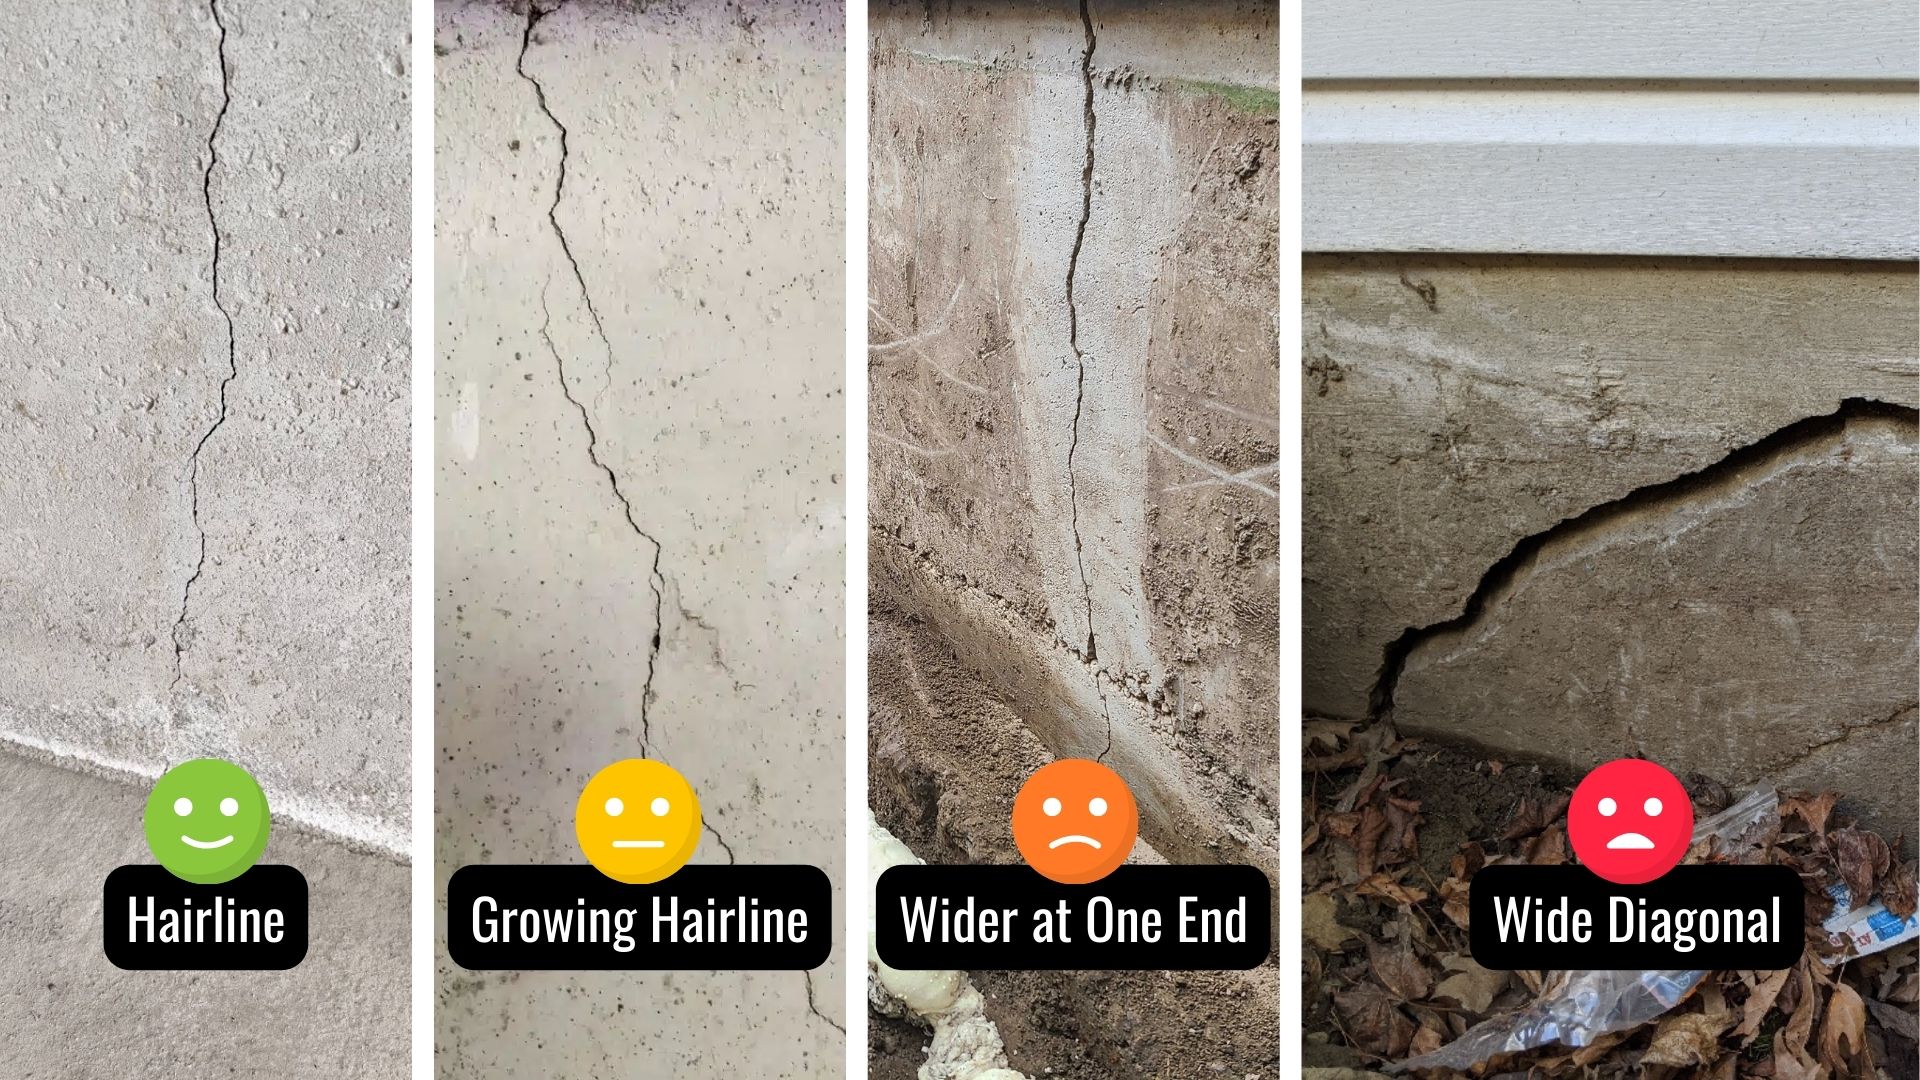
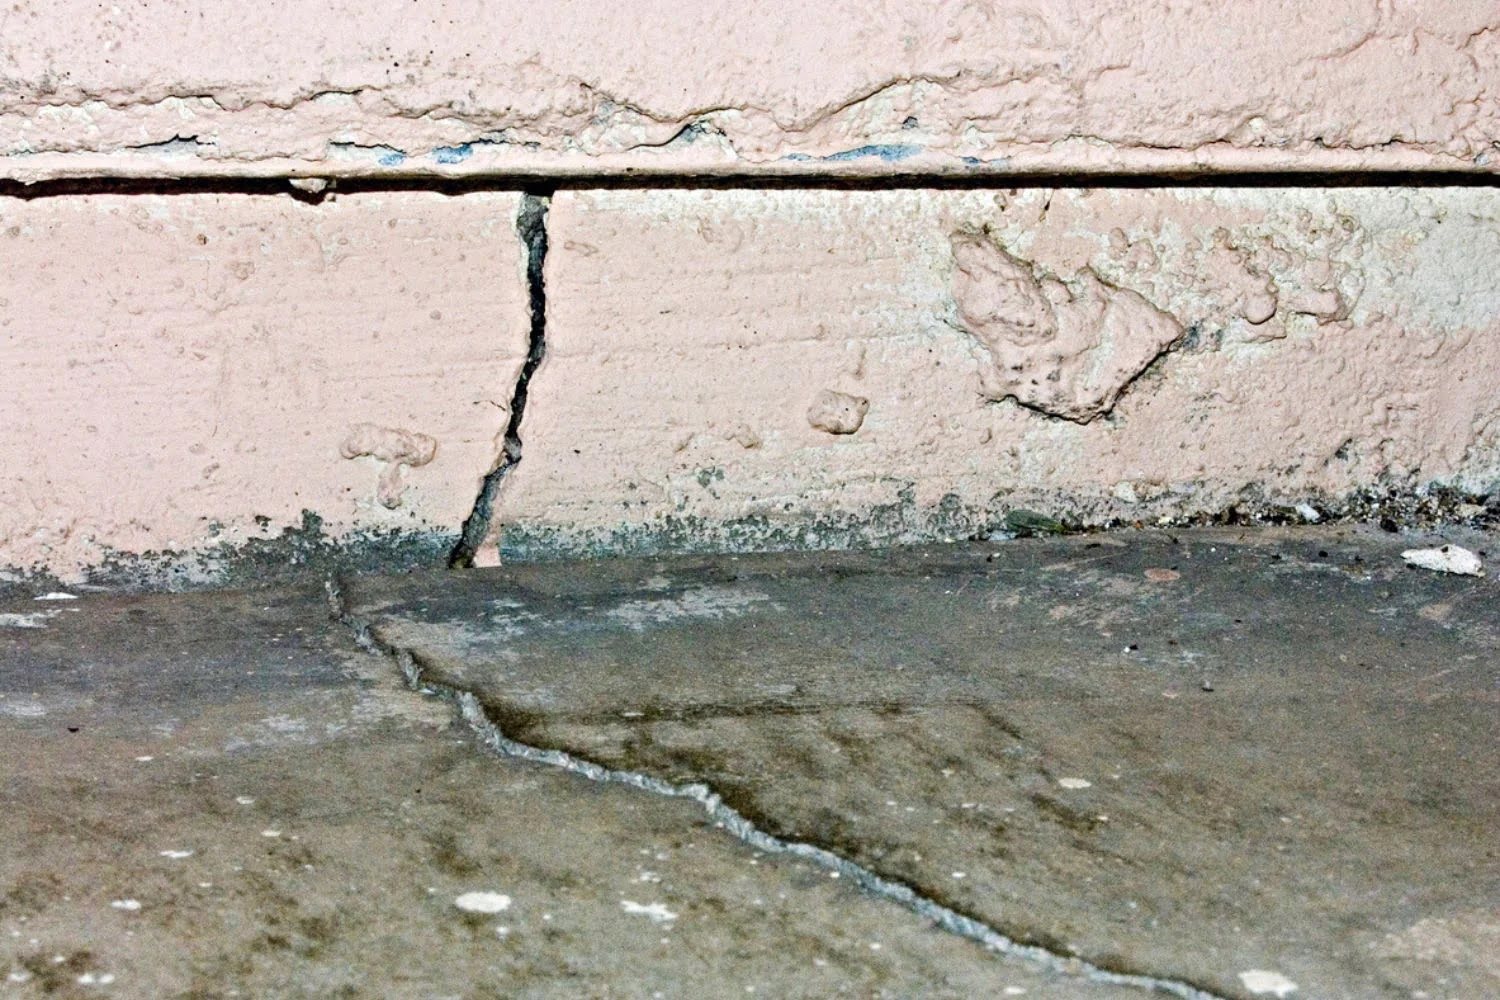
Dealing with a 1/2 inch foundation wall crack requires immediate attention, as this width often signifies structural shifting, hydrostatic pressure, or settling that goes beyond standard hairline shrinkage. Repairing a crack of this scale typically demands heavy-duty structural epoxy injection, high-strength polyurethane foam, or carbon fiber reinforcement to restore the wall's integrity and prevent water infiltration.
Understanding the Nature of a 1/2 Inch Foundation Wall Crack
A foundation wall crack measuring 1/2 inch in width is a serious structural symptom that demands a thorough evaluation before any repair material is applied. In the hierarchy of foundation distress, hairline cracks (under 1/16 inch) are generally considered cosmetic or normal curing phenomena. Cracks measuring 1/8 inch to 1/4 inch require monitoring and standard sealing. However, when a fracture widens to a full 1/2 inch, it crosses the threshold from a minor maintenance issue into a significant structural concern.
Before diving into repair methodologies, homeowners and contractors must diagnose the underlying root cause. Foundation cracks are rarely random; they are physical manifestations of immense physical forces acting upon concrete, poured concrete, or concrete masonry units (CMU blocks). Common culprits include:
- Hydrostatic Pressure: Saturated soil surrounding the foundation exerts tremendous lateral pressure against the walls, bowing or cracking them inward.
- Differential Settlement: Uneven soil bearing capacity beneath the footings causes sections of the home to sink at different rates, tearing the foundation apart.
- Frost Heave: In colder climates, freezing and expanding soils push upward and inward against foundation walls.
- Poor Drainage: Inadequate gutter systems, downspouts discharging too close to the foundation, and negative grading channel water directly against the structure, compounding soil pressure.
Ignoring a 1/2 inch crack or treating it with simple surface patching—such as slapping standard hydraulic cement or acrylic caulk over the opening—will almost certainly lead to failure. Because the crack is wide enough to compromise the load-bearing capacity of the wall and allow substantial water entry, the repair strategy must address both structural stabilization and moisture management.
Safety, Diagnostics, and When to Call a Structural Engineer
Safety is paramount when working around structural foundation damage. Before commencing any repair work on a 1/2 inch wall crack, you must assess whether the wall is actively moving or has stabilized. Active cracks—those that continue to widen or shift over time—will break through rigid repair materials like epoxy, rendering the fix useless.
To determine if a crack is active, you can install a commercial crack monitor or a simple glass gauge across the fracture. Measure and record the width and movement over a period of several weeks to a few months, including seasonal shifts in moisture and temperature.
Furthermore, you should consult a licensed structural engineer or a reputable foundation repair specialist if you observe any of the following warning signs:
- Horizontal or stair-step cracking that runs the entire length of the wall.
- Walls that are actively bowing inward by more than two inches or showing signs of buckling.
- Doors and windows on upper floors that stick or fail to close properly, indicating frame distortion.
- Cracks accompanied by severe efflorescence, crumbling mortar joints, or rotting sill plates.
An engineer will provide a formal assessment, load calculations, and a tailored remediation plan. Once professional clearance is obtained, you can evaluate the primary methods for repairing a 1/2 inch foundation wall crack.
Method 1: Structural Epoxy Injection and Backer Rod Reinforcement
Structural epoxy injection is the gold standard for restoring monolithic strength to cracked poured concrete foundation walls. While standard epoxy is designed for hairline to 1/4 inch cracks, a 1/2 inch crack requires a modified approach because standard low-viscosity resins will simply run out of the gap before curing.
The Mechanics of Epoxy Injection
Epoxy is a high-strength, two-part thermosetting polymer. When properly mixed and injected, it bonds to the concrete flanks of the crack with a tensile strength often exceeding that of the surrounding concrete itself. For a 1/2 inch crack, the process requires modifying the preparation phase to accommodate the sheer volume of the void.
Step-by-Step Execution
- Surface Preparation: Clean the crack thoroughly using a wire brush, chisel, and compressed air to remove all dirt, loose concrete dust, and efflorescence. The bonding surfaces must be completely dry and oil-free for the epoxy to adhere correctly.
- Installing Backer Material: Because the crack is 1/2 inch wide, unmitigated epoxy will drain straight through to the exterior or pool in the hollows. Install a closed-cell backer rod or hydraulic cement dam deep into the crack to create a functional floor for the resin, ensuring it does not push out the other side.
- Mounting Injection Ports: Surface-mounted injection ports (plastic access fittings) are placed along the length of the crack, spaced roughly 8 to 12 inches apart.
- Sealing the Surface: Apply a thick, structural surface-sealing paste over the entire length of the crack and around the bases of the injection ports. Allow this paste to cure fully according to the manufacturer's instructions. This creates a pressurized chamber inside the crack.
- Injecting the Epoxy: Beginning at the lowest port and working your way up, inject the mixed two-part epoxy using a professional injection gun. Continue pumping until the epoxy flows freely out of the adjacent port above it. Cap the lower port and move to the next one.
- Curing and Finishing: Allow the epoxy to cure for 24 to 48 hours. Once hardened, use a grinder or chisel to knock off the surface-sealing paste and injection ports, grinding the area flush with the wall.
| Repair Method | Best Suited For | Primary Benefit | Estimated Cost Range |
|---|---|---|---|
| Structural Epoxy Injection | Poured concrete, stable structural cracks | Restores 100% of original wall strength | Moderate to High |
| Carbon Fiber Straps | Bowing walls, severe structural stabilization | High tensile strength; prevents inward movement | High |
| Low-Pressure Polyurethane Foam & Steel | Active or leaking cracks with water intrusion | Flexible seal that accommodates minor movement | Moderate |
Method 2: Carbon Fiber Stitching and Structural Reinforcement Straps
When a 1/2 inch crack is the result of lateral pressure and slight wall movement, filling the crack alone may not be enough to prevent future failure. In these scenarios, structural engineers frequently recommend carbon fiber reinforcement systems.
Understanding Carbon Fiber Technology
Carbon fiber strips boast an incredible strength-to-weight ratio, featuring a tensile strength significantly higher than steel while remaining lightweight and completely corrosion-resistant. When applied perpendicular to a crack or distributed across a bowing wall, carbon fiber strips tie the fractured sections of the concrete together and anchor them securely to the building's floor joists and foundation footing.
Step-by-Step Execution
- Crack Stabilization: First, fill the 1/2 inch crack itself using structural epoxy or high-strength non-shrink grout to restore baseline integrity and block water seepage.
- Surface Preparation: Grind the concrete surface where the carbon fiber straps will be placed. The concrete must be bare, clean, and free of any paints, sealers, or coatings to ensure optimal epoxy bonding.
- Epoxy Primer Application: Apply a saturated coat of structural saturating epoxy to the prepared concrete surface.
- Applying the Carbon Fiber Strap: Embed the pre-cut carbon fiber fabric or rigid plate directly into the wet epoxy resin. Use a roller or squeegee to press the material firmly into the concrete, eliminating any air pockets and ensuring complete resin saturation.
- Applying Top Coats: Apply a secondary coat of epoxy over the exterior of the carbon fiber strap to encapsulate the fibers and protect them from physical damage or moisture degradation. Once cured, the strap can be painted over to match the rest of the foundation wall.
Method 3: Heavy-Duty Polyurethane Foam Injection with Steel Reinforcement
For foundation walls constructed of concrete masonry units (CMU blocks) or poured concrete that experience ongoing moisture issues alongside structural settling, a combination of polyurethane foam injection and structural steel reinforcement is often deployed.
The Role of Polyurethane Foam
Unlike rigid epoxy, polyurethane foam expands upon injection and remains semi-flexible after curing. This flexibility allows the material to accommodate minor, natural thermal expansion and contraction of the foundation without re-rupturing. Furthermore, hydrophobic polyurethane foams react with water inside the crack, making them exceptionally effective for 1/2 inch cracks that are actively leaking water during rainstorms.
Integrating Steel Supports
Because a 1/2 inch crack in a block wall often indicates that the blocks have shifted independently, polyurethane injection must be paired with mechanical stabilization. Steel I-beams or channel irons are bolted to the floor joists above and the foundation floor below, directly pressing against the interior wall to mechanically lock the masonry in place.
Execution Workflow
- Drilling and Port Placement: Drill injection holes at a 45-degree angle intersecting the crack every 10 to 12 inches.
- Inserting Ports: Insert mechanical packers (injection ports) into the drilled holes and tighten them securely.
- Flushing and Sealing: Flush the crack with water to clear out debris and activate the hydrophilic properties of the foam. Seal the face of the crack with a surface paste.
- Pumping Polyurethane: Inject the expanding polyurethane foam from the bottom up. Watch for foam to appear in adjacent ports, indicating the void is completely filled.
- Erecting Steel Braces: Once the foam has cured and water infiltration is halted, position heavy-duty structural steel I-beams against the wall at engineered intervals to provide permanent load-bearing support.
Comparative Overview of Repair Strategies
Choosing the correct method depends heavily on the construction type of your foundation and whether the crack is active or dormant.
| Evaluation Criteria | Epoxy Injection | Carbon Fiber Straps | Polyurethane & Steel |
|---|---|---|---|
| Material Flexibility | Rigid | Semi-Rigid | Flexible |
| Waterproofing Efficacy | Excellent | Moderate (Requires surface prep) | Superior (Stops active leaks) |
| Installation Complexity | Moderate | Moderate | High (Professional recommended) |
| Best Wall Type | Poured Concrete | Poured Concrete & CMU Block | CMU Block & Poured Concrete |
Preventive Measures and Post-Repair Maintenance
Completing a structural repair on a 1/2 inch foundation crack protects your home, but long-term success requires managing the environmental factors that caused the damage in the first place. Water management is the single most critical factor in foundation longevity.
- Extend Downspouts: Ensure all roof runoff is channeled at least 4 to 6 feet away from the foundation perimeter via solid extension pipes or underground drainage lines.
- Grade the Soil: Verify that the soil surrounding your foundation slopes away from the house at a minimum drop of 6 inches over the first 10 feet.
- Install French Drains: In high-water-table areas or properties prone to pooling water, installing an exterior footing drain or an interior perimeter French drain system relieves hydrostatic pressure before it can stress the foundation walls.
- Monitor Annually: Inspect your foundation repairs at least twice a year—ideally in the spring after heavy rains and in the late autumn—to verify that no new movement or hairline cracking has developed around the repaired zones.
Frequently Asked Questions
Is a 1/2 inch foundation wall crack considered dangerous?
Yes, a 1/2 inch crack is categorized as a major structural issue. While hairline cracks are normal settling phenomena, a half-inch opening indicates significant movement, severe hydrostatic pressure, or structural failure that compromises the load-bearing capacity of the wall and invites water damage.
Can I repair a 1/2 inch foundation crack myself with hydraulic cement?
Using hydraulic cement or surface patching compounds on a 1/2 inch structural crack is only a temporary cosmetic fix. It does not restore the structural integrity of the wall, and because the crack is so wide, surface patches will likely crack or pop out within a short period under shifting soil pressures.
Will home insurance cover the repair of a 1/2 inch foundation crack?
Standard homeowners insurance policies typically do not cover foundation repairs caused by settling, normal wear and tear, or earth movement. However, coverage may apply if the damage is the direct result of a covered peril, such as a sudden plumbing burst beneath the slab. Always review your specific policy wording or consult your insurance agent.
How long do professional foundation crack repairs last?
When executed correctly by a licensed professional using structural epoxy, carbon fiber, or polyurethane injection, foundation repairs are designed to last the lifetime of the structure. The repaired area often becomes stronger than the surrounding untouched concrete.
What causes foundation walls to bow inward alongside cracking?
Bowing and cracking are classic symptoms of excessive lateral hydrostatic pressure. When soil surrounding a basement becomes saturated with water, it expands and exerts tremendous lateral force against the exterior foundation walls, pushing them inward and tearing the concrete apart.
Final Recommendations
A 1/2 inch foundation wall crack is a definitive warning sign that should never be ignored or postponed. Begin by assessing whether the crack is active through professional monitoring or consultation with a structural engineer. Select the repair methodology—epoxy injection, carbon fiber reinforcement, or polyurethane foaming with steel stabilization—that aligns with your specific wall construction and moisture conditions. Prioritize exterior water management to eliminate the root cause of the pressure, and invest in professional contractor services if the structural integrity of your home is in question.