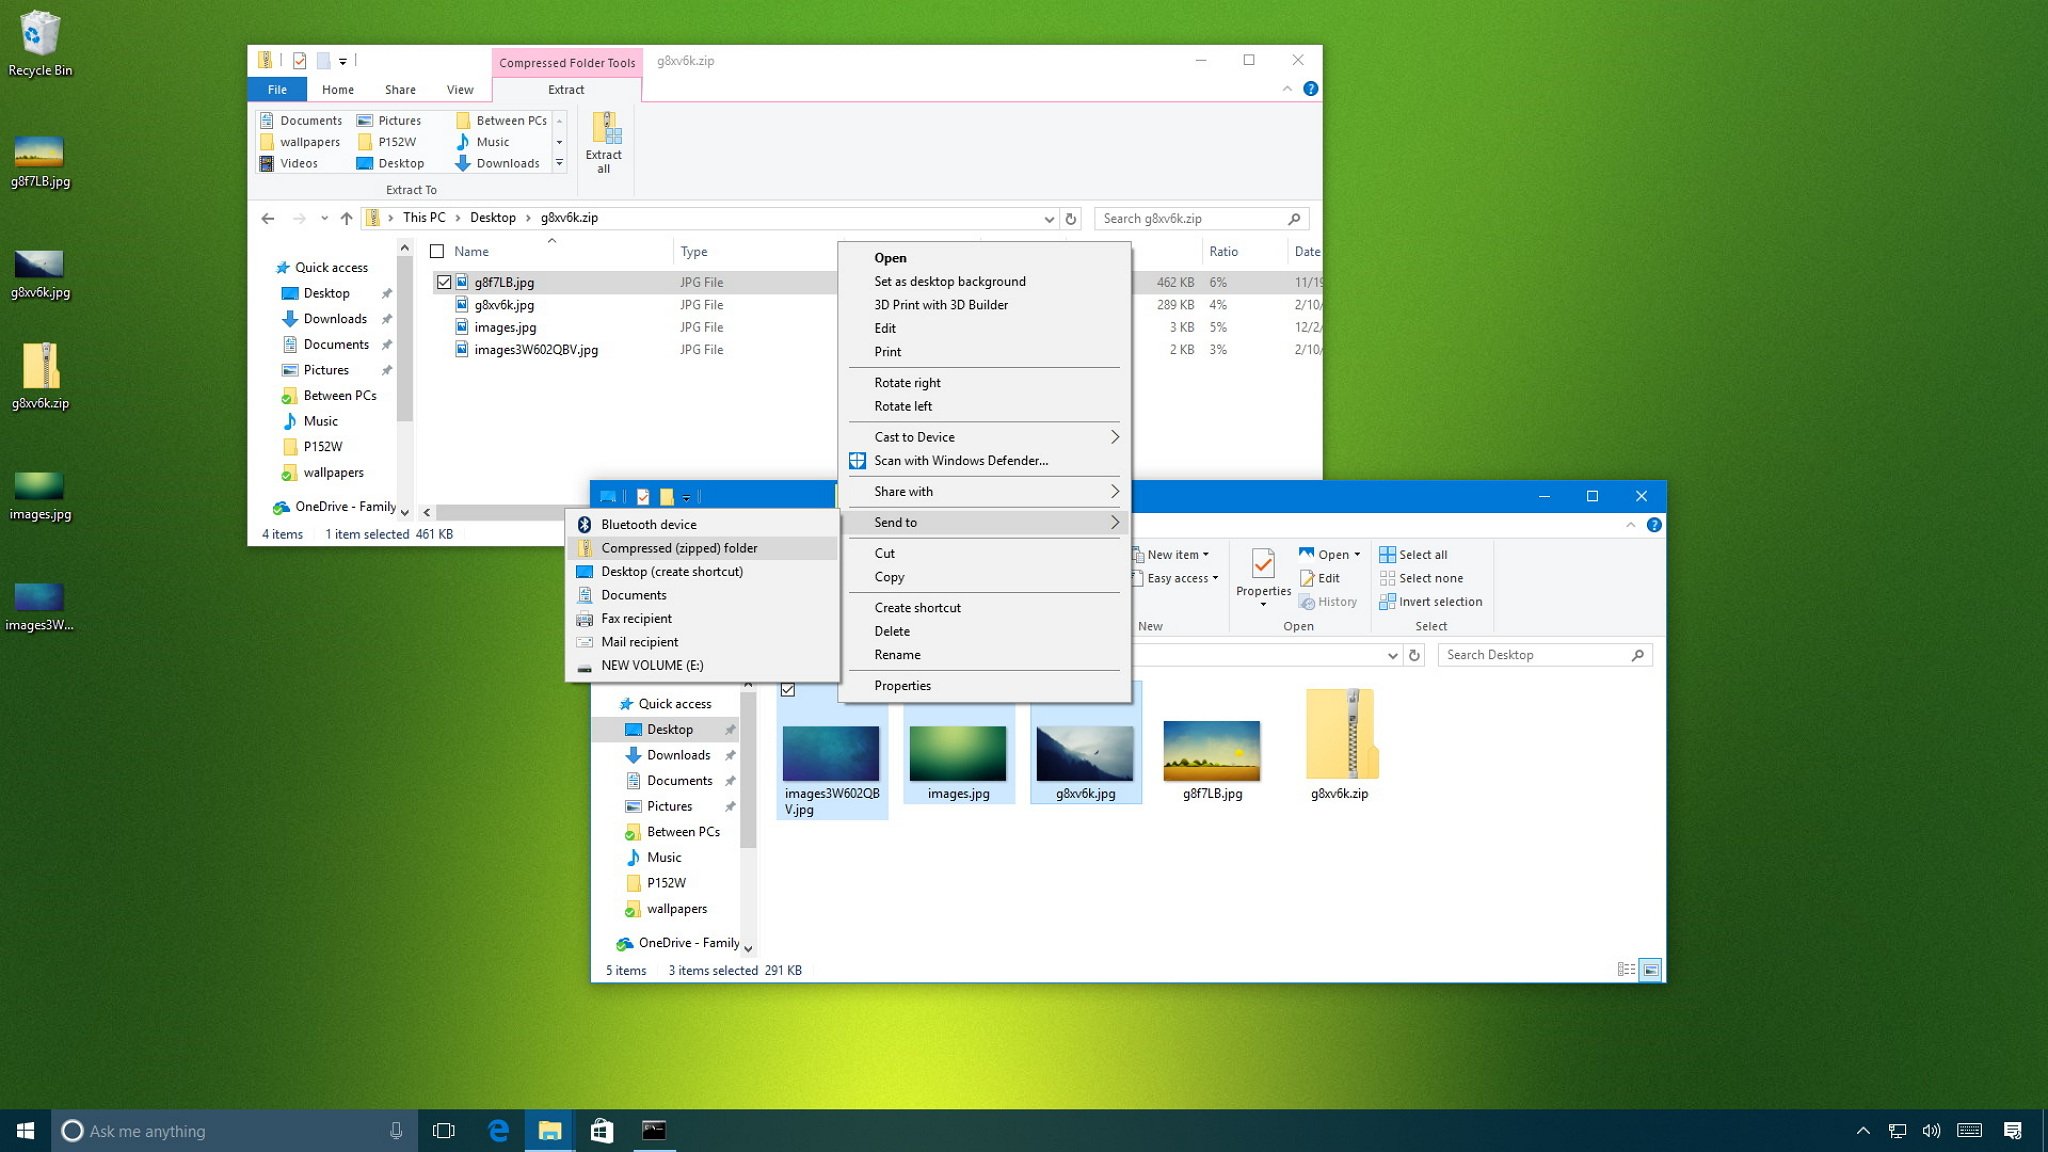
The most straightforward and native way to compress files in Windows 7 is by using the built-in "Send to Compressed (zipped) folder" function. This feature allows users to create a standard ZIP archive from any file or folder directly through the right-click context menu, requiring no third-party software or complex configuration to manage disk space or prepare items for easier transmission.
Understanding Native File Compression in Windows 7
Windows 7, released by Microsoft in 2009, remains in use by specific sectors and users in 2026 for legacy software compatibility, offline tasks, and embedded system management. One of its most useful, yet frequently overlooked, productivity features is the integrated ZIP file support. Compression serves two primary purposes: reducing the storage footprint of data on your hard drive and consolidating multiple files into a single container, which simplifies emailing, uploading, or organizing documents.
Unlike advanced compression formats such as RAR or 7z, the native ZIP format is universally recognized across all modern operating systems, including Windows 11, macOS, and Linux distributions. By using the native Windows 7 tool, you ensure that your compressed files remain accessible to virtually any recipient without requiring them to install proprietary software.
Prerequisites for Compressing Data
Before initiating the compression process, ensure your computer has sufficient system resources to handle the task. Compression is a processor-intensive activity. While Windows 7 handles individual files efficiently, attempting to compress a folder containing several gigabytes of data—or thousands of small files—may cause the system to become sluggish during the operation.
- Storage Space: Ensure your destination drive has enough free space to accommodate the new compressed folder. While the resulting file will be smaller than the source, the system often requires temporary overhead space during the creation process.
- File Permissions: Verify that you have read access to the files you intend to compress. If you are attempting to compress system-level files or files owned by another user account, Windows may prevent the operation or create an empty archive.
- Backup Status: Compression is generally a safe, non-destructive process, but it is best practice to never compress your only copy of critical data. Always maintain an uncompressed backup on an external drive or network location.
Step-by-Step: The "Send to" Method
This method is the standard workflow for compressing files on Windows 7. It is integrated directly into the Windows Explorer shell.
- Locate your files: Navigate to the folder containing the files or subfolders you wish to compress using Windows Explorer.
- Select the items: Click and drag your mouse to highlight all files or folders you want to include in the archive. Alternatively, hold the
Ctrlkey while clicking individual files to make a custom selection. - Open the Context Menu: Right-click on any of the highlighted items.
- Initiate Compression: In the menu that appears, hover your cursor over the Send to option. A sub-menu will open; select Compressed (zipped) folder.
- Name the Archive: Windows will instantly create a new file in the same directory, ending in a
.zipextension. It will automatically be highlighted so you can type a new name for the file. PressEnterto confirm the name.
Technical Performance and Limitations
It is important to understand the technical limitations of the native Windows 7 ZIP utility. While it is the "simplest" method, it is not the most powerful.
- Compression Ratio: The native ZIP implementation in Windows 7 uses a standard compression algorithm designed for speed rather than maximum file size reduction. If you are dealing with highly compressible data, such as large text files or uncompressed bitmap images, you might achieve better results with third-party software that supports advanced algorithms like LZMA2.
- Encryption: The native tool does not offer password protection or advanced AES-256 encryption. If you are compressing sensitive personal or financial information, the resulting ZIP file will not be secure. You should use a third-party tool if your goal is security rather than just file organization.
- File Size Limits: While the ZIP format technically supports very large files, Windows Explorer may encounter issues handling archives larger than 2GB on older file systems or older system configurations.
Comparison of File Compression Methods
To help you decide if the native Windows 7 tool is sufficient for your needs, the following table compares it against other common approaches.
| Feature | Windows Native ZIP | Third-Party Tools (e.g., 7-Zip) |
|---|---|---|
| Ease of Use | Excellent (Native) | Requires Installation |
| Installation | Not Required | Required |
| Password Security | No | Yes (High Security) |
| Supported Formats | .zip only | .zip, .7z, .rar, .tar, .iso |
| Resource Usage | Low | Low to High (Adjustable) |
| Compatibility | Universal | Requires software for .7z/.rar |
Troubleshooting Common Issues
Even a simple process like native compression can occasionally fail. Here are the most frequent hurdles users face in 2026:
- "File Not Found" Errors: If you move or rename a file while the compression process is still running, the task will fail. Ensure that files are static and not currently open in another application while they are being compressed.
- Incomplete Archives: If the process stops suddenly, check if your drive is formatted as FAT32. FAT32 has a maximum file size limit of 4GB. If your resulting archive exceeds this, the operation will fail. If you encounter this, consider moving the files to an NTFS-formatted partition.
- System Slowdown: If you are compressing a massive amount of data, the Windows interface may become unresponsive. Let the process run in the background. Avoid launching heavy applications while the compression utility is active.
Frequently Asked Questions
1. Can I compress files directly to a different location? No, the "Send to Compressed (zipped) folder" function automatically creates the new ZIP file in the current folder. You must manually move the resulting file to your desired destination after the process is finished.
2. Does compressing files damage the quality of images or videos? No. The ZIP format uses "lossless" compression. This means that when you extract the files later, the bits will be identical to the originals. The compression only removes redundancies in the data, not the actual visual or audio information.
3. What happens if I want to add more files to a ZIP folder later?
You can simply drag and drop additional files directly into the existing .zip folder. Windows will automatically include them in the archive without needing to create a new folder from scratch.
4. Can I password-protect a ZIP file in Windows 7? The native Windows 7 feature does not support password protection. If you need to secure your files, you must use a third-party utility to create an encrypted archive instead.
5. How do I know if the compression worked?
Right-click your new .zip file and select "Properties." Compare the "Size on disk" of the new ZIP file with the total size of the original uncompressed files to see the reduction ratio achieved.
Final Recommendation
For general administrative tasks, such as grouping related documents or preparing files for email transmission, the native Windows 7 compression tool is the most efficient and reliable solution. It requires no additional software, preserves the integrity of your original data, and ensures maximum compatibility with other systems. If your primary goal is high-level data security or extreme file size reduction, consider installing a dedicated utility, but for 99% of daily tasks, stick to the built-in Windows functionality to maintain system stability and simplicity.