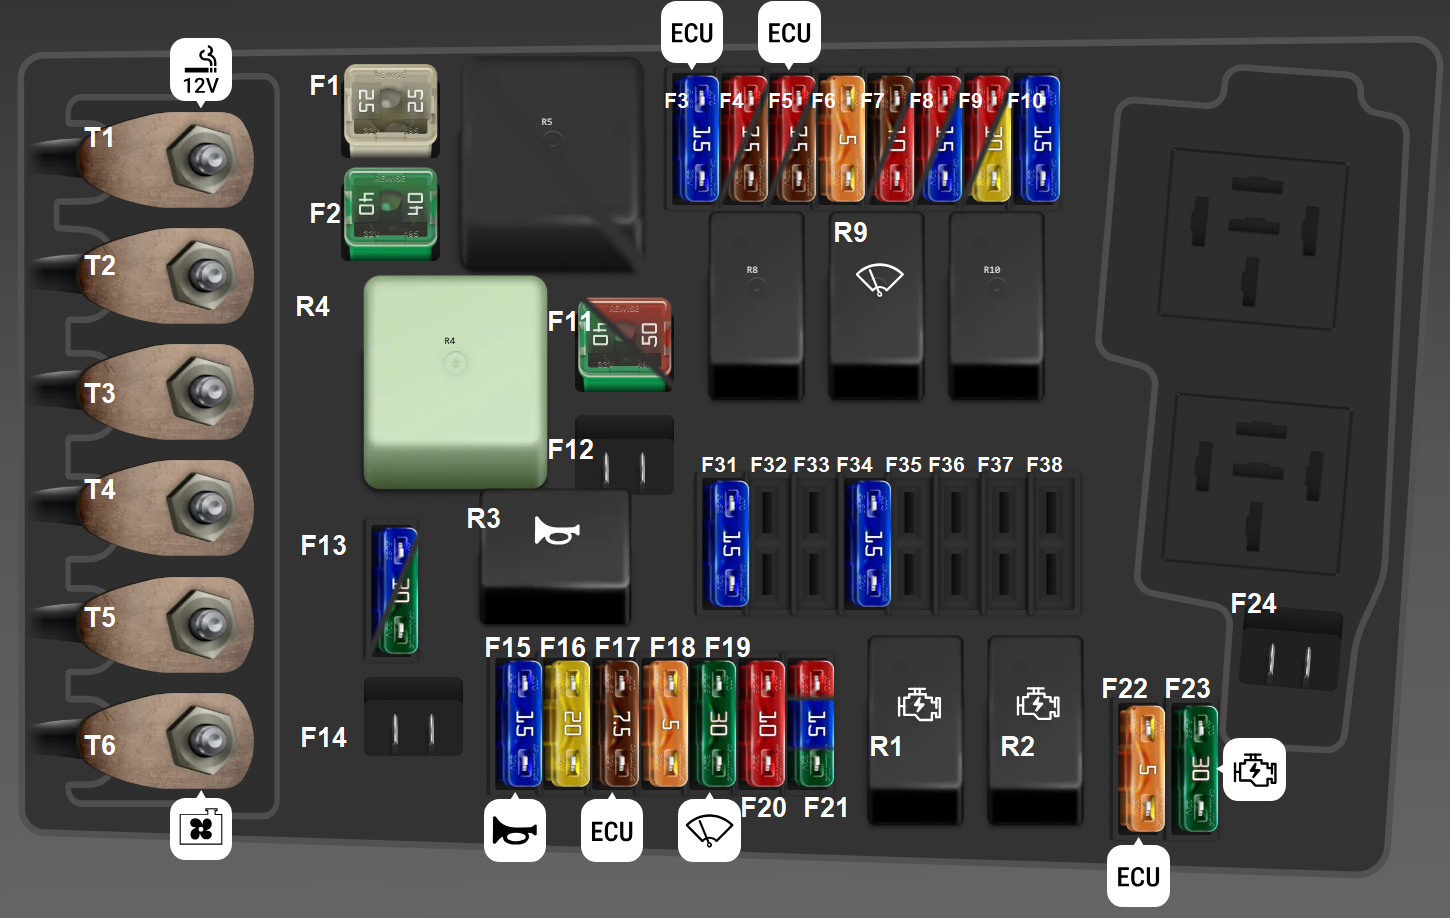
The 2006 Volkswagen Jetta utilizes two primary fuse locations: the instrument panel fuse box located on the driver-side dashboard and the engine bay fuse box positioned inside the battery compartment. Correct identification of these circuits is essential for diagnosing electrical failures, such as non-functional lighting, climate control, or power accessory malfunctions, ensuring safe vehicle operation without risking damage to the electrical system.
Understanding the Electrical Architecture of the 2006 Jetta
The 2006 Volkswagen Jetta (the MK5 generation) features a complex electrical distribution system designed to manage various comfort and safety features. Unlike older vehicles that relied on simple relay systems, the MK5 Jetta incorporates a Central Electronics Control Module (CECM). This module communicates with various sensors and switches throughout the car, meaning that a blown fuse might not just be a simple power failure, but could potentially signal a deeper issue within the electronic control architecture.
When approaching the fuse box, you must understand that there is no singular "master" diagram that covers every possible configuration. Because Volkswagen produced the 2006 Jetta with multiple engine options (such as the 2.0T FSI, the 2.5L 5-cylinder, and the 1.9L TDI), the fuse layout can vary slightly based on the vehicle's production date and specific equipment level. Always prioritize the diagram found on the underside of your specific fuse box cover or within the owner's manual provided with your vehicle.
Accessing the Primary Fuse Panels
Before attempting any electrical repairs, you must ensure the vehicle is parked on a level surface, the ignition is turned off, and the key is removed from the cylinder. Safety is paramount; never attempt to bypass a fuse with metal objects, wires, or improper amperage ratings, as this can cause permanent damage to your wiring harness or lead to an electrical fire.
The Instrument Panel Fuse Box
The interior fuse panel is located behind a plastic cover on the driver’s side of the dashboard. To access this, you must open the driver-side door. Using a flat-head screwdriver or a trim removal tool, gently pry the cover starting from the notch located at the side. Once removed, you will see a grid of fuses. Behind the cover, you will typically find a small plastic fuse puller tool; use this, rather than pliers, to avoid damaging the plastic housings of the fuses.
The Engine Compartment Fuse Box
The engine bay fuse box is located inside a black plastic housing positioned near the battery on the driver’s side of the engine bay. To access it, release the locking tabs on the cover and lift it straight up. This box contains higher-amperage fuses and relays that manage primary vehicle systems like the radiator fan, the engine control module, and the fuel pump. Exposure to the elements can occasionally cause corrosion on these terminals, so if you open this box and see green or white powdery residue, it may indicate a need for contact cleaner rather than a simple fuse replacement.
Identifying Fuse Amperage and Color Codes
Automotive fuses follow a standardized color-coding system. Understanding these colors allows you to quickly verify if an incorrect fuse has been installed by a previous owner. Always replace a fuse with one of the exact same color and amperage rating specified in the official diagram.
| Color | Amperage Rating | Typical Usage |
|---|---|---|
| Tan | 5A | Sensitive Sensors / Modules |
| Brown | 7.5A | Lighting / Interior Controls |
| Red | 10A | Radio / Interior Illumination |
| Blue | 15A | Power Outlets / Fuel Pump |
| Yellow | 20A | High Load Accessories / Horn |
| Clear/White | 25A | Wiper Motors |
| Green | 30A | Engine Management / Power Windows |
Troubleshooting Common Electrical Failures
When a component stops working, the first step is visual inspection. A blown fuse will show a broken or melted metal bridge inside the transparent plastic housing. However, if the fuse looks intact but the component remains unresponsive, you must use a multimeter to check for continuity across the fuse pins.
Diagnostic Steps
- Confirm the Failure: Verify that the component is actually failing and not just experiencing a mechanical jam. For example, if your power window doesn't move, is the switch broken, or is the motor seized?
- Consult the Diagram: Locate the specific fuse associated with that circuit.
- Inspect the Fuse: Use the puller tool to remove the fuse. Hold it up to a light source to check the metal link.
- Test for Power: With the ignition set to "On" (if required for the circuit), touch the probes of a multimeter to the two small test points on the back of the fuse. If you have 12V on one side but 0V on the other, the fuse is blown.
- Replace: If the fuse is blown, replace it with a new one of the exact same amperage.
- Observe: If the new fuse blows immediately, do not replace it again with a higher amperage fuse. This indicates a "dead short" in the wiring, which requires a professional inspection to prevent fire.
Common Myths Regarding Fuse Replacement
Many owners believe that if a 10A fuse blows, upgrading it to a 15A fuse will "solve the problem" or make the system more robust. This is a dangerous misconception. Fuses are calibrated to protect the wiring harness that leads to the specific component. The wire itself has a maximum capacity for electricity before it begins to melt. If you install a larger fuse, the wire—not the fuse—will become the weakest link and potentially catch fire. Never deviate from the manufacturer's specified amperage.
Furthermore, do not rely on "generic" fuse box diagrams found online without verifying them against your vehicle’s specific year and trim. Because the 2006 Jetta straddled the line between early and late-model electronic integrations, some diagrams might reflect a 2005.5 or a 2007 configuration that does not match your specific build.
Frequently Asked Questions
Why does my fuse keep blowing after I replace it?
A recurring blown fuse indicates a short circuit in the wiring or a failing component drawing excessive current. If you replace the fuse and it pops immediately, stop replacing it and have the wiring harness inspected for insulation damage.
Where is the fuse puller tool located?
In the 2006 VW Jetta, the fuse puller is typically clipped into the interior fuse box cover. If it is missing, you can use needle-nose pliers, but be extremely careful not to crack the surrounding plastic sockets.
Can I use a test light to check the fuses?
Yes, a test light is an excellent tool. By touching the tip of the test light to the exposed metal points on the top of the fuse, you can verify if power is reaching both sides of the fuse without removing it.
Do I need to disconnect the battery to change a fuse?
For interior fuses, it is not strictly necessary, provided the ignition is off. For engine bay fuses, it is highly recommended to avoid any accidental contact with high-current terminals, especially near the battery.
Does the 2006 Jetta have hidden fuses?
Yes, some relays and fuses are located deep behind the dashboard or in the engine electronics box. These are generally not user-serviceable and should be accessed by a certified technician to avoid damaging the dashboard harness.
Recommendations for Maintenance
To maintain the longevity of your electrical system, avoid using "cheap" aftermarket fuses found in bulk packs at discount stores. These often lack the precise calibration needed for delicate automotive electronics. Use high-quality, name-brand fuses. Additionally, if you frequently wash your engine bay, ensure that the cover for the engine compartment fuse box is properly seated. Moisture ingress is the leading cause of "ghost" electrical gremlins in the 2006 Jetta, often causing intermittent signal failures that are difficult to diagnose.
If you encounter an issue that remains unresolved after checking the fuses, document the specific symptoms—such as which lights are out or which accessories are dead—and consult a professional mechanic who has access to the official Volkswagen diagnostic software (VCDS). This can save you hours of guesswork and prevent unnecessary component replacement.