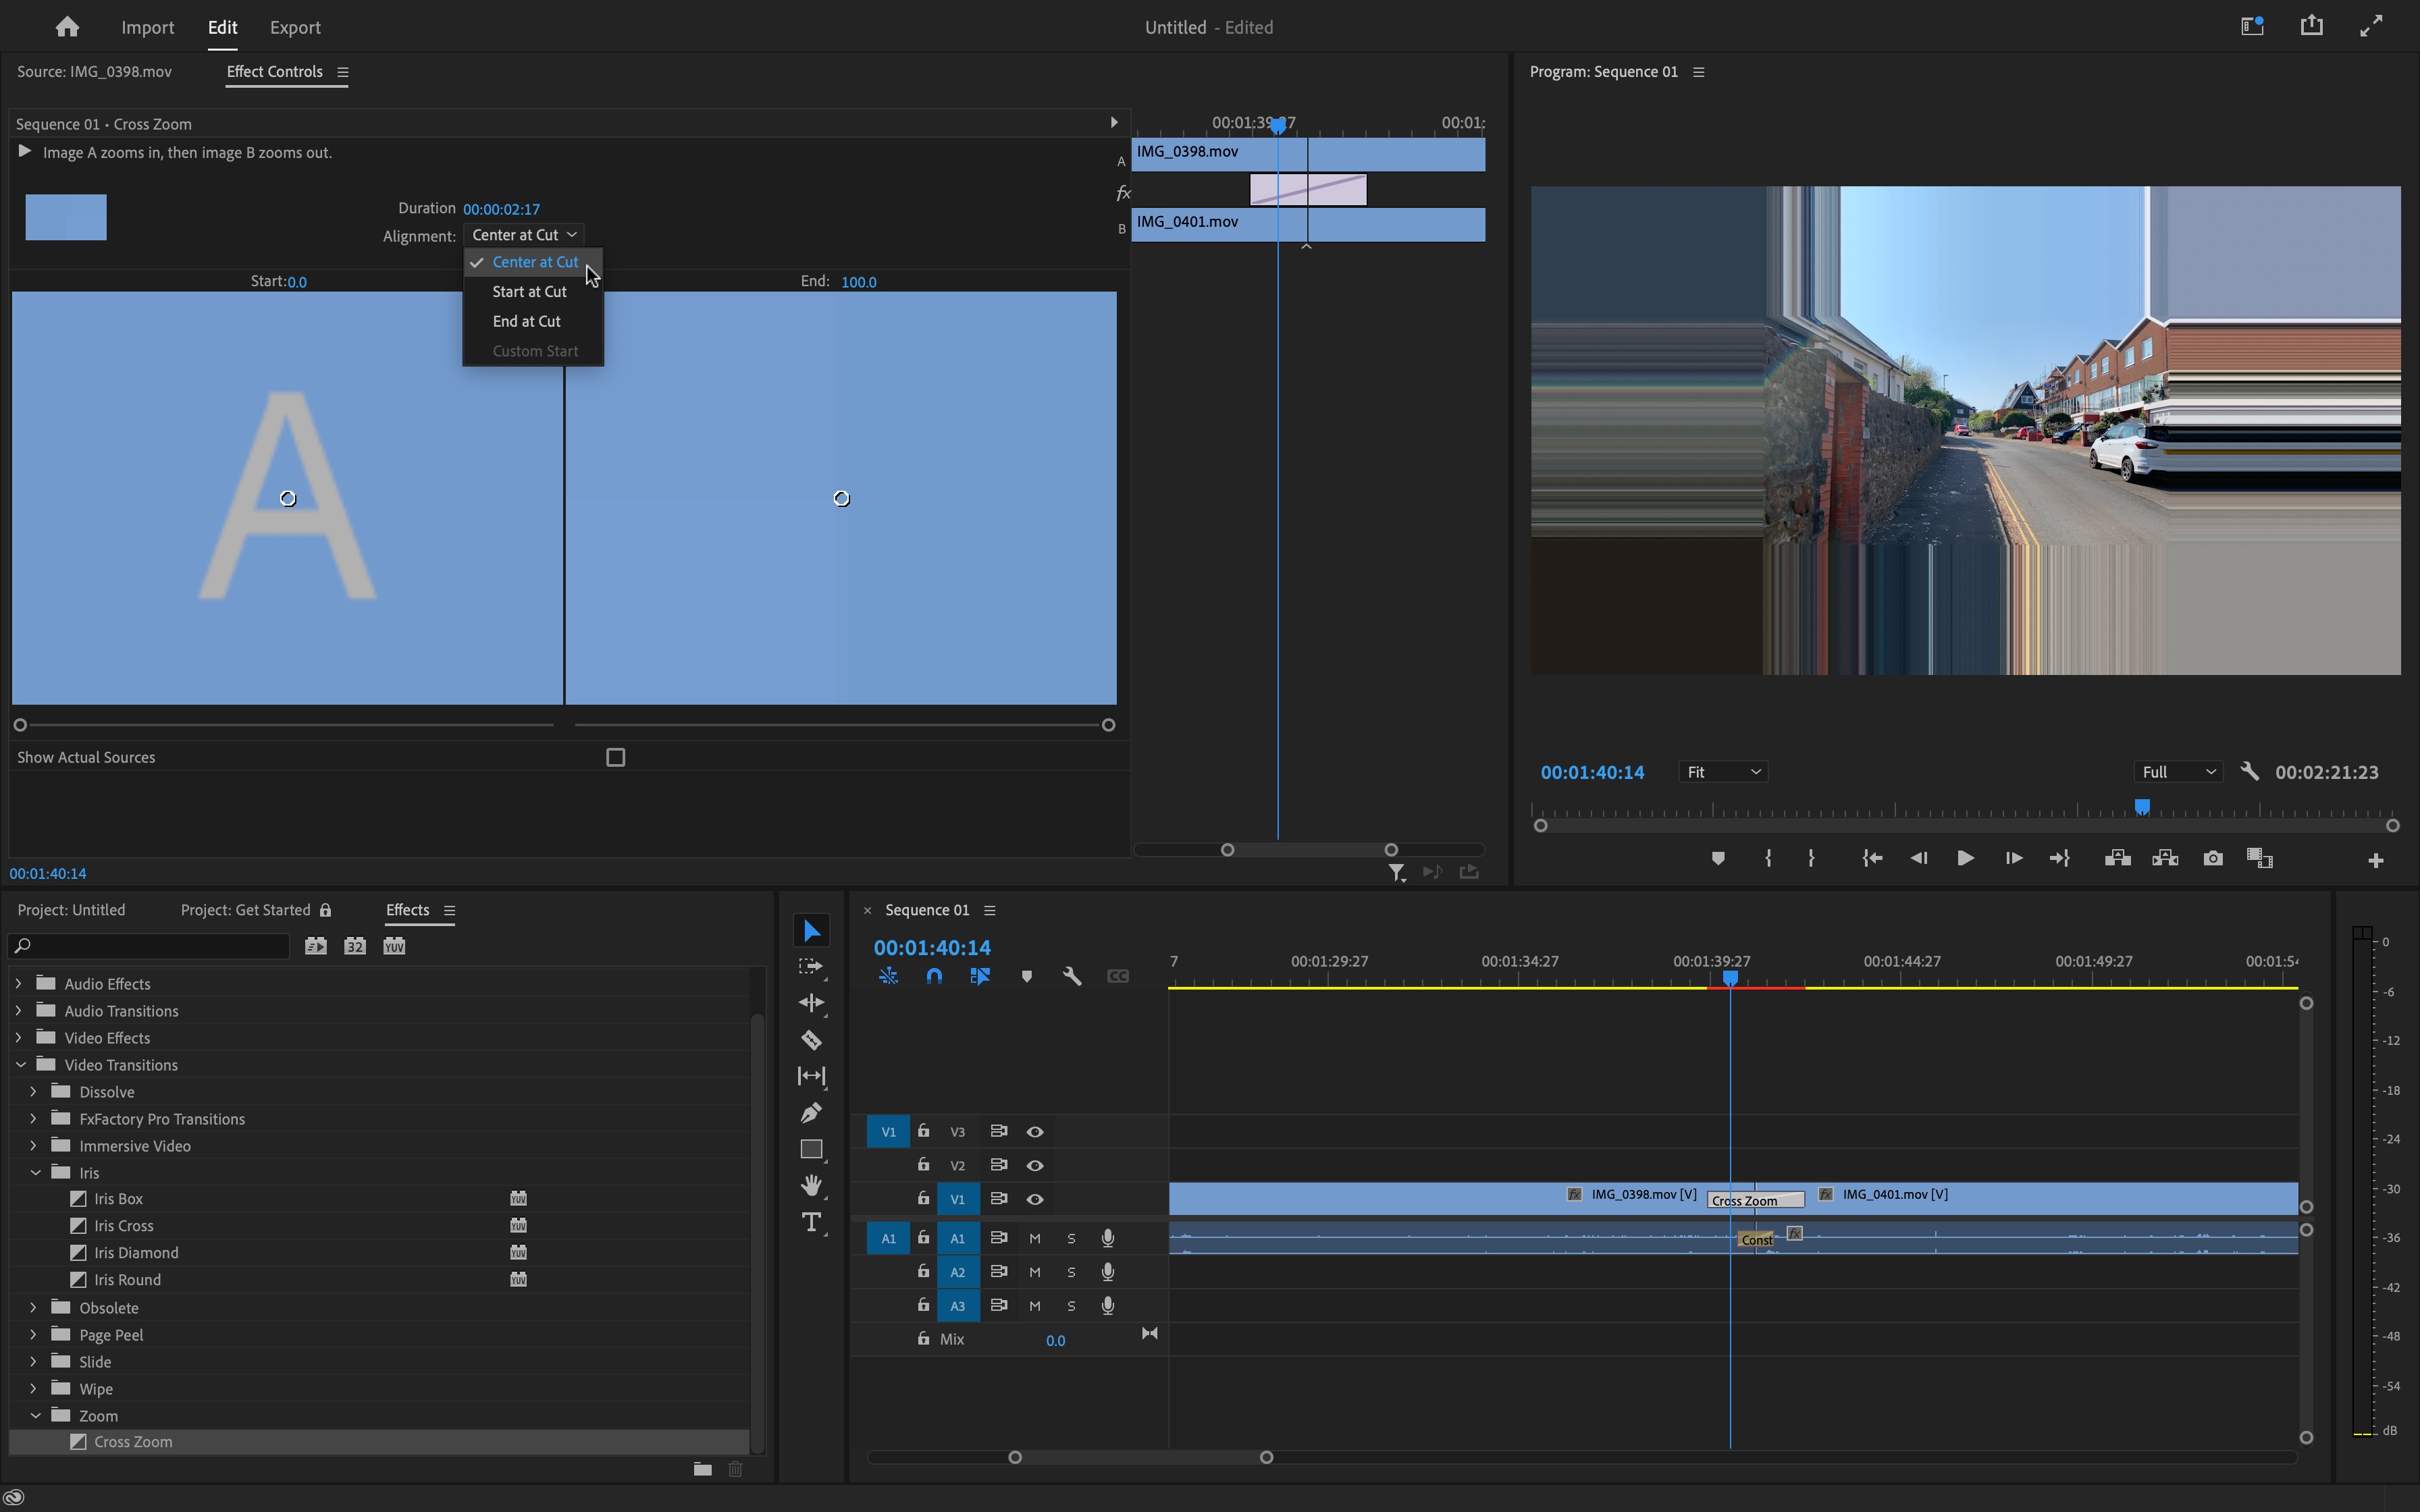
Adding a transition in Adobe Premiere Pro is a foundational skill for any video editor, allowing you to create smooth visual bridges between two separate clips. By utilizing the Effects panel and the Timeline, you can apply standard cross-dissolves or more creative motion effects to enhance your narrative pacing and maintain viewer engagement throughout your production.
Understanding Transitions in Adobe Premiere Pro
Transitions are effects applied to the edit point between two clips. Their primary purpose is to signal a shift in time, location, or subject, or to soften the abruptness of a "hard cut." Adobe Premiere Pro offers a vast library of built-in transitions, categorized by their visual style and function.
Before applying any transition, it is essential to understand that a transition requires "handles." A handle is the extra footage at the end of the first clip (the outgoing clip) or the beginning of the second clip (the incoming clip) that is not currently used in the timeline. If your clips are trimmed exactly to the start or end of the media file, Premiere Pro cannot create a transition because there is no overlapping video to blend. In such cases, the software may prompt you to trim the clips or create a "centered" transition that might result in a slightly shortened total clip duration.
Accessing the Effects Panel
The primary hub for all transition-related tasks is the Effects panel. If this panel is not visible in your workspace, navigate to the top menu bar, select "Window," and ensure "Effects" is checked. This will reveal a tab—usually docked next to your Project panel—that houses all available video and audio effects.
Within the Effects panel, you will find a folder explicitly labeled "Video Transitions." Expanding this folder reveals subfolders such as Dissolve, Iris, Page Peel, Slide, Wipe, and Zoom. Each category contains specific presets that you can preview by hovering over them or by applying them to your timeline to see the result in the Program Monitor.
Step-by-Step: Adding a Standard Transition
Applying a transition is a straightforward drag-and-drop operation. Follow these steps to implement a standard transition between two adjacent clips:
- Prepare your Timeline: Ensure that the two clips are placed directly next to each other on the same video track with no gaps between them.
- Open the Effects Panel: Navigate to the "Video Transitions" folder.
- Select the Transition: Choose your desired effect, such as a "Cross Dissolve," which is the industry standard for subtle, professional cuts.
- Drag and Drop: Click and hold the chosen transition, then drag it directly onto the cut line (the edit point) between your two clips in the timeline.
- Verify Placement: You will see a small, shaded box appear at the junction of the two clips. This indicates that the transition has been applied.
Setting a Default Transition
If you find yourself frequently using a specific transition—such as the Cross Dissolve—you can set it as your default to speed up your workflow. To do this, locate your preferred transition in the Effects panel, right-click it, and select "Set Selected as Default Transition."
Once set, you can apply this transition instantly by selecting the edit point in your timeline and pressing Ctrl + D (Windows) or Command + D (macOS). This keyboard shortcut is a significant time-saver, especially when editing long-form content or music videos where dozens of cuts may require the same treatment.
Customizing Transitions in the Effect Controls Panel
Once a transition is applied, it is rarely static. Most editors prefer to refine the duration, alignment, or specific parameters of the effect. To do this, select the transition box on your timeline so that it becomes highlighted (usually in white or a different color than the clips themselves).
With the transition selected, open the Effect Controls panel. Here, you will see a visual representation of the transition. You can adjust:
- Duration: Change the length of the transition in seconds or frames. A longer duration creates a slower, more deliberate blend, while a shorter duration is punchier and more modern.
- Alignment: You can choose to align the transition to start at the cut, end at the cut, or be centered over the cut.
- Border/Width/Reverse: Depending on the type of transition, you may be able to change the color of the border, reverse the direction of the movement, or adjust the "anti-aliasing" quality to ensure a clean visual result.
Comparing Common Video Transitions
| Transition Type | Visual Behavior | Best Use Case |
|---|---|---|
| Cross Dissolve | Fades out one clip while fading in the next. | General purpose, subtle scene shifts. |
| Dip to Black | Fades to black, then fades up the new clip. | Signifying a major change in time or location. |
| Dip to White | Fades to white, then reveals the new clip. | High-energy transitions or dream sequences. |
| Slide/Push | One clip pushes the other off the screen. | Fast-paced editing, YouTube intros, or social media. |
| Iris | Reveals the new clip through a shape (circle/square). | Stylistic, nostalgic, or comedic effects. |
Handling Common Issues and Troubleshooting
Even experienced editors encounter problems when applying transitions. The most frequent issue is the "Insufficient Media" warning. This occurs when you attempt to add a transition to a clip that has no extra footage beyond what is already visible in the timeline.
To resolve this:
- Trim the clips: Manually shorten the outgoing and incoming clips to provide the necessary "overlap" for the transition.
- Use nested sequences: If you have applied heavy effects or color correction to a clip, Premiere Pro might struggle to apply a transition to it. Right-click the clip and select "Nest," then apply the transition to the resulting sequence.
- Check track layout: Transitions only work on clips that are on the same track and touching. If you have clips on Video Track 1 and Video Track 2 that overlap vertically, you cannot apply a standard "Video Transition" between them; you must instead use Opacity keyframes to create a manual dissolve.
Best Practices for Professional Results
While it is tempting to use the wide array of transitions available in Premiere Pro, professional editors often advocate for restraint. Excessive use of "Flashy" transitions like page peels or complex 3D spins can distract the viewer and make a production look amateurish.
- Maintain Consistency: If you use a Cross Dissolve for one scene, consider using it throughout the project unless you have a specific narrative reason to switch styles.
- Consider the Pacing: A fast-paced action sequence may benefit from hard cuts, while a slow, emotional documentary segment may require longer, softer dissolves.
- Audio Crossfades: Do not forget to pair your video transitions with audio transitions. A jarring jump in background noise is just as distracting as an abrupt visual cut. Drag "Constant Power" from the Audio Transitions folder onto the audio track beneath your video transition for a seamless experience.
Advanced Workflow: Keyframing and Custom Effects
For those looking to go beyond the presets, you can create custom transitions using keyframes in the Effect Controls panel. By animating the Opacity parameter (by clicking the stopwatch icon), you can create manual fades that are custom-tailored to the rhythm of your audio or the movement within your frame. This level of control is essential for high-end color grading and compositing, where a simple preset might not provide the precision required for seamless blending.
Frequently Asked Questions
Why can't I apply a transition to my clip? The most common cause is "insufficient media." Premiere Pro needs frames of footage outside of the portion you are using in your timeline to "blend" the two shots together. Ensure your clips have enough overlapping frames at the cut point.
How do I make a transition faster or slower? Click on the transition in your timeline to select it, then open the Effect Controls panel. You can change the duration numerically (e.g., changing 00:00:01:00 to 00:00:00:15) to shorten or lengthen the transition effect.
What is the difference between a transition and a hard cut? A hard cut is an instantaneous switch from one clip to the next, which is the standard for most narrative filmmaking. A transition is a gradual blending of frames, used to guide the viewer’s attention or provide a stylistic visual bridge.
Can I create my own custom transition? Yes, you can use keyframes on the Opacity or Motion effects to animate your own transitions. Additionally, you can save custom adjustments to an existing effect as a preset by right-clicking it in the Effect Controls panel and selecting "Save Preset."
Next Steps for Your Projects
Now that you understand the mechanics of adding transitions in Adobe Premiere Pro, the next step is to practice applying them in context. Start by editing a simple sequence of five to ten clips and experiment with different durations of the Cross Dissolve. Pay close attention to how the timing of the transition changes the "feel" of your edit. Once you feel comfortable with the standard tools, explore the more creative transitions sparingly to see how they impact your storytelling style. Always prioritize your narrative flow over visual flair to ensure your edits remain clean and professional.