Sharing a calendar in Outlook 365 can be accomplished primarily through three distinct methods: sharing directly with internal organization members via customizable permissions, publishing the calendar to the web via an ICS link for external viewers, or delegating full access to allow another user to manage meetings and respond to invitations on your behalf. The choice of method depends on whether your recipients belong to your enterprise tenant, require view-only or editing access, or need to see details versus free/busy times only.
In modern workplace environments, digital calendar management is central to scheduling efficiency. Whether you are coordinating cross-functional projects, managing executive schedules as an administrative assistant, or sharing your availability with external clients, knowing the exact mechanism to expose or conceal your time blocks is vital. Microsoft Outlook 365 offers robust, granular controls to govern how schedule data flows between individuals and groups.
Before exploring the mechanics of each sharing pathway, it is important to understand the structural ecosystem of Outlook 365 calendars. Unlike legacy local calendar files, modern Microsoft 365 calendars reside in the cloud, backed by Exchange Online. This architecture enables real-time synchronization across desktop applications, mobile clients, and web browsers. However, cloud hosting also introduces security and privacy boundaries that dictate how permissions are granted and enforced.
Prerequisites and Understanding Outlook 365 Permissions
Before implementing any sharing strategy, you must understand how Outlook handles permissions and access levels. Permissions are not a binary toggle; they span a wide spectrum from absolute anonymity to full administrative control.
When sharing a calendar within an organization, Outlook 365 relies on the Exchange global address list and security principals. For external sharing, the system generates secure web links that bypass internal authentication requirements while maintaining read-only protection.
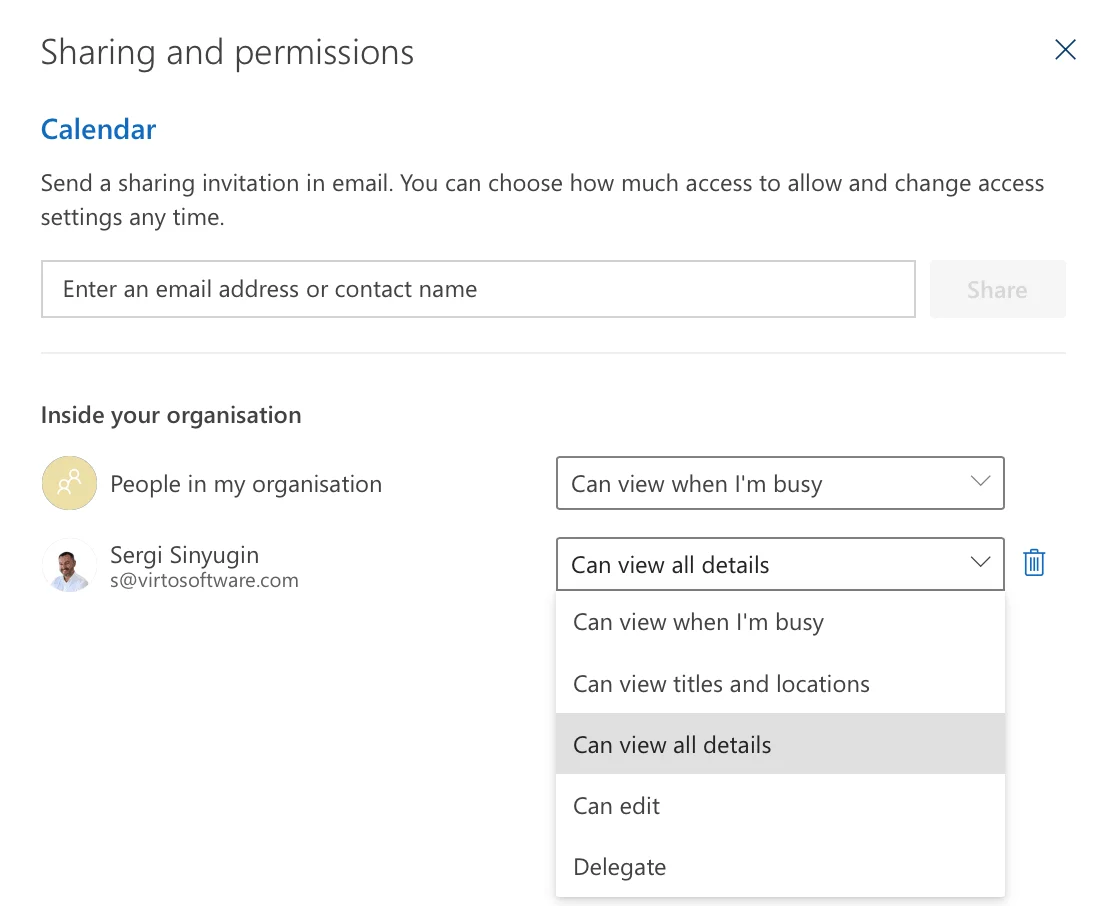
The standard permission levels available in Outlook 365 include:
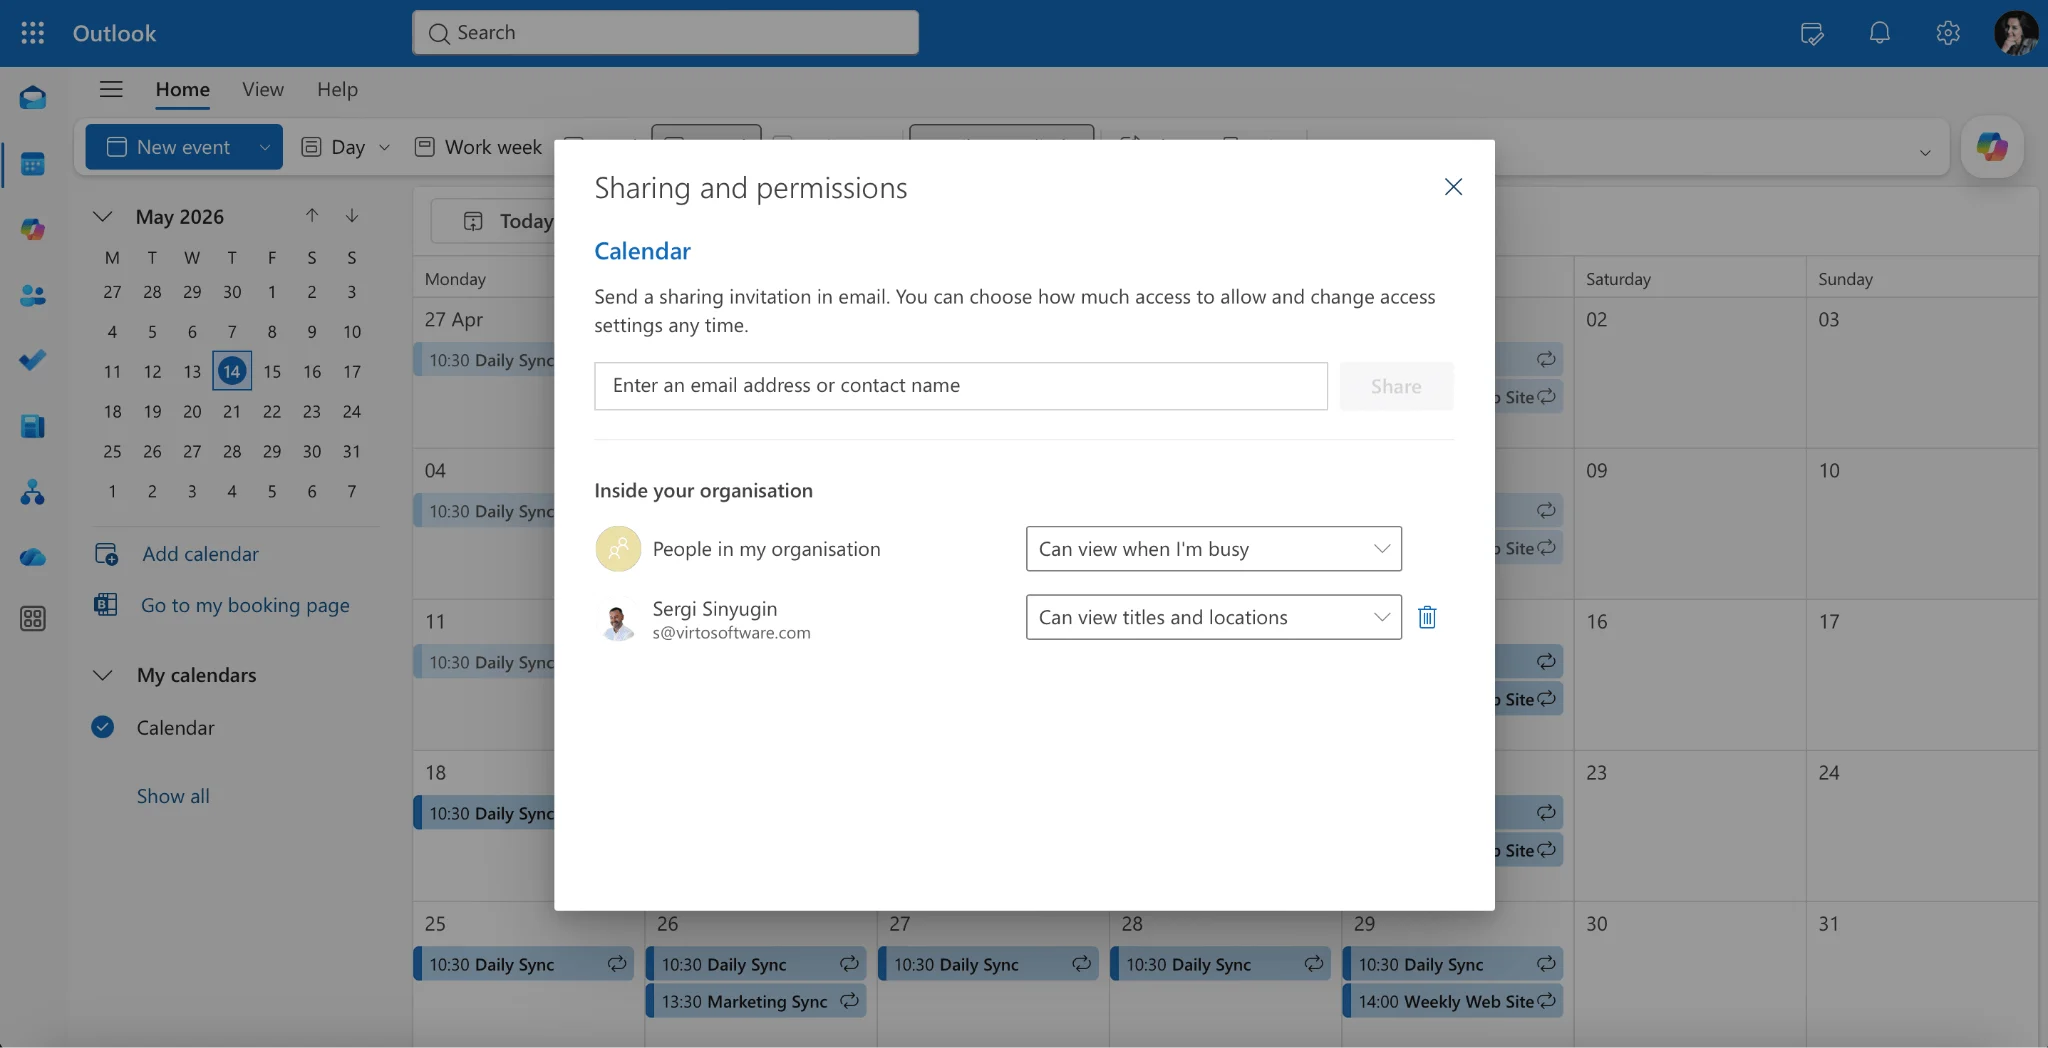
- Can view when I'm busy: Recipients see only free, busy, tentative, or out-of-office blocks without meeting titles, locations, or descriptions.
- Can view titles and locations: Recipients see meeting subjects and places, but the body content, attachments, and attendee lists remain hidden.
- Can view all details: Recipients gain full visibility into every aspect of the calendar events, matching your own view minus private appointments.
- Can edit: Recipients can create, modify, and delete events on your calendar, acting as a direct collaborator.
- Delegate (Full Access + Send As): Allows a designated user to respond to meeting requests, send invitations on your behalf, and manage your incoming scheduling traffic entirely.
Knowing these tiers ensures that you select the correct permission level during the sharing setup, protecting sensitive personal or corporate data from unintended exposure.
Method 1: Sharing with Specific People (Internal and External Users)
The most common way to share an Outlook 365 calendar is by granting specific individuals or groups targeted access directly through the Calendar properties interface. This method is ideal for close teammates, project stakeholders, or external partners who possess a Microsoft account.
Step-by-Step Instructions for Outlook on the Web and Desktop
- Open Outlook 365 and navigate to the Calendar view from the left-hand navigation pane.
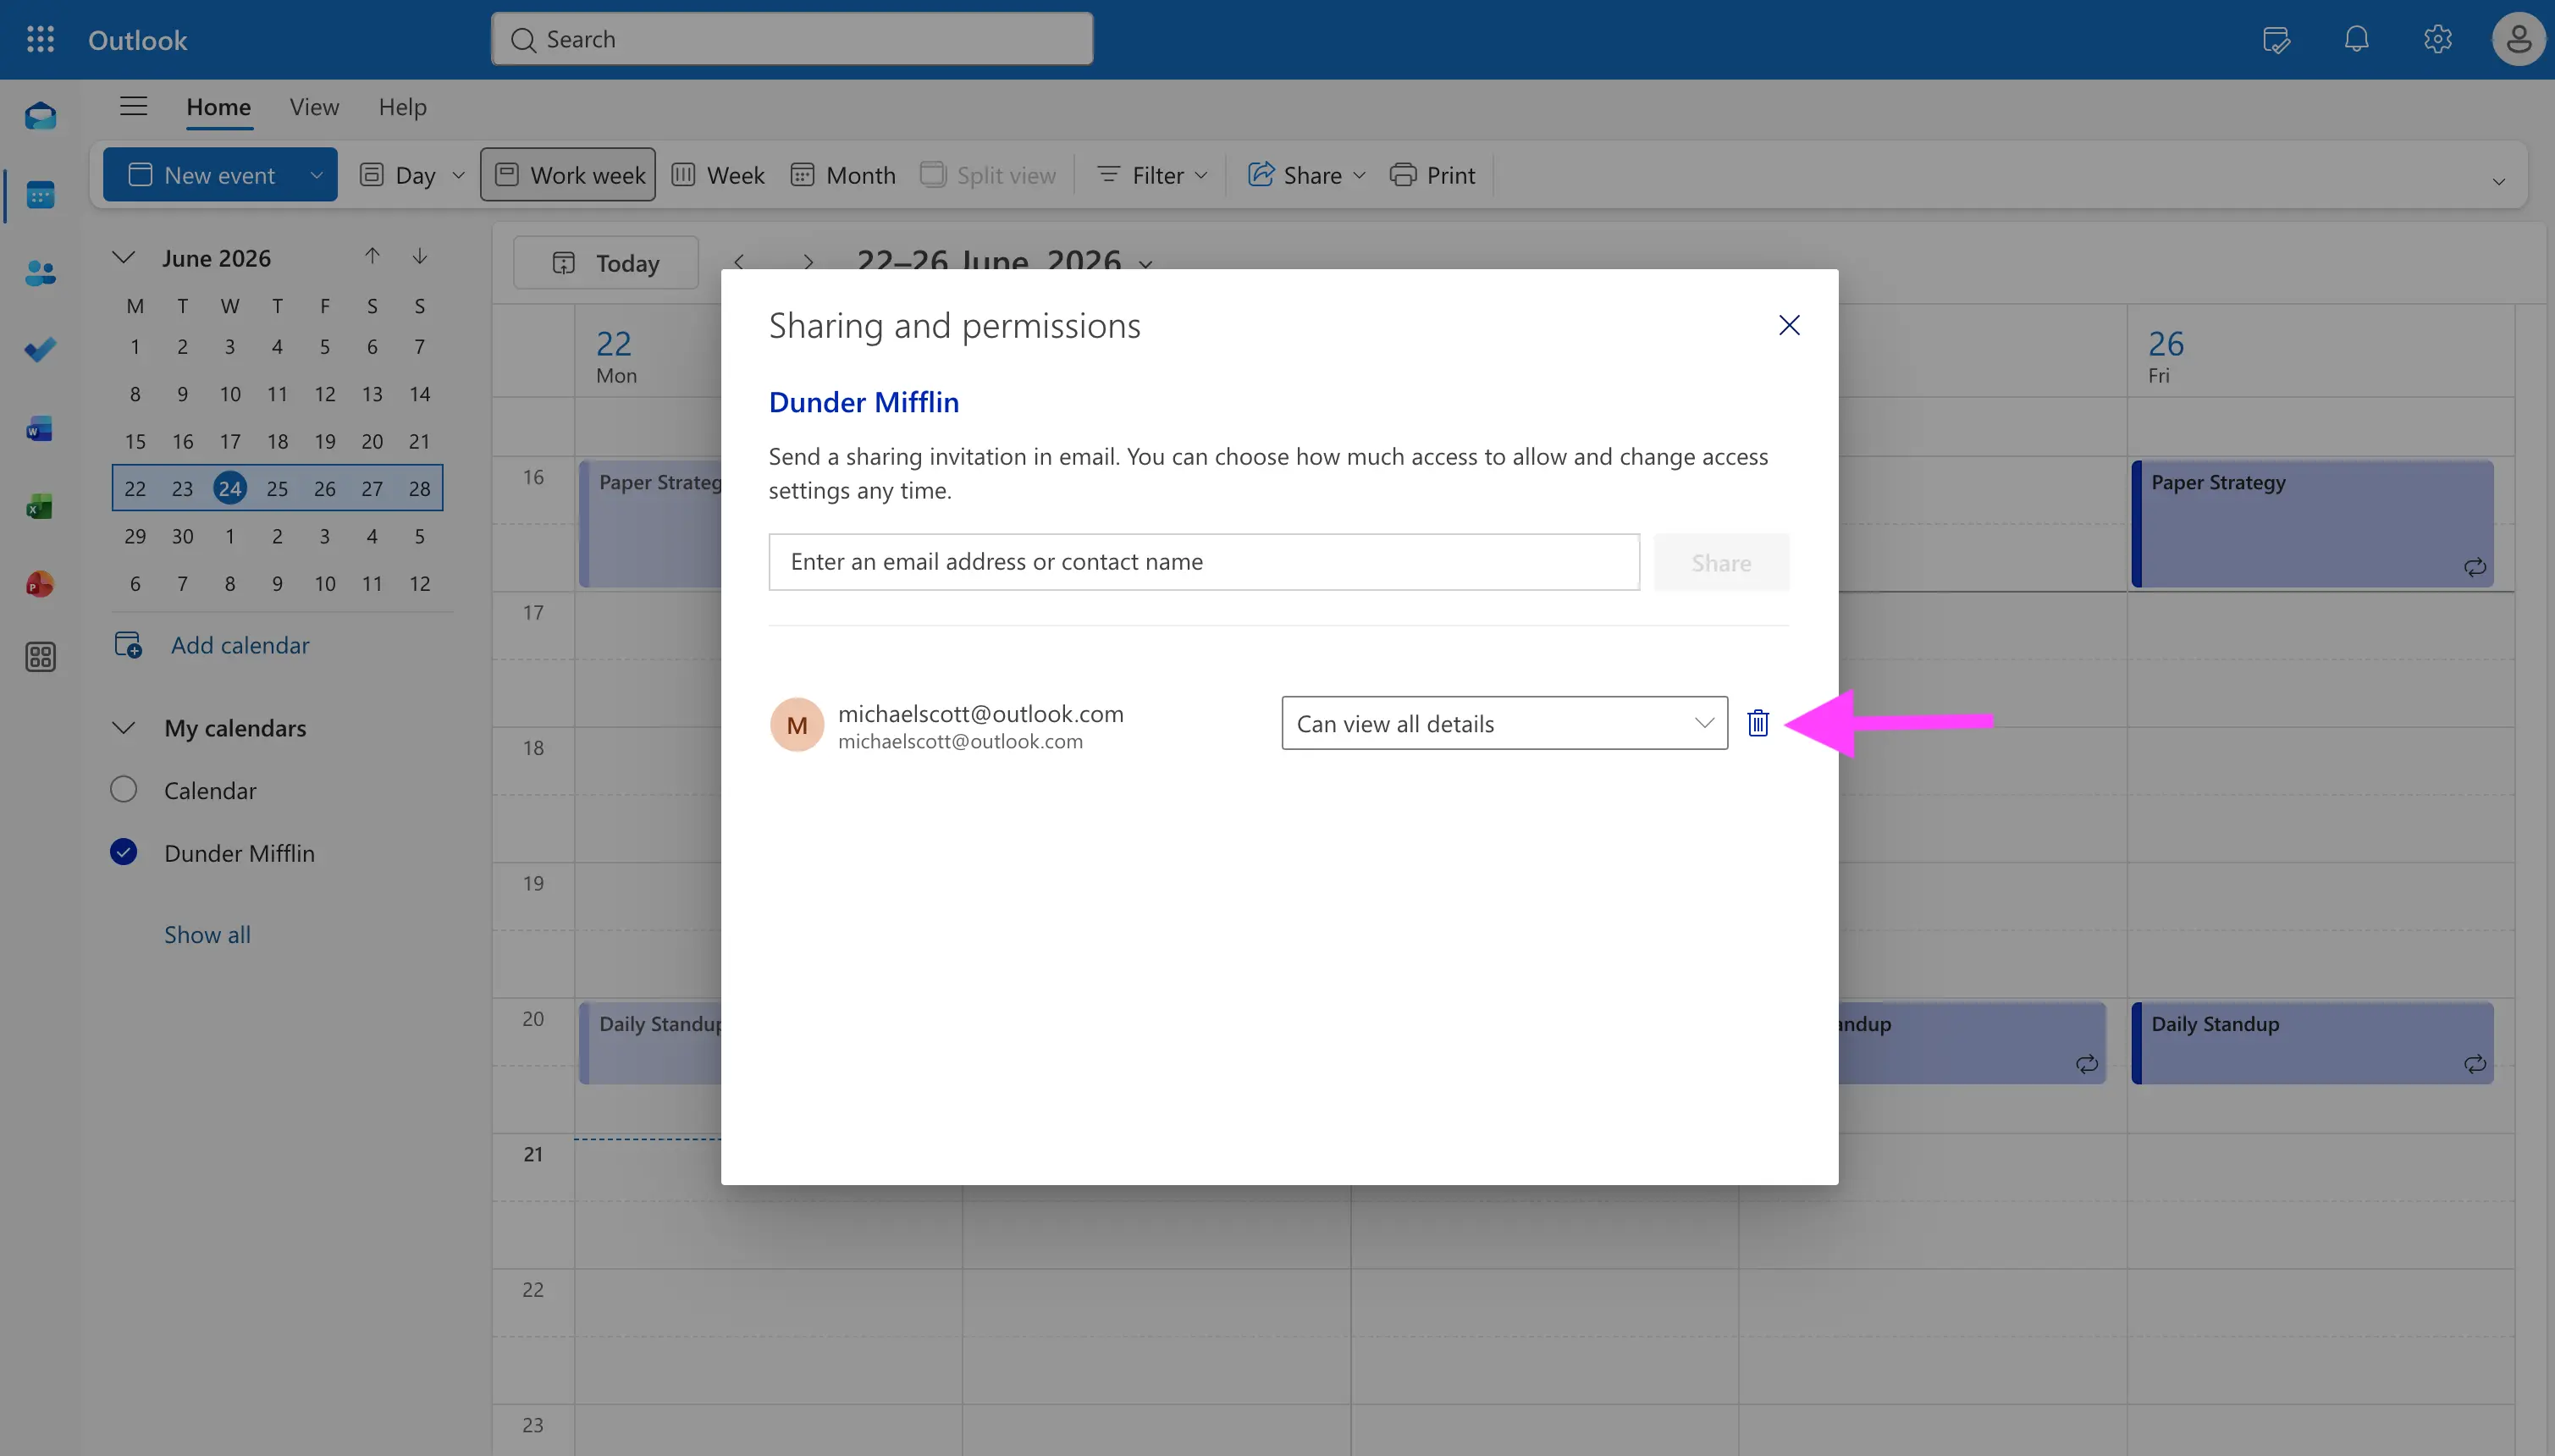
- Locate the specific calendar you wish to share under your primary calendar list. Right-click the calendar name and select Sharing and permissions (in the desktop client, click the Share Calendar button on the Home tab ribbon).
- In the sharing settings window, type the email address or name of the person you want to share with in the Enter email address or contact name field.
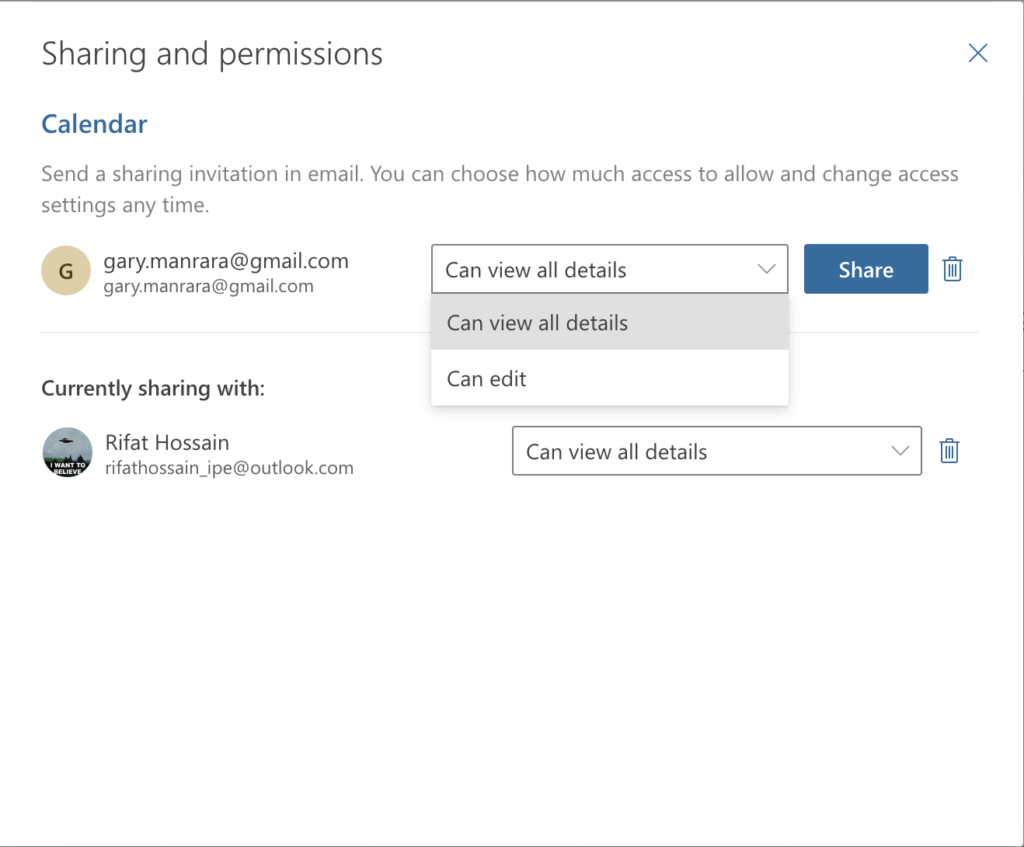
- Once selected, use the drop-down menu next to their name to choose the appropriate permission level—such as Can view all details or Can edit.
- Click Share to dispatch an automated sharing invitation email to the recipient.
- The recipient will receive a notification email containing an Accept button. Once clicked, your calendar automatically populates in their sidebar under "Shared Calendars."
Managing and Revoking Access
Security hygiene requires periodic audits of who holds access to your schedule. To revoke or modify permissions:
- Return to the Sharing and permissions menu via right-clicking your calendar.
- Locate the user in the list of individuals with access.
- Change their permission dropdown to None or click the trash/remove icon to completely sever their access. Changes propagate instantly across the Exchange cloud.
Method 2: Publishing Your Calendar to the Web (ICS Links)
When you need to share your availability with individuals who do not use Outlook 365, do not have a corporate Microsoft account, or when you want to embed a read-only calendar on a public webpage or intranet portal, publishing the calendar via an ICS link is the optimal choice.
How Publishing Works
Publishing a calendar creates a secure web-accessible endpoint. Microsoft generates two links: an HTML link for viewing the calendar in a web browser, and an ICS (iCalendar) link that users can import into third-party calendar applications like Apple Calendar, Google Calendar, or Thunderbird.
Step-by-Step Instructions to Publish a Calendar
- Open Outlook on the Web (OWA). Publishing options are most reliably accessed via the web interface in modern Exchange environments.
- Click the Settings gear icon in the top-right corner, then select View all Outlook settings.
- Navigate to Calendar in the left sidebar, and then select Shared calendars.
- Scroll down to the Publish a calendar section.
- Select the calendar you want to publish from the primary dropdown menu.
- Choose the permission level you wish to expose publicly: either Can view when I'm busy or Can view all details.
- Click the Publish button.
- Two URLs will appear: an HTML link and an ICS link. Copy the relevant link and distribute it to your audience or paste it into your external application.
Important Security Considerations for Published Calendars
Publishing a calendar makes it accessible to anyone on the internet who manages to obtain the URL.
- Avoid publishing calendars containing confidential client meetings, medical appointments, or proprietary financial discussions.
- You can revoke access at any time by returning to this settings pane and clicking Reset permissions, which instantly breaks all previously distributed HTML and ICS links.
Method 3: Delegating Calendar Management to an Assistant or Colleague
Delegation goes beyond simple sharing. While sharing allows someone to view or edit your schedule, delegation grants another user legal and operational authority to act on your behalf. This is the industry-standard workflow for executives, managers, and busy professionals who rely on administrative assistants or co-workers to manage their time.
What Happens When You Assign a Delegate
When you designate someone as a calendar delegate in Outlook 365, they automatically receive permissions to view your private appointments (if configured), edit your calendar, and receive copies of meeting requests sent to you. Crucially, you can configure whether meeting responses go exclusively to the delegate, to both of you, or only to you.
Step-by-Step Instructions to Set Up a Delegate
- Open the Outlook desktop client (classic version provides the most robust delegation controls).
- Click on File in the upper-left corner, select Account Settings, and then click Delegate Access.
- Click the Add button in the dialog box that appears.
- Search for or select the person in your organization whom you want to assign as a delegate, then click Add and OK.
- The Delegate Permissions dialog box opens. Here, assign specific permission levels for various Outlook folders, ensuring Calendar is set to Editor or Delegate.
- Check or uncheck the box labeled Delegate receives copies of meeting-related messages sent to me based on your workflow preferences.
- Click OK to save the delegation profile.
Managing Meeting Responses as a Delegate
Once configured, the delegate can open your calendar, draft meetings, accept or decline invitations using the "Send response on behalf of [Your Name]" function, and maintain your scheduling cadence without exposing your inbox credentials.
Comparison of Outlook 365 Calendar Sharing Methods
To help you decide which approach fits your immediate technical and operational needs, review the comparative matrix below outlining the core attributes of each sharing method.
| Feature / Attribute | Method 1: Shared with Specific People | Method 2: Published to Web (ICS) | Method 3: Delegate Access |
|---|---|---|---|
| Target Audience | Internal colleagues, trusted external partners | General public, clients with non-Microsoft apps | Assistants, co-workers, close deputies |
| Required Account | Microsoft 365 / Exchange account | None (accessible via standard web link) | Internal Microsoft 365 organization account |
| Access Level | Customizable (Busy/Free up to Full Edit) | View-only (Busy/Free or All Details) | Full administrative control & editing |
| Can Send Invites for You? | No (unless given editor rights, but risky) | No (Read-only feed) | Yes (Can send/respond on your behalf) |
| Revocation Ease | High (Remove user from permissions list) | High (Reset publishing link) | High (Remove from delegate list in settings) |
Troubleshooting Common Calendar Sharing Issues
Even when steps are followed precisely, administrators and end-users occasionally encounter friction when sharing Outlook 365 calendars. Addressing these issues requires systematic verification of tenant policies and client states.
Permission Propagation Delays
When you modify sharing permissions in Outlook 365, changes do not always register instantaneously. Because Exchange Online relies on background replication across cloud datacenters, allow up to 15 to 30 minutes for permissions to synchronize across desktop clients and mobile apps. If a user cannot immediately view a shared calendar, advise them to restart their Outlook application or manually click Send/Receive All Folders.
External Recipient Access Errors
If an external user attempts to access a shared calendar link and encounters an error stating they do not have permission, verify the following:
- Ensure the recipient is signing into their Microsoft account (if applicable) or that the calendar was properly published via an anonymous ICS link rather than an internal tenant share.
- Check your organization's tenant-level external sharing policies. Many corporate IT administrators implement strict compliance guardrails that disable external calendar sharing by default. If your organization blocks external sharing, you will need to coordinate with your IT admin to adjust the Microsoft 365 Exhange admin center sharing policies.
Calendar Synchronization Mismatches on Mobile Devices
If updates made by a delegate do not appear on a mobile device, check the account sync settings within the Outlook mobile app. Go to Settings, select the specific email account, and verify that calendar synchronization is enabled and set to push notifications rather than manual fetch cycles.
Frequently Asked Questions
Can I share my Outlook 365 calendar with someone who uses Google Calendar?
Yes. You can publish your calendar to the web using Method 2 to generate an ICS link. The Google Calendar user can then subscribe to your calendar by selecting "Add calendar" followed by "From URL" and pasting your ICS link. This establishes a one-way read-only sync where they see your updated availability automatically.
What is the difference between sharing a calendar and assigning a delegate?
Sharing a calendar grants another user permission to view or edit your events, but they do not act as your legal representative. Assigning a delegate grants explicit operational authority to receive your meeting invitations, accept or decline on your behalf, and manage your schedule directly within your primary work stream.
Why is the "Publish to Web" option missing from my Outlook settings?
Your organization’s IT administrator may have disabled external calendar publishing through the Exchange Online PowerShell or Microsoft 365 Admin Center security baselines. If your company policy restricts public publishing, you must use internal sharing methods or request an exception from your IT department.
Can I hide specific private events while sharing my calendar with colleagues?
Yes. When you grant users "Can view all details" permissions, Outlook automatically respects your privacy settings. Any appointment marked as Private will appear on the shared calendar as a generic "Private Appointment" block, concealing the subject, location, and notes from everyone except you and your designated delegates.
How do I remove a shared calendar from my own Outlook view?
If a colleague previously shared a calendar with you and you no longer wish to see it in your sidebar, right-click the calendar name under "Shared Calendars" and select Remove calendar or Delete. This removes it from your view without altering the owner's underlying sharing permissions.
Conclusion and Next Actions
Mastering the three primary ways to share a calendar in Outlook 365 ensures your time management remains transparent, secure, and operationally efficient. For internal collaboration, leverage targeted permission sharing. For broad distribution to non-enterprise clients or public portals, deploy a published ICS web link. For executive support and administrative workflow management, establish proper delegate access. Review your current calendar permissions today to verify that only authorized individuals hold access to your schedule.